Showing posts with label Jamie Cripps. Show all posts

Initial Door 'Wreath" by Nicole

Friday, September 4, 2015

Nicole on the blog today.  I've made quite a few door wreaths over the years.  Pretty much all were for a holiday or season and I actually don't have one that is for the everyday.  That is what I'm going to show you today is how I made my new "wreath" that is hanging on my front door.  I used French Wired Ribbon in Porcelain Blue as an accent and a hanger.


I started by making a template cut from card stock and used that to trace onto three pieces of chipboard.
I cut out three since the chipboard I had on hand wasn't very thick.  I then glued these three together to make the base nice and thick.  Now I gathered a few more supplies:  a dowel, book paper, and glue.

I started rolling the book paper on the dowel and gluing the edge.
Once glue has secured the edge, slide it off the dowel.  

Once you've made a good handful start laying them down and gluing to the chipboard.  

I worked in sections gluing down quite a few and then turning the chipboard over and cutting off the overhang with scissors.  

Here is the completed letter covered in rolled dictionary paper.

Next I started with a simple ribbon. 
 To get a full bow I cut another length of ribbon and slipped the length underneath this bow.  

Tie this in another bow the opposite direction of the bottom.  Clip the extra ribbon.  
I love using this ribbon technique when you I want something a little more full than just a simple bow. 
I finished with some card stock flowers that I attached using glue and foam adhesive.  


Here is another look at my finished initial hanging on my front door. 


Thanks for stopping by the blog today, Nicole


Flower SVG cut files by Jamie Cripps from digiplayground.com


Gift Box with Jamie

Wednesday, November 26, 2014

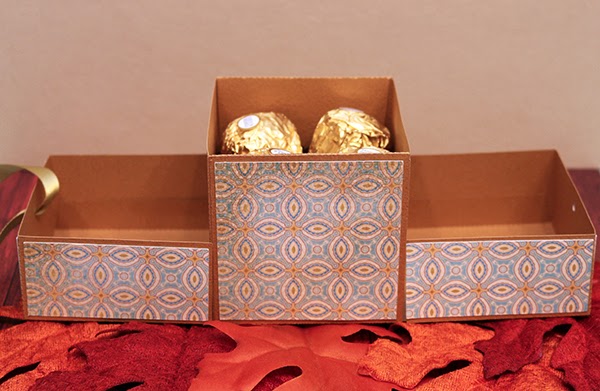
Good Morning!  Jamie back with you today sharing a fun gift box embellished with one of my favorite ribbons, the Golden Olive Double-Faced Satin Ribbon!  There are 196 colors available in widths up to 2-1/4" on the online store, and you can even special order widths up to 4"!  


This box opens up on both ends to reveal a box inside, 

which is perfect for stashing candies in!

Here is the tutorial:
1.  Cut the boxes and mats then fold the boxes on the score lines.
2.  With the smaller box, place adhesive on the four side tabs and adhere them to the box sides to form its shape.  With the large box, place adhesive on the four tabs then adhere the long sides to them as shown.
3.  Adhere the smaller box inside the center of the larger.
4.  Place adhesive on the sides and the coordinating tabs then adhere those sides to the box and fold that tab over within the smaller box.  Do this for both sides. This will hold the center box in place.
5.  Adhere the mats in place and place your goodies in the box.
6.  Once mats are in place, I punched a small hole in each side so that I could run my ribbon through.
7.  I push the ribbon up through the holes and pull the ribbon tight as I close the box.
8.  Cut out the Thank You sentiment and adhere to a tag.  Note: I cut my Thank and You apart so that I could move them to fit my tag better.  Tie a bow on the box and then tie the tag to the bow.


The ribbon really gives the box an elegance!

Thanks so much for stopping by today!
-Jamie


Cheerleading Centerpiece with Jamie

Friday, November 7, 2014

Good morning!  Jamie back with you today!  We are gearing up for competitive cheer season and today I am sharing my new 3D Paper Megaphone!  This project is great for individual cheerleaders or to use as a table centerpiece!  

I am using the Silver Luxor Ribbon for both of these projects.  This ribbon has a delicious shimmer to it so it draws in a lot of attention AND it is wired so the bow really holds its shape well!  You can find more colors of the Luxor Ribbons here!


This file is really easy to assemble, you simply place adhesive on the tabs and wrap the paper around and adhere the tabs to the paper to form the cone shape.  Layer the banner and adhere with a foam square to the megaphone then adhere the cheer sentiments in place and adhere with foam to the banner.  Tie the Silver Luxor Ribbon around the handle in a bow then tie twine around the bow center.


Thanks so much for stopping by today!


Finger Treat Boxes with Jamie!

Friday, October 24, 2014

Good Morning!  Jamie with you and today I am sharing Halloween Finger Boxes!  I am absolutely in love with these.  You can put all sorts of goodies in these boxes; handmade munchies, school supplies, crayons, or party treats!  

I am using the Emerald Grosgrain Swiss Dot Ribbon in 7/8" to embellish my boxes with! 


You can find the box tutorial HERE
Here is a quick tutorial for assembling the box details:
1.  Cut out the box and finger pieces.  Fold the box on the score lines and then place adhesive on the side tab and the bottom flap.  Adhere the box sides together and then adhere the bottom flap to the box side.
2.  Adhere the finger details on the finger mat piece as shown.   Place a strip of adhesive on one side of the box.
3.  Adhere the finger on the box, lining up the bottom and centering.
4.  Ink around the edges with a coordinating ink color.
5.  Slightly bend the finger nails.  Continue the steps for the other four boxes.


I love the pop of color the Emerald Grosgrain Swiss Dot Ribbon in 7/8" 
adds to the Skeleton Fingers!


You can find the boxes here:


Spider Bow with Jamie

Friday, October 3, 2014

 Good Morning Ribbons Unlimited, Inc. Fans!  Jamie back with you and today I am sharing a fun tutorial for creating a ribbon spider!  You can use these spiders for hair accessories, to decorate a vase, or even on gifts!  I placed my spider in the center of a bow on a hair tie so that we can use it on a vase and in our hair too!  

For my project I am using the following:

Here's the tutorial:
1.  Cut four 8" pieces and one 24" piece of the black satin ribbon.  
2.  Starting with the 24" piece, place a small piece of double-sided adhesive on one end of the ribbon.
3.  Adhere the ribbon to itself making about a 1-1/2" loop.
4.  Roll the ribbon around that loop then add another piece of double-sided adhesive to the end.
5.  Adhere the end in place.  Your loop should look similar to this now.
6.  Gather your four 8" strips together in one line.  Tie them around the loop.
7.  Pull the knot tight and pull the "legs" on each side out.
8.  Separate out the loop to form the body.
9.  Trim the "legs" at angles.  I did the front two in one direction and the back two in the other direction.
10. Next cut a 22" piece of the Princess Glitter Ribbon.  Get your hair tie and a zip tie for your bow if you are using it.
11.  Flip your bow over and place the hair tie on the back.  Feed the zip tie around and include the hair tie in and latch it together.  Fluff out your bow to have equal loops then pull the zip tie tight.
12.  Trim off the back of the zip tie.
13.  Flip your bow back over - it should look similar to this.  Fluff the bow as needed.
14.  Hot glue your spider in place in the center!


Thanks so much for stopping by today


Pop-Up Card with Jamie

Wednesday, September 24, 2014

Good Morning Ribbons Unlimited, Inc. Fans!  Jamie back with you and today I am sharing a pop-up card made elegant with Buttermilk Double-Faced Satin Ribbon!  This ribbon is so gorgeous and feels just as amazing as it looks!  

Here's the tutorial:

1.  Cut out all your pieces.  Bend the leaf pieces up from the mat as shown.
2.  Curl your flower petals with a skewer/pencil then layer the two flower pieces together staggering the petals and adhere the center to the flower, pulling the points up as shown.  
3.  Adhere the flowers to the mat with foam adhesive and tie a ribbon to embellish.
4.  Adhere the mat to the card base using foam adhesive, centering.

Thanks so much for stopping by today!
-Jamie


Fall Ribbon Projects from Pinterest!

Friday, September 5, 2014

Good Morning!  Jamie with you here today and I thought it would be fun to share with you some of my most favorite Fall Ribbon projects that I have found on Pinterest!  You can get to the pins by clicking on the images!

Wreaths:
 

How gorgeous would this next one be with our Pumpkin Ombre Ribbon?


I just love these fun hair clip ideas from FunkyPolkaDotGiraffe!

She even has a witch on her blog:

...and I found this witch from My Baby Boutique too!
Totally cute!


Of course, I always love clever DIY projects like these:


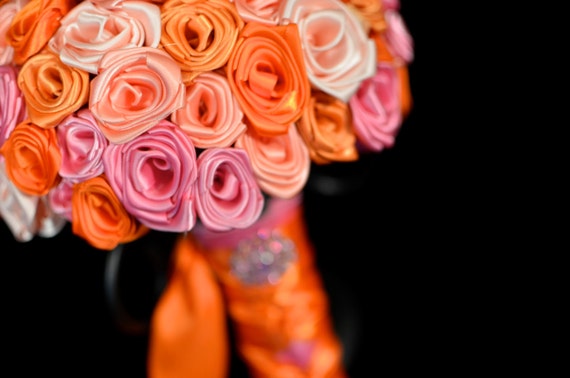
And we couldn't forget to share a gorgeous ribbon bouquet 
from our friends at Elegance On The Avenue
Simply Stunning!

I hope you enjoyed today's featured pins!

We would love to see some of your favorite ribbon projects that you have done or have found on Pinterest!  Be sure to link us up in the comments!


Homemade Cheer Bows!

Wednesday, August 27, 2014

 Good Morning Ribbons Fans!  Jamie with you today to 
share a Cheer Bow that I made for my daughter's team!  


For this bow, I used the 2-1/4" Width Navy Blue Satin Ribbon and a cut 24" length piece.  I folded the bow to make the shape and used a zip tie to hold the bow in the middle (you can see a tutorial HERE).  Once I had the bow shaped, I cut strips of the Dazzle ribbon and hot glued them on the angles and around the middle.  I finished the bow by cutting out our team logo with heat transfer vinyl in two colors and ironing it on the satin bow (carefully!)!


We love how they turned out and they are so much 
cheaper than ordering team bows!

I hope you will give them a try!


Tic Toc Cheer Bow Tutorial

Friday, August 8, 2014

Good morning!  Jamie back with you today to share a fun and easy way to create a 
Tic Toc Cheer Bow without having to use heat bond!  


Here's what you'll need:
Two 14" different colors of coordinating cuts of 1-1/2" ribbon
One 2" cut of 3/8", 1/2", or 5/8" coordinating ribbon
Zip tie
Hot glue gun/hot glue
Scissors
1/2" double sided tape

I am using the Lime/White Polka Dot Wired Ribbon and the Lime Princess Glitter Ribbon for my 1-1/2" cuts and 5/8" of the Apple Green/Lime Satin Ribbon for my center.

Here's the tutorial:
 1.  Cut 14" of each of your 1-1/2" ribbons.
 2.  Add 1/2" double sided tape to one end of your bows.
 3.  Join the two bows together.
 4.  Once your ribbons are together, form a loop with one side of the ribbon.
 5.  Form another loop with the other ribbon side.
 6.  Join the zip tie lightly around the center between the loops.
 7.  Play with your ribbon until you have the loops equal and the ends where you want them. Pull the zip tie tight and clip the end off.
 8.  Fold the glitter ribbon tail in half and cut the ribbon at an angle.  Place double sided adhesive on the other ribbon end where you would cut a matching angle.
 9.  Adhere the glitter cut to the ribbon tail, with the straight edge closet to the bow.
10. Your ribbon should look like this now.
11. Fold the ribbon tail in half and cut your angle in.
12. Your ribbon will look similar to this now.
13. Grab your coordinating center piece.
14. Place hot glue on the back and adhere you center ribbon on.  Wrap your center ribbon twice tightly around the center.  Cut your ribbon to fit on the back again and hot glue in place.
15. Add your bow hardware and you are ready to use!


Thanks so much for stopping by today!
Jamie


Woven Ribbon Tutorial by Jamie

Wednesday, July 23, 2014

Good Morning!  Jamie with you today to share a fun 
tutorial for creating a woven ribbon!  You can use the woven ribbon to create 
barrettes, headbands, bracelets or even as an embellishment for layouts or cards!

Today I am working with Ribbons Unlimited Inc.'s Double Faced Satin Ribbon in Copper in 1/4" width.  This tutorial will work with other ribbon types as well and you could even use two different colors of ribbon to change it up!

Here's the tutorial:
1.  Cut two pieces of ribbon of equal lengths.
2.  Place glue a little over an inch in on one of the ribbons.  Fold the end over to form about a 1/2" loop and adhere the end on the glue.
3.  Repeat the step for the other ribbon.  Your ribbons should look like this now.
4.  Slide one loop through the other.
5.  Next form a loop (bringing the ribbon up on itself) with the ribbon that you slid the other loop through.
6.  Push the loop through the loop that you slid through in step #4.
7.  Next form a loop with the second ribbon as you did above.
8.  Push that loop through the other loop.  Pulling the ribbons tight as you go.
 9-11. Continue forming loops and passing them through, alternating ribbons as you go.
12.  Continue until you have your desire lengths.  Trim your ribbon.
13.  Place glue under the braided ribbon end.
14.  Place glue under the second braided ribbon end. 
15.  Trim the ribbon ends.
16.  Hot glue the woven ribbon on your headband.
17.  Cut another piece of matching ribbon and tie in a bow around the headband.

Here's a look at the headband in hair!

Be sure to check out all of the ribbon selections HERE.
Thanks so much for stopping by today!


Related Posts Plugin for WordPress, Blogger...