Showing posts with label Holiday. Show all posts

Cute Snowman Boxes! by Melissa Craig

Friday, November 20, 2015


Hi everyone!  It's Melissa and I am sharing one of my favorite things in the whole wide world.  Snowmen!!!  I am such a sucker for a snowman, so much so that I usually dedicate an entire week on my blog to snowman projects.  I'll do that in December.

But today I'm featuring Samantha Walker's Snowman Nesting Boxes.  What a great idea!  These boxes will nest inside each other for easy storage and then stack up to the cutest display.  Tuck little treats inside each box to give to someone special.  Instead of the paper scarf that comes in the file, I used Kiwi Grosgrain ribbon.  I meant to put ribbon around the base of the hat but got too excited to put this together that I had already glued on the holly leaves and berry when I realized my little piece of ribbon was still sitting on my table.  He's still super cute!

There are some wonderful ribbons in the store that will finish off any holiday project and it's time to get those projects in the making.  Thank you for stopping by!


Be Merry Dazzling Cards by Pinky

Friday, January 2, 2015

Hey again, Happy Holidays from Pinky!

It's that time of year, the time to create cards and use that glitter.
Perfect for cards and so much more. 
 For this card I used a card stock base at 3.5X6, then added an acrylic front. 
In order to add the acrylic front I needed to use a stripe of glue,
the Ribbons Unlimited Dazzle Ribbon is perfect for covering that stripe
of glue. Adding the bow above the sentiment image was just for fun!
This ribbon is strong, and works well on any project from cards 
to hair bows, sewing and more. 
The glittered side is beautiful and adds holiday fun. 


Ombre Ribbon Luminaries by Pinky

Wednesday, December 17, 2014

 Hello again,  
It's Pinky today with a Fall Leaf Bag Luminary Tutorial 
perfect for the holiday table or home decor.  
Inside they contain a battery operated flameless candle, completely 
safe and perfect to keep him feeling comforted. 

1. Using card stock and SVG file at
8.5X11 size, and cut file out using die cut machine. 

2. Before assembling boxes, spray lightly using Krylon gold paint. 

3. Assemble boxes and adhere side panel. 
 4. After assembling box (leaving bottom open) punch out some leaf shapes. 

5. Adhere leaves to front of boxes. 

6. Take wide Ribbons Unlimited Ombre ribbon and adhere to back as shown in final photos. 

7. Adhere leaf to cover any adhesive. 

8. Insert flameless tealight candle into bottom of bag. 

These would also make wonderful holiday table decor, or even
on your TV stand etc....they are so easy to make and pretty to boot!


  I hope you enjoyed this tutorial today, until next time- keep on creating!
Pinky Hobbs: Ribbons Unlimited Design Team


Christmas card with ribbon scraps - Grace

Friday, December 12, 2014

Hello there friends. Today I’d like to share a super easy card design that can be mass produced for your holiday greetings. It’s also a great way to use up ribbon scraps. 

Instructions:
Gather your supplies. I will show you on a different blog post where all my ribbon scraps came from but for now, you can see all sorts of widths and lengths of ribbon in the mix. This design is also very useful to use up tools such as embossing folder, die and glitter glue. 

Create your card base from whatever cardstock you prefer. I made mine from white cardstock to measure 4 ¼ x 5 ½”. I then cut a 4 x 5 ¼” piece of white cardstock and ran them through my Cuttlebug using the Swiss dot embossing folder.

Next, I used a gold shimmer cardstock to cut my Christmas tree die from. I ran it through my die cut machine twice to make that all of the detail cuts were made. 

After that, I assembled the card. I picked out a pattern paper with red and green strips on it as a border and laid out how I want my ribbon scraps to go under the pattern paper strip. I then cut notches on each one and adhered to a ¾” strip of pattern paper. 

I first adhered my embossed background onto the card then my red strip with ribbon scraps under it; Followed by the die cut Christmas tree. To add some more texture, I filled the star top of the die with glitter glue. 

Here are some more close ups of the cards….


 I hope this inspired you to add some ribbon scraps to your next project. Thank you for stopping by.

-Grace
Supplies Used:
Dazzle ribbon, Ivory, 7/8”, Ribbons Unlimited Inc.
Country check, Royal, 5/8”, Ribbons Unlimited Inc.
Edinburgh, Dress Stewart, 1”, Ribbons Unlimited Inc.
Grosgrain, Copen, 3/8”, Ribbons Unlimited Inc.
Cardstock- (white) Walmart; (gold shimmer) Worldwin Cardstock
Pattern paper- Bazzill
Die- Die Versions

Glitter glue- Studio G, Hampton Arts


Ribbon Wreath Card Tutorial by Pinky

Friday, December 20, 2013

Good morning and Happy Holidays from Pinky today!

I am here today with a new idea for a beautiful 
Ribbon Wreath Card- and to be honest you could totally turn this into
a package topper, ornament or even a PIN!
 It all revolves around the gorgeous Ribbons Unlimited Ribbon!
Starting with Double Ruffle Ribbon 7/8" Kiwi and a heavy duty card stock. 
Trim heavy duty card stock into a 2.5-3" circle. 
 Using a sewing machine and fold ribbon as you straight stitch around
the edges of the card stock circle. 
 Trim out middle of paper to leave a ribbon wreath. 
 Adhere a vintage bracelet or pearl strand in the middle
 to cover stitching and add flair. 
Add sticker or flare to bottom. 
 Adhere patterned paper to front of card base. 
Ink edges in coordinating ink. (I used turquoise blue). 
 Adhere quote to center of wreath. Adhere to card front. 
 Add some Pearls or gemstones. 

I hope you enjoyed my post today.

Until next time- Keep on creating!

Products Used:
Xyron adhesives, SEI Noel Papers & Stickers, vintage bracelet. 


Holiday Tags with Jill

Wednesday, December 11, 2013


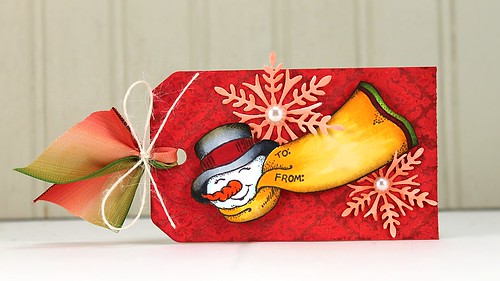
Looking for a fantastic holiday ribbon? Our Pumpkin Ombre ribbon fits the bill...
Christmas Creations

Christmas Creations
To create these tags, I stamped them each using Penny Black's Harmony background and Distress Paint (Barn Door and Wild Honey).  Once dry, I added Distress Inks over the top.  The areas stamped in paint acted as a resist.  My two smaller tag images were stamped with Memento Tuxedo Black Ink and then adhered using dimensional adhesive after being colored with Copic markers and cut out. To embellish each tag I used Penny Black Creative Dies Snowflake Trio and Dancing Leaves.  Finally, I added the Ombre Ribbon to pull all of the colors together.


Do you love ribbon?
Be sure to check out our 2014 Design Team Call!


Announcing the Holiday Magic Cash Giveaway!

Thursday, November 21, 2013

Good Morning!  We are so happy to be bringing you a
fantastic giveaway just in time for the Holidays!


This giveaway would not be possible without an awesome group of bloggers and businesses. They include Spaceships and Laser BeamsMighty DelightyThis Little MamaDesign DazzleA Wife A Mom A LIfePaperCandeeDoodlecraftMade by Cristina MarieSquared Party PrintablesBellaGrey DesignsPetite Bebe, I DO invitations by michelleMore Than PaperPSA EssentialsYumtasticsBauble YumzPartystockPretty My PartyAngelina's Dream PartiesParty With the WarriorsWe Heart PartiesGiggles GaloreJ'adore Lexie CoutureFancy Cakes LLCInkberry Cards + DesignCupcake Wishes & Birthday DreamsSamantha Walker LLCI Will InvitationsTempo di FestaRibbons Unlimited, Inc.Young Adult Moneybabiesartroom and Hello My Sweet. And that's not even everyone! Take a look at the Rafflecopter form to see everyone who so generously provided sponsorship.

$1100 Holiday Magic Cash Giveaway

November 21, 2013 at 12:00am - December 16, 2013 at 12:00am
Open Worldwide
PRIZE: One winner will receive $1100 USD payable via PayPal
Eligibility and Rules: This giveaway runs from 12:00AM ET on November 21, 2013 to 12:00AM ET on December 16, 2013. It is open to individuals over the age of the majority in their home country. The winner will be chosen randomly through the Rafflecopter form. It is the sole responsibility of the winner to adhere to all laws in their respective country, which includes payments to any governing tax body. This giveaway is void in any country where it is prohibited by law.
Claiming Prize: The prize will be sent via PayPal. The winner must claim their prize within 48 hours of receiving notice. If you do not claim your prize within this time frame, your entry will be void and another winner will be drawn. We don't want to have to do that! Please ensure that the email spaceshipsandlaserbeams [at] gmail [dot] com is on your "safe list."
Disclosure: This giveaway is a blogger-sponsored event that is in no way affiliated with PayPal, Facebook, Twitter, Pinterest, Instagram or any other social media channel. If you have questions, email Stephanie at Spaceships and Laser Beams at spaceshipsandlaserbeams [at] gmail [dot] com.

Please use the Rafflecopter below to enter!

None of the entries are mandatory but the more entries you do, 
the more chances you have to win!
(If you're running low on time, you can come back as many times as 
you like to finish the form and optimize your chances.)


Joy to the World by Jill

Wednesday, November 13, 2013

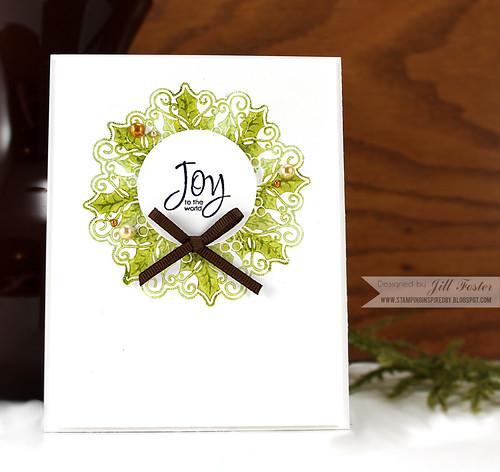
Jill is joining us today using our 1/8" Grosgrain ribbon to accent this stunning Holiday card!

IMG_1008

Jill first stamped her image (Penny Black) using Distress Paint then added a sentiment stamped in black on a punched circle.  She added pearls for a little extra embellishment but it is the thin grosgrain ribbon that finishes this card off perfectly!  The small size of the ribbon matches perfectly with the scale of the stamped image.

You can find our Grosgrain Ribbons HERE!


Holiday Card with Jill

Friday, October 18, 2013

Jill is joining us today with another amazing hand stamped Holiday card that she ties all together with our Black and White Polka Dot Ribbon!  Doesn't it just make the card pop!?
19

Our dotted ribbon is wired so it stays where you want it and comes in 1-1/2" width. 
 It uses our "Lyon" French Wired ribbon as a backdrop and is made in Germany.  
You can find our varieties HERE!


Merry and Bright with Jill Foster

Wednesday, October 9, 2013

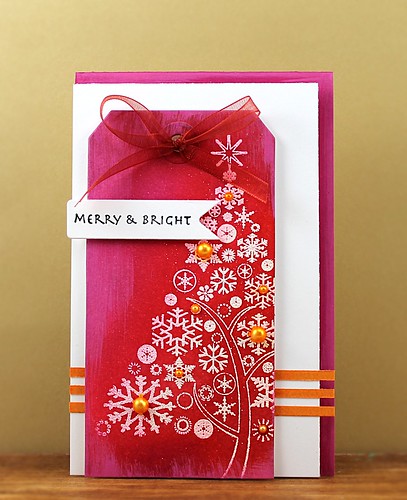
Jill is joining us today with a gorgeous Holiday card!  We love the bold and bright colors Jill selected for this card and she is using our Red Organdy Ribbon to tie it all together.   Our Organdy ribbon is an unwired sheer ribbon that has a monofilament edge sewn in to give it extra body!  The sheerness of the ribbon works perfectly with this card, allowing you to see all of the beautifully stamped and embossed tree!
11


Related Posts Plugin for WordPress, Blogger...