Showing posts with label Grosgrain Stripes. Show all posts

Christmas Glittered Cards with Grace

Friday, November 14, 2014


Hello there ribbon friends.  It’s that time of the year again. I’m talking about tackling those holiday projects. 
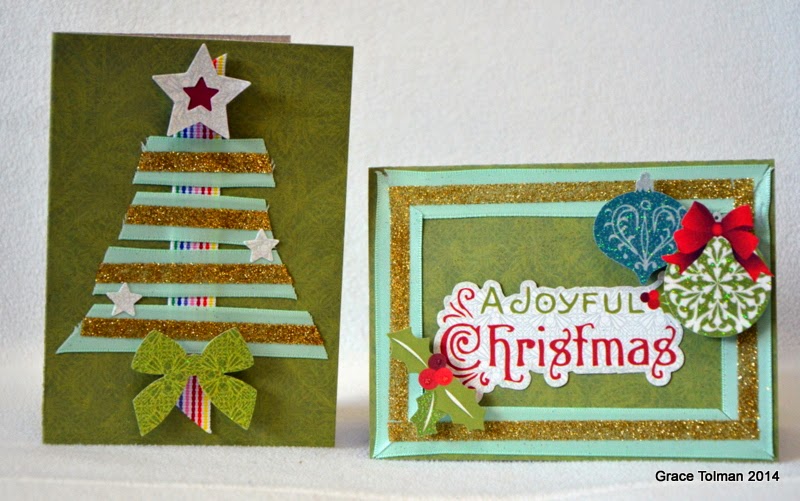
Today I’d like to share a couple of cards where I used some ribbon and glitter to add some “shine” to these Holiday greetings.

 Instructions:
1. Create your card base. Mine measured to 4 ¼ x 5 ½”

2. Cut a strip of the candy stripe ribbon and adhere it on the center of the card front horizontally. Cut staggered length of the pastel green satin ribbon to create the Christmas tree, don’t adhere yet.

3. Adhere a strip of adhesive on the center of the ribbon strips, pour glitter over it, press to adhere the glitter and dump the rest back into the container or on a scrap of paper. Use a paint brush to clean off the rest of the glitter on the ribbon. Decorate the tree with die cut and stickers.

4. For the frame card-  Adhere some of the pastel green trim around the card front using strips of adhesive.

5 Adhere another layer of adhesive over the center of the ribbon frame and add glitter, brushing off the excess. Decorate with stickers and die cuts.

Here are some pictures of the final product….


Thank you for joining me today and I hope this inspired you to add glitter to your favorite trims to make your next crafting project “sparkle “ even more.

Happy Creating,
Grace


Supplies Used:
Satin,Pastel green, 5/8”, Ribbons Unlimited Inc.
Grosgrain,Stripes, 5/8”, Ribbons Unlimited Inc.
Paper and stickers- Noel, SEI
Glitter- American Crafts

Others- Adhesive strip, foam adhesive


Today Minibook by Grace

Friday, October 17, 2014


Hello there friends. Today I’m sharing a mini book project that I created using some 4x6 pocket scrapbook papers. Pocket pages and scrapbook supplies are a rage right now. While I don’t do project life, I still like to get the products cause they’re so cool. Recently, I got a pack of 4x6 papers designed for pocket scrapbooking. I used it as a base for my mini album. I then put it all together with a coil binding.  Because the papers were already cut into one size, I was able to put this book together in record time.


To spruce up the front of the book, I tied some colorful ribbons from Ribbons Unlimited Inc.


Here are a few pictures of the inside pages of the book…


I hope this inspired you to use those pocket scrapbooking products in your next mini album project.

Happy Creating,
Grace
Supplies Used:
#995 Grosgrain stripes, Yellow, 3/8”, Ribbons Unlimited Inc.
Grosgrain, Stripes, 5/8”, Ribbons Unlimited Inc.
Country check, Red, 1”, Ribbons Unlimited Inc.
Lilac Leopard Grosgrain 5/8”, Ribbons Unlimited Inc.
Giraffe 7/8”, Ribbons Unlimited Inc.
Edinburgh, Dress Stewart, 1”, Ribbon’s Unlimited Inc.
Papers and border stickers- Ruby Rock It
Letter stickers- My Little Shoebox
Cardstock- WorldWin Cardstock
Bind it tool- Bind it all, Zutter
Pen- Millennium, Zig

Enamel dots- homemade


Ribbon Accents for Layouts by Grace

Friday, September 12, 2014


Hello Ribbon friends. Today I’m sharing a layout I created recently with some ribbon accents from Ribbons Unlimited Inc. My favorite part of adding ribbon to my scrapbook pages is finding ways to layer and create dimension with them. With the different widths that Ribbons Unlimited Inc. offers, it was super easy to achieve my goals. Read on to see how I created this scrapbook page….


Instructions:
1. Gather your supplies


2. Trim the grey pattern paper to about 11 ½” square and adhere to the yellow cardstock, centering it. Adhere the pictures. 


3. Add the journaling block on the bottom of the layout, next to the photo. Cut the ends of three different ribbons into a notch and adhere them on the left side of the layout, layering them over each other a little bit. 


4. Add the title using two different sizes of letter stickers. 


5. Add the yellow grosgrain striped ribbon on the bottom of the layout, ruffling it a little bit and attaching it with some machine stitching.  


6. Add other embellishments, layering them over each other. Add some glitter glue to the centers of the butterflies and set aside to dry.

Here’s a few close ups of the scrapbook page…


I hope this inspired you to layer your trims and ribbons on your next scrapbook page.
-Grace


Supplies Used:
#995 Grosgrainstripes, Yellow, 3/8”, Ribbons Unlimited Inc.
Royal/white dots, Polka dot, 1 1/2", Ribbons Unlimited Inc. 
Grosgrain,Stripes, 5/8”, Ribbons Unlimited Inc.
Countrycheck, Red, 1”, Ribbons Unlimited Inc.
Cardstock- Worldwin Papers
Pattern papers- My girl, American Crafts
Butterfly chipboard- Studio Calico
Glitter glue- Turquoise, Stickles, Ranger Industries
Stickers- American Crafts, My Mind’s Eye
Circle punch- EK Success
Pen- Millenium, Zig


Merry and Bright layout by Grace

Friday, August 15, 2014

I know that we are in the middle of summer but I can’t help but get into the Christmas spirit when I saw these photos of my Holiday decorations. Today I’d like to share with you how I created this layout along with a fun way to add ribbons to your project….

Instructions:

 1. I first pulled out papers and products that matched my photos.

2. I loved the circle die cut accent that came with this collection and used it as my journaling frame. I cut out a circle from a beige pattern paper and then adhered it on the back of the circle frame.

 3. I also added some stickers onto the journaling block before hand writing my thoughts.

 4. I adhered all of my elements on the page and then added a ruffle red ribbon over the photos and scallop border for some added dimension.

5. Next I worked on adding some bubble stickers to my page. I used my ribbons with these plain bubble stickers for an easy way to add festive touches to the page. 


 6. For the smaller bubble stickers, I added them to some plastic scallop accents and brad makers.

7. Then I added them on three different positions in the layout to create a visual triangle.

Here’s the layout again with some close up details…


Thank you for joining me today and I hope this inspired you to create your very own holiday project, even if it’s in the middle of summer.

Happy Creating,
Grace
Supplies Used:
Doubleruffle red, 3/8”, Ribbons Unlimited Inc.
Dazzle, red, 7/8”, Ribbons Unlimited Inc.
Grosgrain,Stripes, 5/8”, Ribbons Unlimited Inc.
Countrycheck, Red, 1”, Ribbons Unlimited Inc.
Cardstock- Worldwin Papers
Pattern papers, stickers, die cut frame- Heidi Swapp
Epoxy stickers, brad maker and white embellishments- Epiphany Crafts
Pen- Millenium, Zig

Circle cutter- Creative Memories


Great Sunshine & Outdoors by Grace Tolman

Friday, July 11, 2014

Hello ribbon friends. I love looking at trends and trying them out in my papercrafting. One of the big trends right now that I’m loving is using your diecut machine in creating one of a kind elements in your page. I’ve had a few die cut machines but my go to right now is the Cameo from Silhouette. Recently I played around with it and cut some Summer themed elements. I don’t like wastes so I kept the negative part of the cut. With the help of some ribbons from Ribbons Unlimited, I was able to make use of this negative cuts and bring an interesting texture to my title.


Instructions:
 1. Cut out two pieces of white cardstock measuring 11 x 11 ½” and adhere to the blue cardstock.

2. Cut out the negative title cuts and adhere ribbon behind the paper. I used my Xyron adhesive maker to make sure that the ribbon is well adhered on the back of the cardstock. Trim the ribbon.

3. Adhere the title block on the page. Adhere the rest of the elements. 
4. Cut out two long and two short strips from the same ribbon. Cut a notch on one side of each of them and adhere at two different places of the page. 
5. Handwrite your journaling and add the stickers and chipboard for embellishment. 

Here’s a look at the finished page and a few more detailed shots….


Thank you for joining me today and hope you’ll use your ribbons with the latest trends today.


Supplies Used:
#990 Dazzle Ribbon, Red, 7/8”, Ribbons Unlimited Inc.
Cardstock- WorldWin Papers Inc.
Journaling block- Echo Park
Stickers- Creative Memories
Chipboard shapes- Sources Unknown
Die cut- Cameo, Silhouette
Pen- (Black) Millennium, Zig
Mist- source unknown


Related Posts Plugin for WordPress, Blogger...