Showing posts with label Gift Bag. Show all posts

Graduation Gift Set by Nicole

Friday, June 5, 2015

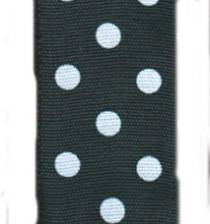
Graduation season is here.  Since I work with the youth at church I had a graduation to celebrate this year.  Our local high school colors are black & yellow with white accents.  I used Black/White Polka Dot wired ribbon, Sheer Organdy ribbon in Apple Green, and Dazzle Ribbon in Ivory to decorate this gift bag.  


I added the Black/white polka dot ribbon through the holes in the bag and secured it on the inside with Helmar Fabric Glue.  Side note:  Between the depth of the holes in the bag and the wire in the ribbon the handles stood up on there own.  I love the look and height it creates to the finished bag.  


The organdy ribbon I used to make leaves.  I brushed Helmar Stiffener & Draping Liquid to lengths of the ribbon with a foam brush.  Fully saturate the ribbon and let dry.  


After a couple of hours the glue dries and the ribbon becomes stiff and you can carefully peel away from the paper plate.  
The stiffener makes the ribbon stiff, but it also allows you to cut the ribbon and keeps it from fraying.  I used a pair of fabric scissors and cut the ribbon in to leaf shapes.  

I glued these to the bag handle.  

I then took a length of the glitter ribbon to make my flower.  I threaded it onto a piece of wire to form the base.  

I formed the wire into a circle and twisted the wire onto the base cutting off the excess.  

I took another length of the glitter ribbon and began gluing it around itself to form the center making sure to cover the wire and inside.     

My finished flower.

I glued this on top of the leaves. Once finished I decided to add some depth to my flower with a yellow marker making the insides of the flower a little darker.  


Here is a look at the finished gift bag and card I gave to the graduate.  She loved it!

Thanks for stopping by the blog today.  
Happy Crafting, Nicole

Products used in this post:

All digital svgs are from digiplayground.com


Gift Set by Pinky

Wednesday, January 29, 2014

 Hey there RU friends, 

It's just me Pinky today with a fun birthday gift project idea.
Today I am sharing this gift bags I created using the Kraft paper and my Silhouette. 
Here is how I created this project:
1. Cut out gift bag using Kraft Paper
and Silhouette Cameo or other digital die cut machine. 
2. Assemble gift bag. 
3. Glitter decorative top  of the gift bag.
4. Using negative cuts from hits bag- 
stamp Happy birthday Sentiment onto heart. 
5. Glitter edges of heart. 
5. Using double sided tape- adhere a strip to all for sides of 
an invitation. 
6. Glitter with coordinating glitter. 
7. Adhere sentiment heart to center and negative flourishes. 
beneath heart and onto the bag- folding the ribbon in half for the card. 

Fill bag with goodies and give!!
It's fun to create the perfect stripe of glitter using double sided tape. 
Ribbons to accent any project at Ribbons Unlimited!

I hope you enjoyed my birthday project today. 
Feel free to share with your friends, and don't forget to like us on 
Until next time- Keep on creating!


Products Used:

Neenah Classic Linen A2 Folded Invitations Avon Brilliant White, BROWN BAG Kraft 8 1/2 x 11, Clearsnap Glitter, Silhouette Cameo, Xyron High Tack Tape.


Birthday Bag with Grosgrain Ribbon! by Jamie Cripps

Wednesday, January 22, 2014

Hi guys!  It's Jamie with you today!  I have always had a thing for kraft paper I just love how it looks and feels…and it is so easy to coordinate everything with it!  So today I am sharing one I created using the black grosgrain ribbon!  This ribbon works wonderfully as a handle for bags and looks great for decorative elements too!


We are always struggling for boy gift bags around here so I kept the main portion of the gift bag as the Kraft color and then used Black Basis Card Stock as the under accent to make the letters pop.  I brought color into the bag with the twine pom!  

Here is the tutorial: 
  1.  Grab a large serving fork and wrap your first color of twine around it.
  2.  Next wrap a second color of twine around the first color.
  3.  Grab a small piece of twine and tie a tight knot around the twine pieces (up through the fork hole).
  4.  Slip the twine off the fork.
  5.  Cut all the loops and fluff out the pom!
  6.  Next cut the Birthday Bag with the kraft card stock.  Fold on the score lines and add adhesive to the side flap.
  7.  Bring the two box sides together and adhere the flap in place.
  8.  For the bottom of the box, tuck the two side tabs in…
  9.  Then push the slot side up and tuck the flap into the slot.
10. Stand the box up and bend the sides on the score lines.
11. Cut a piece of black grosgrain ribbon for the handle and tie each end in a knot on the inside of the bag.  Trim the pieces close to the knot.
12. Your bag should look like this now.
13. Cut the bag panels.
14. Place adhesive on the backside of the sentiment panel.
15. Adhere it on top of the solid panel.
16. Place a piece of black grosgrain ribbon around the right edge as shown.
17. Next grab your pom, a piece of coordinating twine and a black grosgrain ribbon bow.
18. Place the black grosgrain ribbon bow in the center of your ribbon on the sentiment panel.  Place the coordinating twine piece under both.
19. Place the pom on top of the bow.
20. Tie a knot to hold everything together…
21. Then tie the twine in a bow and trim the ends.
22. Adhere the panel on to the front of the bag and fill your bag with goodies!

We filled ours up with M&M's and added a little money in between!


Supplies Used:


You can find more grosgrain ribbons HERE!

Thank so much for joining me today!  
Be sure to check back in on Friday for Crystal's first post!


Altered Gift Bag by Rae

Wednesday, January 16, 2013

Ribbons Unlimited, Inc. Designer, Rae Barthel, needed a gift bag in a baby theme. She created this cuteness by altering a plain kraft bag. Rae says, "This week at work, we are having a baby shower for one of our coworkers. I purchased a diaper bag, and realized I needed a decent sized gift bag. I found the large kraft gift bag at Target, and replaced the original ribbon that created the handles of the bag with some pretty Ribbons Unlimited, Inc. ribbon and baby embellishments."


Ribbons Unlimited, Inc. Ribbon Supplies:


Love the look of the layered ribbon!  Thanks, Rae.  You'll see more from Rae this week when she's back on Friday with a fantastic hair bow making tutorial.  Be sure to bookmark our Blog and join as a 'follower' so you don't miss a thing!


Related Posts Plugin for WordPress, Blogger...