Flip Flops and Matching Hair Flower by Crystal

Friday, March 28, 2014

Hello RU Fans !!
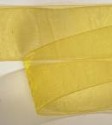
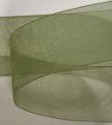
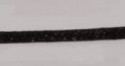
It's Crystal here! I hope you have had a great week.  Thanks for stopping by to see what I have for you today. I am so ready for Flip Flop season and today I have made a matching set to get you ready for the season. Ribbons Unlimited has beautiful quality ribbon and today I am using the 1 1/2" Organdy in Yellow and 5/8" Organdy in Moss and some Satin cord in black . I am going to show you step by step how I created my flowers so let's get started ...
With the 1 1/2" Organdy in Yellow  cut 6 pieces 6" long , fold in half , length wise and tack the center edge with sewing thread that matches your ribbon (do all 5 petals and set aside), next I fold that in half and meet the straight end edges together (it should look like a triangle), then add a running stitch on the edge 
week  3-24-2014 posts 010
continue adding all 5 petals on your running stitch so they are all on the same line of thread
week  3-24-2014 posts 011
pull the running stitch tight to gather all the petals to form a circle.  Stitch the first and last petal together to close up and knot off.
week  3-24-2014 posts 013
Your flower will now look like this.  It will form a 6" flower when done.
week  3-24-2014 posts 014
Next with the 5/8" Organdy in Moss , I used about 36" and loop ribbon back and forth until you have 3 loops and a tail on each side  to end up with a 5 inch across bow and sew center to secure.
week  3-24-2014 posts 015
Then with the Satin cord in black  knot up 5 pieces if cord for the center and use the lighter to singe the end so it don't fray later.  I hand sew these into the center of my flower ...
week  3-24-2014 posts 027
I then cut 1-1/2" circles of felt for the back side in matching color to finish my backs
week  3-24-2014 posts 028
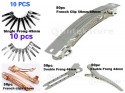
I wanted to make these flower detachable so I added them to gator clips , now they can go on your flip flops, in your hair, on a bag the possibilities are endless ... my flowers on the flip flops are 4 " across so cut pieces to create
week  3-24-2014 posts 029
Here's a look at my finished Flip Flops!
week  3-24-2014 posts 060
...and my finished 6" flower hair clip!
week  3-24-2014 posts 064

Now we have a set for Summer .. come on flip flop season!
week  3-24-2014 posts 065
I hope you loved this fun project and that you will give it a try!  With Ribbons Unlimited and an amazing array of colors and ribbon to choose from to make these, you can use Grosgrain or even Satin to make these flowers too.. until next time stay crafty  ..
Crystal Lopez - Design Team member for Ribbons Unlimited
crystal_lopez_bio_pic


Canvas Tote with Grace

Friday, March 21, 2014

Hi Crafty friends. Today I would like to share with you how I added some beautiful Ombre ribbon from Ribbons Unlimited Inc. and a couple of few other things to dress up a plain canvas tote.

I got this tote at my local craft store. They came in a three pack which is great to make one for you and two more for friends or family.

The one thing I learned (the hard way) in creating this project is that you'll need A LOT of ribbon. I had about 4 feet of the Ombre ribbon but after ruffling them, I was only able to make two lines of ruffled accents instead of the three that I had initially planned for this tote.

Are you ready to learn how to recreate this bag? Read on for the instructions and supplies...

Instructions:

1. Sew a straight stitch on one long edge of the ribbon. Do not close the stitches on the beginning nor the end of the ribbon.

2. Pull the thread away from the ribbon gently to create the ruffles. Do this until you've ruffled the entire length of your ribbon.

3. Place the ruffled ribbon over the bag to see where to cut the trims. Fold the ends and sew the ruffled trim on the bag. This time, make sure you close the stitches on both ends. Repeat the process with as many ruffles you'd like your bag to have.

4. For additional accents, add premade flowers on the left side of the bag.

5. Cut a title (or name) from a vinyl sheet using a die cut machine. Peel the negative part of the cut and adhere to the bag.

6. Mix a little bit of textile medium to your acrylic paint of choice. By adding the medium and following the procedure to treat the paint, your paint shouldn't fade if you wash the tote. Add paint over the space inside the negative space of the template. Make sure you don't go over the spaces. Set aside to dry.
Once completely dried, carefully peel the vinyl sheet to reveal the painted word.

Supplies Used:
Canvas bag- Hobby Lobby
Fabric Flowers- Jolee's Boutique, EK Success
Vinyl sheet- Glue Arts
Paint and textile medium- Plaid Enterprises
Die cut machine- Cameo, Silhouette
Thread and Sewing Machine

Happy Creating,
Grace


Mini Album Filled with Ribbon by Pinky

Wednesday, March 19, 2014

Hey there RU friends, 
Pinky here today...
You know EVERYTHING Is better when it's FILLED with ribbon 
and I mean filled, so I wanted to share this mini album I am using in a class
I am teaching this month and of course it is filled with Ribbons Unlimited!
Every page is right and just better with the Double Faced Satin 


It adds amazing style to any project!


Clear Scraps Mini Tab Album, 
Xyron Adhesive, CutCardStock card stock, Spellbinders dies. 


Butterfly Ribbon Hair Clip Tutorial by Pinky

Friday, March 14, 2014

Hey there friends, 
As spring approaches (we hope anyways) I wanted to share an 
original creation I created that you will find exclusively with Ribbons Unlimited 
and of course with a FULL tutorial! :) 
For two butterflies:
 Heat set the ribbon edges. 
Fold to make a circle- stitch middle to create bunching
on all four cuts. 
 Stitch larger and smaller together as shown. 
 Tie off threads. Trim. 
 Trim out 2" Light Blue Organdy Sheer 3/8" and cut edges at angle- 
heat set edges. 
both adages in as shown and use one dot of hot glue (thin) to adhere. 

 Fold around butterfly and glue into place. 
from behind as antennas. 
 Adhere to hair clip, then add two buttons to the front. 
 Adorable fun butterfly clips! 
I hope you enjoyed this tutorial and be sure to SHARE IT! 
Facebook, Pinterest, Instagram- share it all!

Until next time- Keep on creating!
Products Used:
Blumenthal Lansing Buttons, Hair Clip, Hot Glue


Scrapbook page with handmade floral accents by Grace Tolman

Wednesday, March 12, 2014

Hello friends. Today I’m going to share with you some ways I sprinkle some ribbon goodness into my scrapbook pages. "Selfies" are all the rage now and I decided to print some of mine up for this “on-trend” scrapbook layout. 

Two of my favorite go-to techniques to add ribbon to a scrapbook page are to stamp with it and to create a handmade accent with the trims. In this page, I stamped some sentiment words on the satin ribbon using Stazon. This allowed me to personalize my accents to match my theme.

The second one was creating this beautiful yellow flower with ribbon. I was inspired to create it to match the rose necklace I was wearing on two of the photos. Matching it with something in my photo creates cohesiveness in the project.

Instructions:
 1. Gather your supplies.

 2. Cut a circle big enough to fill the inside space of the doily from pattern paper. Repeat the process one more time and adhere the circle shapes to two doilies.

 3. Adhere the decorated doilies on two opposite ends of the cardstock base.

 4. Cut out 11 ¾” strips from Yellow grosgrain ribbon, add adhesive on the back and adhere to the cardstock creating a frame around the doilies.
Add the photos on the center of the layout, overlapping some of them over parts of the doilies.

 5. Stamp sentiments on the Pastel green satin ribbon. Use an ink like Stazon to make sure your stamped design transfers perfectly on the smooth surface of the ribbon. Cut the ends into notches. Adhere to the bottom part of the photos.
Add stars in between the sentiment phrases using adhesive dots.

 6. Punch out a small circle (about 1 ¼”) from pattern paper. Adhere a large glue dot over it. Cut out 3” strips from Yellow grosgrain ribbon, fold in half and adhere to the circle (with adhesive). Fill the circle with folded ribbon pieces until it resembles a flower. Add a button (threaded with twine) on the center for a finished look. Adhere to the layout.

7. Add the title with stickers and cut out the printed journaling into strips and adhere to the layout.

Thank you for joining me today and I can’t wait to see how you use these techniques on your next project. Happy Creating!


Supplies Used:
#995Grosgrain stripes, Yellow, 3/8”, Ribbons Unlimited Inc.
Cardstock- Worldwin Papers
Pattern paper- Crate Paper
Doily and Letter stickers- Doodlebug Design Inc.
Stars- Studio Calico
Button- American Crafts
Bling- Bazzill
Sentiment stamps- Inspired By Stamping
Circle cutter- Creative Memories
Journaling font- Century Gothic, MS Word
Twine- Source Unknown


Related Posts Plugin for WordPress, Blogger...