Showing posts with label Christmas. Show all posts

Cute Snowman Boxes! by Melissa Craig

Friday, November 20, 2015


Hi everyone!  It's Melissa and I am sharing one of my favorite things in the whole wide world.  Snowmen!!!  I am such a sucker for a snowman, so much so that I usually dedicate an entire week on my blog to snowman projects.  I'll do that in December.

But today I'm featuring Samantha Walker's Snowman Nesting Boxes.  What a great idea!  These boxes will nest inside each other for easy storage and then stack up to the cutest display.  Tuck little treats inside each box to give to someone special.  Instead of the paper scarf that comes in the file, I used Kiwi Grosgrain ribbon.  I meant to put ribbon around the base of the hat but got too excited to put this together that I had already glued on the holly leaves and berry when I realized my little piece of ribbon was still sitting on my table.  He's still super cute!

There are some wonderful ribbons in the store that will finish off any holiday project and it's time to get those projects in the making.  Thank you for stopping by!


Christmas Ornament by Crystal

Wednesday, December 31, 2014

Hello Ribbons Unlimited, Inc Fans!

It's Crystal here and today I want to share one of my ornaments of the many I made this year , I have been a busy little elf ..lol  Custom Ornaments are the perfect gift for teachers bus drivers and yes even the lady who does your hair , I do these custom ornaments and top them off with bows made from Ribbons Unlimited Inc , this one I am using Luxor silver metallic sheer wired edge  2 3\8", this ribbon adds the perfect elegant touch .


Front 

IMG_3488

Back


I take a clear ornament glitter the inside and then add my vinyl art that I design up to it , and top it off with an amazing bow.

Thanks so much for stopping by , leave me some feed back if you loved this project ,
I love hearing from my scrappy computer friends who love getting crafty : )
Crystal Lopez – Design Team member for Ribbons Unlimited


crystal_lopez_bio_pic


Christmas Glittered Cards with Grace

Friday, November 14, 2014


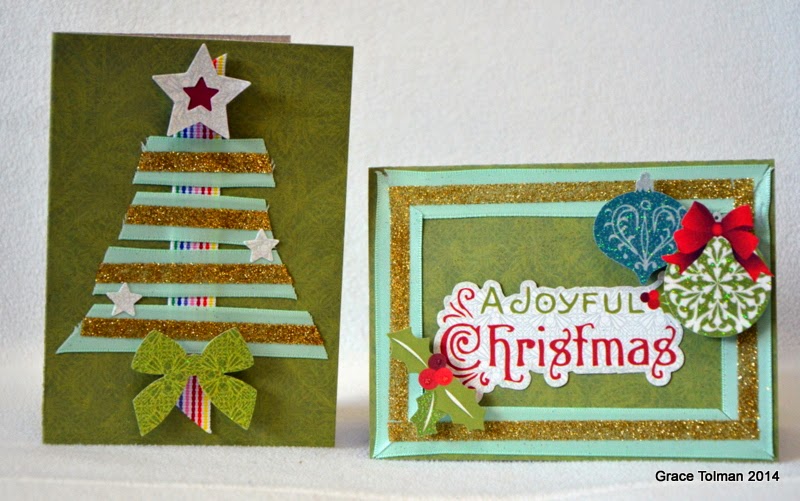
Hello there ribbon friends.  It’s that time of the year again. I’m talking about tackling those holiday projects. Today I’d like to share a couple of cards where I used some ribbon and glitter to add some “shine” to these Holiday greetings.

 Instructions:
1. Create your card base. Mine measured to 4 ¼ x 5 ½”

2. Cut a strip of the candy stripe ribbon and adhere it on the center of the card front horizontally. Cut staggered length of the pastel green satin ribbon to create the Christmas tree, don’t adhere yet.

3. Adhere a strip of adhesive on the center of the ribbon strips, pour glitter over it, press to adhere the glitter and dump the rest back into the container or on a scrap of paper. Use a paint brush to clean off the rest of the glitter on the ribbon. Decorate the tree with die cut and stickers.

4. For the frame card-  Adhere some of the pastel green trim around the card front using strips of adhesive.

5 Adhere another layer of adhesive over the center of the ribbon frame and add glitter, brushing off the excess. Decorate with stickers and die cuts.

Here are some pictures of the final product….


Thank you for joining me today and I hope this inspired you to add glitter to your favorite trims to make your next crafting project “sparkle “ even more.

Happy Creating,
Grace


Supplies Used:
Satin,Pastel green, 5/8”, Ribbons Unlimited Inc.
Grosgrain,Stripes, 5/8”, Ribbons Unlimited Inc.
Paper and stickers- Noel, SEI
Glitter- American Crafts

Others- Adhesive strip, foam adhesive


Ribbon Wreath Card Tutorial by Pinky

Friday, December 20, 2013

Good morning and Happy Holidays from Pinky today!

I am here today with a new idea for a beautiful 
Ribbon Wreath Card- and to be honest you could totally turn this into
a package topper, ornament or even a PIN!
 It all revolves around the gorgeous Ribbons Unlimited Ribbon!
Starting with Double Ruffle Ribbon 7/8" Kiwi and a heavy duty card stock. 
Trim heavy duty card stock into a 2.5-3" circle. 
 Using a sewing machine and fold ribbon as you straight stitch around
the edges of the card stock circle. 
 Trim out middle of paper to leave a ribbon wreath. 
 Adhere a vintage bracelet or pearl strand in the middle
 to cover stitching and add flair. 
Add sticker or flare to bottom. 
 Adhere patterned paper to front of card base. 
Ink edges in coordinating ink. (I used turquoise blue). 
 Adhere quote to center of wreath. Adhere to card front. 
 Add some Pearls or gemstones. 

I hope you enjoyed my post today.

Until next time- Keep on creating!

Products Used:
Xyron adhesives, SEI Noel Papers & Stickers, vintage bracelet. 


Holiday Tags with Jill

Wednesday, December 11, 2013


Looking for a fantastic holiday ribbon? Our Pumpkin Ombre ribbon fits the bill...
Christmas Creations

Christmas Creations
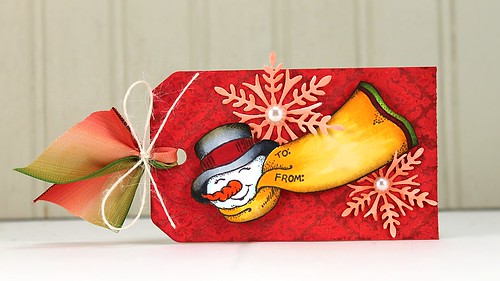
To create these tags, I stamped them each using Penny Black's Harmony background and Distress Paint (Barn Door and Wild Honey).  Once dry, I added Distress Inks over the top.  The areas stamped in paint acted as a resist.  My two smaller tag images were stamped with Memento Tuxedo Black Ink and then adhered using dimensional adhesive after being colored with Copic markers and cut out. To embellish each tag I used Penny Black Creative Dies Snowflake Trio and Dancing Leaves.  Finally, I added the Ombre Ribbon to pull all of the colors together.


Do you love ribbon?
Be sure to check out our 2014 Design Team Call!


Framed Holiday Decor with Christine

Wednesday, December 4, 2013

Hi Ribbons Unlimited Fans!  Christine joining you again today! I'm so excited that it is the Christmas Season and today I have simple way to add some holiday decor to your home.

 One thing I like to do is switch out some of the pictures in my picture frames for a Christmas look.  I go very simple!  All you need is a vibrant piece of Christmas patterned paper.  This one comes from Doodlebug Design.  Then if you add ribbon you can make it look like the top of a present.

I added a real simple bow (that doesn't look simple.)  First of all the key to making this bow easy and with lots of dimension is to use wired ribbon (for this one I used the Luxor Wired Metallic Ribbon in red).  To make it simply cut 7 strips of equal sized ribbon.  Fold them in half and staple the ends together.   Then lay 6 out to look like the base of the bow.  Cover up the mess center with one more in the middle (use some good fabric glue and it sticks in nice and easy).  Then use your fingers to puff them up and make them pretty!  I also left the glass off the frame, so that my bow wouldn't get smashed back down!

Hope your holiday season has started off wonderfully!


Be sure to enter to win!
Simply click the photo and fill out the Rafflecopter 
to get your chance at $1,100 CASH!


Counting Down to Christmas...with Jamie

Friday, November 1, 2013

Welcome to November!  Before you know it Christmas will be here...which is why I started this next project!  It's Jamie with you today sharing a fun count down to Christmas!


Supplies used:


I know it is hard to see the project in the full photo...I just couldn't figure out how to photograph it :)  Here are some close ups...

 
Each loop is about 2" x 2-1/4" when finished which means you could place little treats in each one or you could use it like a traditional count down and just remove the loops as you go until you are down to Christmas day!

This project is a lot of fun to put together and easy enough to get the kids to help with!  It would also be a fun gift to get the Holiday season started and begin building the excitement!

Here is the tutorial:

1.  Cut out the pieces in your desired papers.
2.  Bring the tab end around and tuck it into the slot end to form a loop.
3.  Next cut a 20" piece of ribbon and pull one end through the loop as shown.
4.  Place the ends of your ribbon through a second loop, crossing the ribbon.
5.  Bring the ribbon up on top of the second loop and tie.
6.  Complete a bow and trim the ends of the ribbon.
7.  Continue with steps #3-6 until all 25 loops are in place.
8.  Adhere the numbers on the the larger circles and then adhere one number on each loop using a foam adhesive.


Thanks so much for stopping by!


Merry and Bright with Jill Foster

Wednesday, October 9, 2013

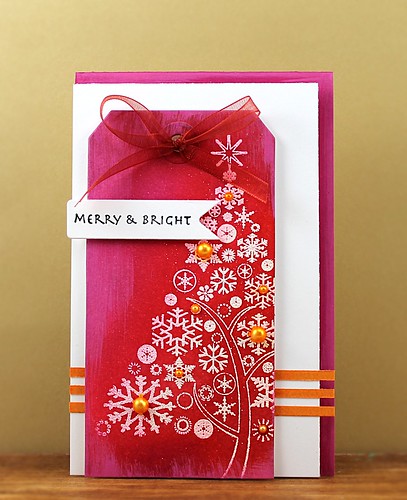
Jill is joining us today with a gorgeous Holiday card!  We love the bold and bright colors Jill selected for this card and she is using our Red Organdy Ribbon to tie it all together.   Our Organdy ribbon is an unwired sheer ribbon that has a monofilament edge sewn in to give it extra body!  The sheerness of the ribbon works perfectly with this card, allowing you to see all of the beautifully stamped and embossed tree!
11


Introducing Designer, Rae Barthel

Wednesday, January 2, 2013

The supremely talented Rae Barthel has joined the Ribbons Unlimited, Inc. Design Team. We are thrilled to have her on board and we know you'll love her work as much as we do!


Greetings! My name is Rae Barthel. My husband Tom and I have been married for 17 years and have three fun & fabulous children: Michael (15), Lauren (12), and Matthew (10). Originally from suburban Chicagoland, we now call Huntsville, Alabama, home. I work full-time as an office assistant in a home health care agency. In my 'free time' (not that there is much of that with three active kids!), I enjoy card making and paper crafting, reading, genealogy, and Pinterest! The card making bug bit back in 2003 and I have enjoyed every minute of this hobby and am so grateful for the people that I get to meet because of it. My work has appeared in Paper Crafts magazine, CARDS idea book series, and a few other publications. I am greatly looking forward to showcasing beautiful ribbon throughout my Design Team term!

Here are a few samples of Rae's work. Gotta love the clever combination of lace and burlap in her beautifully gift wrapped box!


Be sure to hop over to Rae's Blog for a little somethin' special!  Also, if you scroll down a few posts, you'll see we're giving away lots of ribbon!


Welcome to Ribbons Unlimited!

Monday, December 17, 2012

Welcome! We are so glad you stopped by our brand new Blog. We're Ribbons Unlimited and we are excited to share our product line with you. We have assembled a dream team of Designers that will inspire you to create with ribbon!


Today's project uses double face satin ribbon. It's perfect for card embellishing and has a rich look and feel.  In the coming months you'll see a variety of ribbon projects from the newly assembled Ribbons Unlimited Design Team.  You'll be inspired by gift wrap, wedding items, floral arranging, altered projects, paper crafts, and so much more.  Please bookmark our Blog and come back to see us!

What better way to welcome new friends to our Blog than with a giveaway!  Just sign up as a follower (on the sidebar) and leave a comment on this post with your 10 favorite satin ribbon colors.  We'll choose THREE winners to receive 5 yards of each!  Winners will be announced on January 7th.  

Stay tuned for our Design Team announcement, contests, challenges, and more!  Join our Facebook FanPage (where you'll find even more inspiration), Twitter Feed, and Pinterest Board so you don't miss a thing.  Thank you for stopping by!

Related Posts Plugin for WordPress, Blogger...