Gift Set by Pinky

Wednesday, January 29, 2014

 Hey there RU friends, 

It's just me Pinky today with a fun birthday gift project idea.
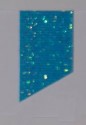
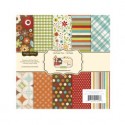
Today I am sharing this gift bags I created using the Kraft paper and my Silhouette. 
Here is how I created this project:
1. Cut out gift bag using Kraft Paper
and Silhouette Cameo or other digital die cut machine. 
2. Assemble gift bag. 
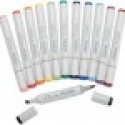
3. Glitter decorative top  of the gift bag.
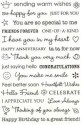
4. Using negative cuts from hits bag- 
stamp Happy birthday Sentiment onto heart. 
5. Glitter edges of heart. 
5. Using double sided tape- adhere a strip to all for sides of 
an invitation. 
6. Glitter with coordinating glitter. 
7. Adhere sentiment heart to center and negative flourishes. 
beneath heart and onto the bag- folding the ribbon in half for the card. 

Fill bag with goodies and give!!
It's fun to create the perfect stripe of glitter using double sided tape. 
Ribbons to accent any project at Ribbons Unlimited!

I hope you enjoyed my birthday project today. 
Feel free to share with your friends, and don't forget to like us on 
Until next time- Keep on creating!


Products Used:

Neenah Classic Linen A2 Folded Invitations Avon Brilliant White, BROWN BAG Kraft 8 1/2 x 11, Clearsnap Glitter, Silhouette Cameo, Xyron High Tack Tape.


Ribbon Embellishments on Cards by Crystal

Friday, January 24, 2014

Hello RU Friends !
It's Crystal here and today is my first post for Ribbons Unlimited.  I am so happy to be on this Design Team!  I love the quality of the ribbon and I am thrilled to show you the different ways I like to use it. Today I am showing you how I embellished my card with ribbon in two ways, so let's get started.
Here is a look at my finished card and matching envelope:
Ribbons unlimited 1-24-14 002
I used the Turquoise Dazzle ribbon 5/8" and cut it 1 1/4" long.  I then fork cut each end and accordion folded the center and wrapped the accordions with floss.  I left the ends of the floss longer for the antennas!  This ribbon has such a beautiful sparkle so it makes a perfect butterfly!  Here is a close-up view...
Ribbons unlimited 1-24-14 006
I also used some Lime Organdy delight  5/8" ribbon tied this around my bottom strip layer.  This ribbon has beautiful satin edges and a sheer center with a subtle shimmer.
Ribbons unlimited 1-24-14 007
Here are a few more views of my card:
Ribbons unlimited 1-24-14 003

Ribbons unlimited 1-24-14 004

Ribbons unlimited 1-24-14 005

Ribbons unlimited 1-24-14 008
For the inside of my card I made another butterfly using the same steps as above:
Ribbons unlimited 1-24-14 009
Lastly, here is a close-up of my matching envelope...
Ribbons unlimited 1-24-14 011
Supplies :
Make time to get scrappy and create something that makes you smile : )
crystal_lopez_bio_pic
Crystal Lopez -  Ribbons Unlimited Design Team


Birthday Bag with Grosgrain Ribbon! by Jamie Cripps

Wednesday, January 22, 2014

Hi guys!  It's Jamie with you today!  I have always had a thing for kraft paper I just love how it looks and feels…and it is so easy to coordinate everything with it!  So today I am sharing one I created using the black grosgrain ribbon!  This ribbon works wonderfully as a handle for bags and looks great for decorative elements too!


We are always struggling for boy gift bags around here so I kept the main portion of the gift bag as the Kraft color and then used Black Basis Card Stock as the under accent to make the letters pop.  I brought color into the bag with the twine pom!  

Here is the tutorial: 
  1.  Grab a large serving fork and wrap your first color of twine around it.
  2.  Next wrap a second color of twine around the first color.
  3.  Grab a small piece of twine and tie a tight knot around the twine pieces (up through the fork hole).
  4.  Slip the twine off the fork.
  5.  Cut all the loops and fluff out the pom!
  6.  Next cut the Birthday Bag with the kraft card stock.  Fold on the score lines and add adhesive to the side flap.
  7.  Bring the two box sides together and adhere the flap in place.
  8.  For the bottom of the box, tuck the two side tabs in…
  9.  Then push the slot side up and tuck the flap into the slot.
10. Stand the box up and bend the sides on the score lines.
11. Cut a piece of black grosgrain ribbon for the handle and tie each end in a knot on the inside of the bag.  Trim the pieces close to the knot.
12. Your bag should look like this now.
13. Cut the bag panels.
14. Place adhesive on the backside of the sentiment panel.
15. Adhere it on top of the solid panel.
16. Place a piece of black grosgrain ribbon around the right edge as shown.
17. Next grab your pom, a piece of coordinating twine and a black grosgrain ribbon bow.
18. Place the black grosgrain ribbon bow in the center of your ribbon on the sentiment panel.  Place the coordinating twine piece under both.
19. Place the pom on top of the bow.
20. Tie a knot to hold everything together…
21. Then tie the twine in a bow and trim the ends.
22. Adhere the panel on to the front of the bag and fill your bag with goodies!

We filled ours up with M&M's and added a little money in between!


Supplies Used:


You can find more grosgrain ribbons HERE!

Thank so much for joining me today!  
Be sure to check back in on Friday for Crystal's first post!


DAZZLE Triple Heart Hair Bow Tutorial by Pinky

Wednesday, January 15, 2014

Good morning RU friends!

I have a fun tutorial today for this DAZZLE Triple Ribbon Heart
I created to make headbands and hair bows!
It is a beautiful cross grain ribbon with moonstone glitter sealed in. 
And the best part is- no heating the ends for a seal! Just cut and GO!

Each one 1" shorter than the last. Each one trimmed to the same slanted shape. 
 Glue ends together as seen in photo below. 
 Pull the middle down into a point and adhere each one. 
 Adhere to clip for headband. 
 Layer 2 or even 3 for a pretty heart effect. 
Also these would make fantastic butterfly wings!  
 Perfect for any girl who loves hairbands!
That's it for me today- Hope you enjoyed my tutorial- 
please do share with your friends and don't forget to "like" us on Facebook!

Products Used In This Project:


Related Posts Plugin for WordPress, Blogger...