Cute Storage + Pretty Ribbon with Christine Meyer

Tuesday, July 30, 2013

Hi Ribbons Unlimited fans!  Christine back with you today and ready to share some more simple storage pieces that I added a little ribbon to to jazz them up.  Sometimes the perfect finishing touch comes in the form of a simple ribbon tie or bow!


These simple storage pieces are designed by fellow Ribbons Unlimited Design team member Jamie and cut out on my Silhouette Cameo.  After decorating each piece with paper, washi tape, and stickers; I went back and added in bows and ties to give them a final touch.


For this holder I used the ribbon as the pull for the drawer at the bottom.


Here I just tied a simple bow around the marker box.


A bow at the top of this desktop caddy was the perfect touch.


A bow overwhelmed this washi tape box so I opted to just do a simple tie instead.

The next time you are looking spruce something up don't forget to look at your Ribbons Unlimited stash.  With the variety of colors and designs you are sure to find several fabulous options!

Supplies Used:
Websters Pages Patterned Paper
My Minds Eye Washi Tape
American Crafts Cardstock


Prettying Up Storage with Christine

Friday, July 26, 2013

Happy Friday Ribbons Unlimited Fans!  Christine up with you on the blog today!  I can't believe we are already smack dab at the end of July!  One of my summer goals was to work on putting together this storage piece and Ribbons Unlimited had the perfect ribbon to help me finish it off!  Organdy ribbon is probably my favorite (and go to) ribbon on most projects.  I love the selection that Ribbons Unlimited has of this gorgeous ribbon!

This storage piece comes from Gina's Designs and you have to assemble each drawer.  I covered mine with various patterned paper from Echo Park's "Beautiful Life" line.


I then tied bows using the Strawberry Organdy Ribbon .  I stuck a large brad through the bow and then put them through the drawer hole.  The ribbon is perfect for being the pull to get the drawers out and adding a feminine and pretty touch!

Supplies Used:
Echo Park Paper "Beautiful Life"


Adding Interest to Everyday Invitations with Jamie

Wednesday, July 24, 2013


Good Morning!  Jamie back with you today sharing an easy way to add interest to a plain invitation!  I am going to be working with the Polka Dot Ribbon in Dark Mint/Chocolate, the 7/8" Chocolate Chip Grosgrain, and the 3/8" Aqua Double Ruffled Ribbon!

Before we go into the tutorial, I wanted to show you my before invitation...

Okay, so let's begin!
1.  Tie a bow using the Polka Dot Ribbon in Dark Mint/Chocolate ribbon.
2.  Next tie a piece of the 3/8" Aqua Double Ruffled Ribbon around the Polka Dot ribbon and then tie into a bow.
3.  Tie a piece of the 7/8" Chocolate Chip Grosgrain around the invitation body and tie in a knot.  Place a piece of twine under the knotted area.
4.  Place your bow on top of your knot and then attach with the twine.
5.  Finish by tying the twine in a bow.

Now...are you ready to see the finished invite?
Have a look...


Pretty amazing how quickly the ribbon changes the look of the invitation set, right!?
I love how easy it is!  This would work great with packaging and gift wrapping too!

Thanks so much for stopping by today!


Inspiration Sun Catcher by Pinky

Friday, July 19, 2013

Inspiration Sun Catcher by Pinky

Hi there Ribbons Unlimited friends, 
Pinky here today with an inspirational Sun Catcher using 

You know I find myself using ribbon for the smallest and largest
of projects especially home decor projects because it makes the perfect hanger. 

This sheer ribbon adds the perfect balance on my vintage style 
globe hanging sun catcher. It blends all the vintage goodness together. 
 First I covered the globe chipboard in dictionary papers.
 Then I added some Clearsnap copper ink to the edges.
 Trimmed out my sticker sentiments onto cardstock. 
Place the sentiments inside to globe on both sides. 
 Sealed the globe using Beacon Zip Dry adhesive. 
Punched a hole in the bottom with my Big Bite- 
then added the crystal sun catcher. 
Then attached the Ribbons Unlimited bow to cover the clear line,
and to hang the globe. It's two sided and perfect for the window!

Once again Ribbons Unlimited comes to the rescue!

I hope you enjoyed my crafty post today- until next time...
keep on creating!


Bringing in Some Zebra with Jill Foster

Wednesday, July 17, 2013


Have you had a chance to see our Animal Print Ribbons?  We have leopard spots, zebra stripes and more and these fun animal prints come in natural and wild colors!

Jill is with us today using our Zebra Fest Ribbon which adds an eclectic mix of patterns on this beautiful stamped card!  We love the bold statement it brings!


Dry Erase Board Tutorial by Pinky Hobbs

Friday, July 12, 2013

Hi there Ribbons Unlimited fans,
Pinky here today with a fun DIY Dry Erase Board tutorial!

This adorable "farm" theme dry erase board is perfect for those 
little messages to the family or reminders to hang in the kitchen. 
Start out with a piece of Clear Scraps acrylic from the Travel Brag Bag
peel both sides of protective film off.
Using My Little Shoebox papers (tags and border sheet as well).
Using Beacon Zip Dry- Place small amount of adhesive on border strip. 
Adhere to front of acrylic. 
 Using small dots- dot coordinating label and place on back of acrylic. 
Place small dot on all four corners of patterned paper- place on the back
of acrylic piece over label. Set aside to dry.

 Punch holes on each side of the acrylic/patterned paper piece.
Using 5/8" Wired Single Face Satin in Victorian Lilaccreate a small bow. 
Adhere to front of Dry Erase Board.
Thread ribbon through holes and knot in the back. 
 It's quick, easy, and so very useful! And you did it YOURSELF!
They make adorable gifts, tags, home decor. 
Thanks for stopping by. 

Until next time- Keep on creating!


Products Used:
Clear Scraps Travel Brag Bag
My Little Shoebox paper and labels
Beacon 3N1 adhesive, Zip Dry Adhesive


Set of Tags by Jill Foster

Wednesday, July 10, 2013

Jill is back with us today sharing a gorgeous stamped set of tags she created using our Polka Dot Ribbons along with her Distress Inks and Stains!  Just have a look...


Aren't they stunning? 

This dotted ribbon is so versatile.  It is wired and comes in 1 1/2" width on 20 and 100 yard put ups. It uses our "Lyon" French Wired ribbon as a backdrop and is made in Germany. 


Advice for the Graduate by Jamie Cripps

Friday, July 5, 2013

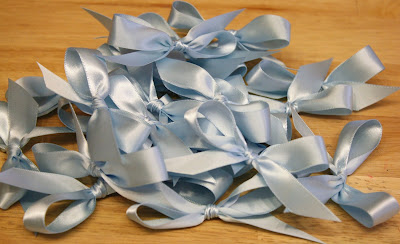
Good Morning!  Jamie back with you and today I am working with the Light Blue Double-Faced Satin Ribbon to create an entry way piece for a Graduation party!  I love that there are 196 colors of this Satin Ribbon in widths up to 2 1/4" in the store and other widths up to 4" can be special ordered!  With that many colors, you are sure to find a match for your school colors!


This will sit beside a large metal tree so guests can write their "keys to success" or their special wishes for the graduate on the tags and then hang them on the tree!

I started by cutting 9" lengths of the Light Blue Double-Faced Satin Ribbon and then tying them in bows.  I trimmed each of the ends at a slant.
I cut the tags and keys with my digital die cutting machine.

To create each tag:
1. Place a 5" piece of twine through the top of the tag.
2. Place your satin bow in the middle of the twine and tie the twine around the bow.
3.  Place the key through one end of the twine.
4.  Tie a knot in the top of the twine to hang.


Supplies:
Cardstock: Neenah Natural Linen, Basis White, Basis Navy (CutCardstock.com)
Die Cuts: Keys, Tags, Holder (Silhouette)
Sticker: Graduation (SRM)


Two Ribbons - One Card - Fabulous Results!

Wednesday, July 3, 2013

Hi all! Christine here and excited to be with you for the very first time!  I love playing with ribbon and I love trying to incorporate a couple different types of it into my projects.  Today I have a card to share with you that uses two different ribbons!  I pulled out the new American Crafts line "Mayberry" and combined it with a doily from Gina's Designs.  
I love how ribbon can add a pop of color and texture to a background.  To create my yellow ribbon scallops I used the Sew Ribbon Scallop Tool by We R Memory Keepers and created several rows to weave the ribbon through.  It was the perfect size ribbon to fit!


I then decided to use the sheer ribbon to add a pretty bow to the bottom of the card.  It's a totally different texture than the grosgrain but it works!  I flipped the tails of my bow in different directions so that they didn't make the bottom of the card too heavy.


Supplies Used
Die Cuts & Stickers - American Crafts
Sequins - Pebbles
Pearls - Ranger


Related Posts Plugin for WordPress, Blogger...