Candy Wand by Crystal

Sunday, November 30, 2014

Hello Ribbons Unlimited Inc. fans !!
It's Crystal here and today I have a fun project I made for my daughter , she love to dress up and run around the house like a princess , so today I made her a candy wand , play now treat later . For this project I'm using the 7/8" Aqua DF Satin ribbon from the Ribbons Unlimited Inc. online store , lets get busy and I'll show you how I made this ..

Supply list :
6" wide sparkle tulle
7/8" Aqua DF Satin ribbon
Giant Pixie Stix
Tim Holtz mini snowflake rosette die
cardstock
scoretape
shatter proof plastic snowflake
a bottle cap with an image ( I just punched out a princess from the packaging off a toy my daughter received ) (#trash to treasure )
felt circle
sharp scissors

wand
put score tape on end of rosette die cut
wand 2wand 3I added glue dot to hold rosette in shape so I could hot glue the felt circle in place
wand 4wand 5
punch the image from toy packaging and make the bottle cap
wand 6
next tie a bow with tulle
wand 7
the layer should be tulle bow then glue pixie stick to tulle bow , next glue the plastic snowflake
wand 8
glue the rosette with bottle cap and add my Aqua satin bow
wand 9

close up to my finished candy wand
I am sure my daughter will love this and I hope it has inspired you to create something fun
for your little one and look at that toy packaging a new way lol..

wand 10

Thanks so much for stopping by , leave me some feed back if you loved this project ,
I love hearing from my scrappy computer friends who love getting crafty : )
Crystal Lopez – Design Team member for Ribbons Unlimited

crystal_lopez_bio_pic


Gift Box with Jamie

Wednesday, November 26, 2014

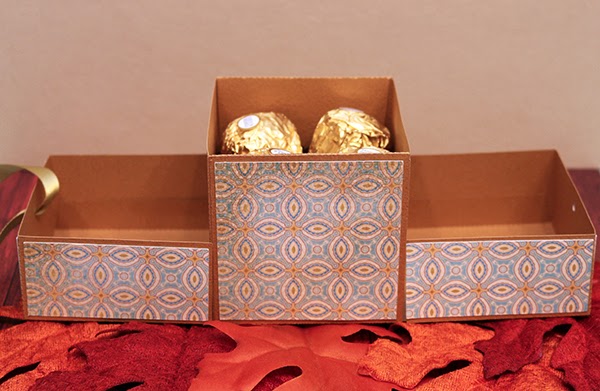
Good Morning!  Jamie back with you today sharing a fun gift box embellished with one of my favorite ribbons, the Golden Olive Double-Faced Satin Ribbon!  There are 196 colors available in widths up to 2-1/4" on the online store, and you can even special order widths up to 4"!  


This box opens up on both ends to reveal a box inside, 

which is perfect for stashing candies in!

Here is the tutorial:
1.  Cut the boxes and mats then fold the boxes on the score lines.
2.  With the smaller box, place adhesive on the four side tabs and adhere them to the box sides to form its shape.  With the large box, place adhesive on the four tabs then adhere the long sides to them as shown.
3.  Adhere the smaller box inside the center of the larger.
4.  Place adhesive on the sides and the coordinating tabs then adhere those sides to the box and fold that tab over within the smaller box.  Do this for both sides. This will hold the center box in place.
5.  Adhere the mats in place and place your goodies in the box.
6.  Once mats are in place, I punched a small hole in each side so that I could run my ribbon through.
7.  I push the ribbon up through the holes and pull the ribbon tight as I close the box.
8.  Cut out the Thank You sentiment and adhere to a tag.  Note: I cut my Thank and You apart so that I could move them to fit my tag better.  Tie a bow on the box and then tie the tag to the bow.


The ribbon really gives the box an elegance!

Thanks so much for stopping by today!
-Jamie


Christmas Paper Treat Box by Grace

Friday, November 21, 2014

Hi there Ribbons Unlimited friends. Today I’d like to share a project that can easily be mass produced and could hold your favorite Holiday handmade gift or like me, just fill it up with candy and you are good to go.


Instructions:
1. Using a full 12x12 sheet of paper, Score at 1”, 4”, 8” and 11”. Turn the paper 90 degrees and repeat the scoring process. Fold on the scored marks. 

2. Cut at the 4” and 8” marks leaving a 4” square box in the center. If you desire, you can cut away 2x4” on each corner of the template. I did this for the first one to trim down the excess paper and the layers of paper won’t be too bulky but I found that it lost some important structure so I opted not to trim the corners on the second box.
Punch out a border on each edge of the box. Grabbing the two 2x4” pieces towards the center, adhere them together and then adhere one side of the box over them. Fold the edge over the front. 

3. To reinforce the structure of the first box, I adhered a strip of the red checkered ribbon around the box. 

4. Adhere the ends over each other using some glue dots. 

5. Punch out a hole on two adjacent sides of the box. Adhere the checkered ribbon over the gold trim. 

6. Thread both ribbons through your holes, and adhere the ends inside the box using some tape. 

7. Create two bows from the gold ribbon and adhere on the sides of the box, covering the holes you’ve created for the handle. 

 8. Add a sentiment block using paper and stickers. Repeat the process for how many boxes you need to make.

Here’s some more close ups…

Thank you for joining me today and I hope this helped you find ways to incorporate your ribbons and papercrafting supplies in your gift giving this season.

Happy Creating,
Grace

Supplies Used:
Country check, Red, 1”, Ribbons Unlimited Inc.
#274 Luxor(Wired) Gold, 1 ½”,Ribbons Unlimited Inc.
Paper and stickers- Noel, SEI
Border punch- Recollections

Others- Adhesive strip, foam adhesive


Christmas Glittered Cards with Grace

Friday, November 14, 2014


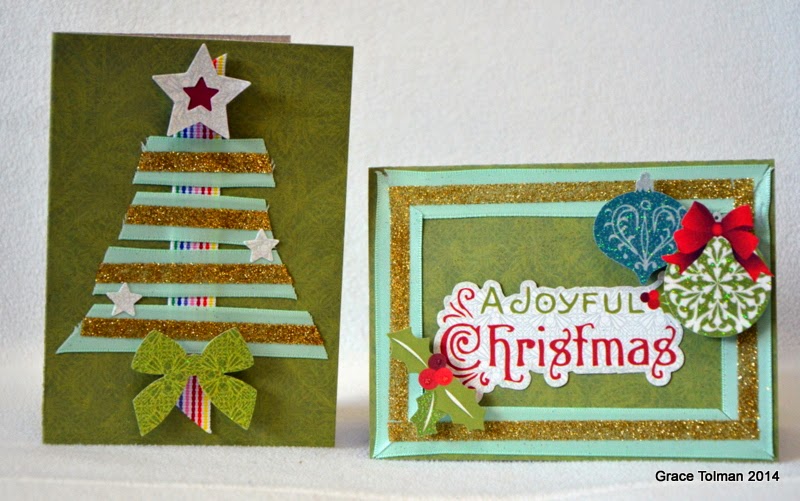
Hello there ribbon friends.  It’s that time of the year again. I’m talking about tackling those holiday projects. Today I’d like to share a couple of cards where I used some ribbon and glitter to add some “shine” to these Holiday greetings.

 Instructions:
1. Create your card base. Mine measured to 4 ¼ x 5 ½”

2. Cut a strip of the candy stripe ribbon and adhere it on the center of the card front horizontally. Cut staggered length of the pastel green satin ribbon to create the Christmas tree, don’t adhere yet.

3. Adhere a strip of adhesive on the center of the ribbon strips, pour glitter over it, press to adhere the glitter and dump the rest back into the container or on a scrap of paper. Use a paint brush to clean off the rest of the glitter on the ribbon. Decorate the tree with die cut and stickers.

4. For the frame card-  Adhere some of the pastel green trim around the card front using strips of adhesive.

5 Adhere another layer of adhesive over the center of the ribbon frame and add glitter, brushing off the excess. Decorate with stickers and die cuts.

Here are some pictures of the final product….


Thank you for joining me today and I hope this inspired you to add glitter to your favorite trims to make your next crafting project “sparkle “ even more.

Happy Creating,
Grace


Supplies Used:
Satin,Pastel green, 5/8”, Ribbons Unlimited Inc.
Grosgrain,Stripes, 5/8”, Ribbons Unlimited Inc.
Paper and stickers- Noel, SEI
Glitter- American Crafts

Others- Adhesive strip, foam adhesive


Holiday Frame Gift Project By Pinky

Wednesday, November 12, 2014

Have you checked out the selection of ribbons from RU lately?
Hi there, it's Pinky today with this holiday frame project.
Actually this is my favorite time of year to craft because I love the holiday
glitter and shine that happens!
For this project I used Gold Krylon paint, along with Clear Scraps Mascils, 
Tri-Fold Frame, and Flower Mixers. 
And some beautiful ribbon from Ribbons Unlimited along with some 
crystals, and card stock. 


I am happy with how it turned out and it's so much richer with Ribbons Unlimited ribbon. 
What gifts are you making this year??


Cheerleading Centerpiece with Jamie

Friday, November 7, 2014

Good morning!  Jamie back with you today!  We are gearing up for competitive cheer season and today I am sharing my new 3D Paper Megaphone!  This project is great for individual cheerleaders or to use as a table centerpiece!  

I am using the Silver Luxor Ribbon for both of these projects.  This ribbon has a delicious shimmer to it so it draws in a lot of attention AND it is wired so the bow really holds its shape well!  You can find more colors of the Luxor Ribbons here!


This file is really easy to assemble, you simply place adhesive on the tabs and wrap the paper around and adhere the tabs to the paper to form the cone shape.  Layer the banner and adhere with a foam square to the megaphone then adhere the cheer sentiments in place and adhere with foam to the banner.  Tie the Silver Luxor Ribbon around the handle in a bow then tie twine around the bow center.


Thanks so much for stopping by today!


Boutique Style Hair Bow with Crystal

Wednesday, November 5, 2014

Hello Ribbons Unlimited Inc. Fans!!!
It's Crystal here with a fun bow made with grosgrain ribbon from the Ribbons Unlimited Inc.
Today I will be using the Zebra and the Black 1 1\2" grosgrain ribbon to create my boutique style bow with feathers.  I start with a 30" strip of  black and Zebra grosgrain form a figure eight and clamp to hold together.

IMG_3347
next bring each side to the middle and clamp
IMG_3348
next I crease the center to form valleys and hills and the wrap it with a very thin wire
IMG_3349
it should look like this , make both the zebra and black layer like this
IMG_3350
next  cut 8" strips that I fork tailed the ends and heat sealed them , layer up and crease the center and wrap with wire
IMG_3351
next I knot  the center of a 4" strip
IMG_3352
this is the finished layers
IMG_3353
start with the pin wheel layer and then I layered on some feathers from my stash
IMG_3354
layer on the zebra bow , I hot glue each layer then add the black and wrap the zebra knot and
finish the  off the bow by glueing a clip of your choice to the bow

IMG_3355
a look at the clip I glued on the back
IMG_3356
my finished bow
IMG_3360
IMG_3361


Thanks so much for stopping by , leave me some feed back if you loved this project ,
I love hearing from my scrappy computer friends who love getting crafty : )
Crystal Lopez – Design Team member for Ribbons Unlimited
crystal_lopez_bio_pic


Related Posts Plugin for WordPress, Blogger...