Showing posts with label Chevron Ribbon. Show all posts

Throw pillow by Nicole

Friday, July 3, 2015

Nicole here on the blog today to share a throw pillow I made accented with ribbon.  I've been meaning to make a throw pillow for my sis for awhile.  When this pink ribbon came in my box I knew it was the perfect time since pink and black were her wedding colors.  


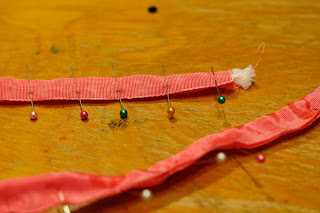
I started by making piping with cording and hot pink ribbon.  The cording I found at the craft store in the upholstery findings.  


I cut enough of the cording to go around my pillow and then made it just a tad bit longer.  Now you'll take the cording and place it in the middle of the ribbon and pin it closed.  

Once the length is pinned I did a simple straight stitch down the length of the ribbon.


Now I cut a piece of drop cloth material big enough to fit my pillow top.  The finished piping I pinned around the edges of the drop cloth being careful around the corners.    

Attach with another pass through the sewing machine.
Now to embellish that pillow top.  I used my Silhouette Cameo to cut a piece of vinyl.  Once cut I carefully laid the design on the center of my pillow top.  

The vinyl was giving me grief since I didn't get it to lay flat and it was bubbling slightly around the edges of the hearts.  To make sure the paint didn't bleed under the edges of vinyl I used a foam brush to add the black acrylic paint in an up and down motion.    
Once the paint dried I removed the vinyl and also cut three of the hearts out with a pair of fabric scissors.   

These hearts I filled with the patterned ribbon.  I took pieces of drop cloth and traced the heart shapes with a pencil.  These are going to be my base to which I attach the ribbon and and will also be placed behind the cutouts.  

Using Helmar Fabric Glue I attached all the ribbon over the top of the hearts.  
I then pinned them in place and added more glue around each of the openings on the back to secure them in place.  


Once all the glue was dry I added some sewing details with pink embroidery floss.  


I then finished off my pillow by sewing two smaller pieces of drop cloth material to form a envelope cover.  


Here is another look at the finished pillow.


Thanks so much for stopping by the blog today.

Ribbons used in this project:


All digital SVG files from digiplayground.com


Ribbon weaved background by Grace Tolman

Friday, May 23, 2014


Hello Ribbons Unlimited Inc. friends. Recently I went to Ikea for some window shopping and also to gather some inspirations. Don’t you just love that place? Anyways I couldn’t resist grabbing a couple of the Tolsby frames. I have seen a few ideas on altering them on Pinterest and I thought I’d give it a go myself.  So with the help of the Apple chevron grosgrain ribbon and a fantastic. Dr. Seuss quote, I was able to create a frame fit for my bookshelf. 


 Instructions:
1. First off cut your cardstock to the size of the frame insert. Mine was 4x6. I then added some thin strips of adhesive on the top and bottom portion of the paper and adhered the ends of my ribbon.

 2. Then I added some more ribbon, horizontally, in a weaving fashion to create my background. I moved the ribbons a few times to make sure that they are even all around. After trimming the excess, I adhered the quote on the center and slipped the paper into the frame.
 3. To add some “dimension”, I adhered some homemade epoxy dots on the four corners of the quote on the OUTSIDE of the frame. This allowed me to add some dimension without adding bulk to the inside of the frame.
 4. Then I tied some satin ribbon into a bow, trimmed the edges and adhered it to the top of the frame. I adhered the ends of the ribbon to the sides so it didn’t block the quote from view. I also layered some flowers and added another epoxy dot in the center for a more finished look.

And here’s some close ups of the finished frame….

Creating a ribbon background to any project creates some unique interest and texture. I hope you’ll give it a go soon.

Happy Creating,
Grace
Supplies Used:
Applegreen/blue chevron 7/8”, Ribbons Unlimited Inc.
#088 DFSatin Ribbon, Pastel Green, 5/8”, Ribbons Unlimited Inc.
Frame- Ikea
Cardstock- The Paper Company
Flowers- Prima
Quote- Kaiser Craft


Butterfly Ribbon Hair Clip Tutorial by Pinky

Friday, March 14, 2014

Hey there friends, 
As spring approaches (we hope anyways) I wanted to share an 
original creation I created that you will find exclusively with Ribbons Unlimited 
and of course with a FULL tutorial! :) 
For two butterflies:
 Heat set the ribbon edges. 
Fold to make a circle- stitch middle to create bunching
on all four cuts. 
 Stitch larger and smaller together as shown. 
 Tie off threads. Trim. 
 Trim out 2" Light Blue Organdy Sheer 3/8" and cut edges at angle- 
heat set edges. 
both adages in as shown and use one dot of hot glue (thin) to adhere. 

 Fold around butterfly and glue into place. 
from behind as antennas. 
 Adhere to hair clip, then add two buttons to the front. 
 Adorable fun butterfly clips! 
I hope you enjoyed this tutorial and be sure to SHARE IT! 
Facebook, Pinterest, Instagram- share it all!

Until next time- Keep on creating!
Products Used:
Blumenthal Lansing Buttons, Hair Clip, Hot Glue


Scrapbook page with ribbon flair by Grace

Friday, February 21, 2014

Hello Ribbons Unlimited Inc. friends, Grace here to share with you how 
I incorporate ribbons to my scrapbook pages.

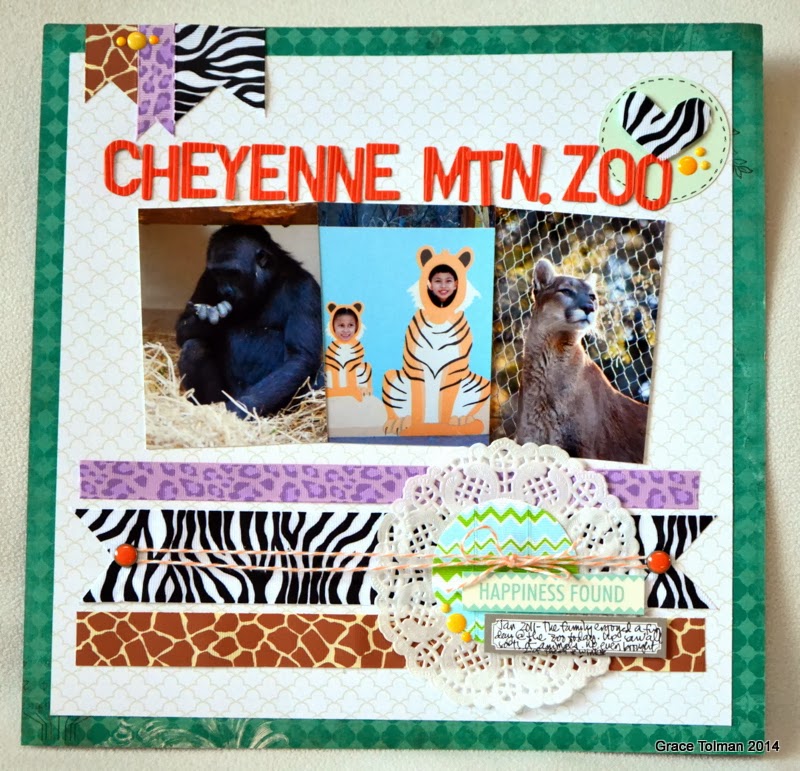
When I received these animal print ribbons, I knew exactly what page to create with it. What I found to be challenging was to find unusual ways to add the ribbons to the page. Thankfully, the variety of sizes and prints of the ribbon ignited some great ideas. Read on to see more how I created this page….


1. Create the scrapbook page foundation. Cut a white pattern paper into an 11” square and adhere to the center of the dark green paper. Add the three 4x3 photos to the center of the page.
2. Cut out the ribbons to fit the inside of the white paper and lay it horizontally on the page. Cut the widest ribbon’s edges into notches and adhere to the layout.

3. Add the same three ribbons on the top left edge of the page. Cut the edges into notches before adhering them.


4. To add some texture and layers to your page and ribbon, poke two holes on the ends of the longest ribbon. Attach brads through the holes.


5. Wrap some twine around the brads and tie the ends into a bow.


6. Cut out a handmade heart out of the wide zebra print ribbon. Add some fray check on the edge of the shape so that the ribbon threads don’t unravel. Add some pen stitching around a die cut circle, adhere to the top right edge of the page and add the heart ribbon using foam adhesive. Add the title.


7. Add a pattern paper like circle shape using ribbon. Cut out a scrap of circle from paper. Add adhesive all over the top of the paper. Add the strip of ribbon, making sure to match the pattern. Trim the excess. Add fray check to the edges of the cut so that the ribbon ends don’t fray.
8. Add some more embellishments and handwritten journaling.


I hope that my post today inspired you to pull out your favorite ribbons and add them to scrapbook pages. Find ways to incorporate them in the most unusual way. Happy creating!

Supplies Used:
Applegreen/blue chevron 7/8”, Ribbons Unlimited Inc.
LilacLeopard Grosgrain 5/8”, Ribbons Unlimited Inc.
Giraffe 7/8”, Ribbons Unlimited Inc.
Zebra festribbon 1 ½” , Ribbons Unlimited Inc.
Cardstock- WorldWin Papers
Pattern papers- (dark turquoise) BoBunny; (white) Creative Memories; (word/journaling strips) Elle’s Studio
Letter stickers- Thickers, American Crafts
Brads- My Mind’s Eye
Twine- The Twinery
Enamel dots- Doodlebug Design Inc.
Circle cutter- Creative Memories
Pen- Millennium, Zig
Others- Fray Check, Dritz

Doily- Doodlebug Design Inc. 

Ribbons Unlimited Inc. 2014 Design Team Member


Related Posts Plugin for WordPress, Blogger...