Patriotic Hair Bows by Jamie L.

Friday, June 26, 2015

Hi everybody,

This is Jamie and today I want to share some easy to make hair bows with you all. These bows are perfect for 4th of July!


Here is a list of the things you will need to make these bows:
Alligator clips (one per bow)
Hot glue gun
Hot glue sticks
Scissors
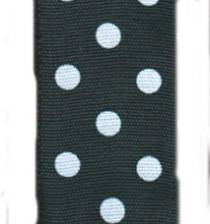
11/2" navy blue mini stars wired ribbon


It took me less than 30 minutes to make these bows start to finish. I made a (hopefully) easy picture tutorial for you just in case.

Step 1.
Cut ribbons to size. I cut the navy star ribbon at aprox. 11 inches and the red approx. 3 inches.

Step 2.
Take your blue star ribbon and gate fold until the ends overlap (make sure to have them overlap enough for a line of glue to hold them together).

Step 3.
Hot glue a line across one of the edges and then press the two edges together to make a continuous piece of ribbon (it should look like a circle or bracelet shape once unflattened).

Step 4. 
Flatten the ribbon you just glued together and grab in the center of the ribbon and pinch together.

 Step 5.
While still pinching the center of the ribbon, use your other hand to fold the top and bottom of the pinched area to the back (so that the center now makes a "W" shape). At this point you can hot glue to hold it together or use some twine/thread and tie it in this position if you like.

Step 6. 
While holding the center in a "W" shape (you won't have to hold it if you've tied the center in this position) take your red ribbon and wrap around the center to hide the fold. (The 3 inches is enough to wrap around 2x. If you only want to wrap around once cut off the excess now).

Step 7.
Now secure the red ribbon with hot glue (making sure your ribbon seam end is on the back side of your bow).

Step 8.
Now hot glue your alligator clip (or hair piece etc. of your choice) to the back side of the bow. Make sure you line it up in the middle so that you can't see the clip from the front.

See, I told you easy! I hope my tutorial was easy enough to follow.  Thanks for taking the time to view my project today!


Thanks for stoppin' by and have a great day!


Just a little bit can make a big impact - by Melissa Craig

Friday, June 19, 2015

Good Morning!  I cannot tell you how excited I am about today's card.  I've been dreaming this one up since I received the Country Check - Light Blue ribbon.  It's just a little bit of ribbon, but who wouldn't identify this combo right off the bat?


Although I used red glitter paper, Dazzle (Glittered Grosgrain) Red would work equally as well!

I created the card by first typing out a sentiment in a word program and printing it on white card stock.  Then I embossed some clouds using an embossing folder by Darice.  I adhered the ribbon and the glittered card stock below the sentiment.  I then cut out 5 doggie shapes, stacked them to give my embellishment some dimension and that was it!  Clean... simple... a great encouragement card.

I do hope you like my card and thank you for letting me share with you today.


Ombre Ribbon Rocks by Steph Ackerman

Friday, June 12, 2015

Good morning everyone, Steph Ackerman here with a pair of cards using some really pretty Dawn Ombre Ribbon.  At 1 1/2" wide, it is just the right size to decorate cards.  And can I say that ombre ribbon is lovely with it's varying colors.


Sometimes, you just need some pretty ribbon to finish up your cards.   While this card was pretty, the ribbon added a much needed touch of pizzazz around the panel.  To all some fullness, I tied another piece of ribbon around the knot.  Then a simple sentiment from So Suzy Stamps was attached to the ribbon.


My next card uses the same ribbon to dress up a butterfly card.  This time, I tied the ribbon to the card and placed the butterfly image on top.  A sentiment was then added to the upper right corner.


The Ribbons Unlimited Store carries such a wide variety of ribbons and colors, there is sure to be something for all your projects.

Thanks for stopping by today.  Have a wonderful day.


Graduation Gift Set by Nicole

Friday, June 5, 2015

Graduation season is here.  Since I work with the youth at church I had a graduation to celebrate this year.  Our local high school colors are black & yellow with white accents.  I used Black/White Polka Dot wired ribbon, Sheer Organdy ribbon in Apple Green, and Dazzle Ribbon in Ivory to decorate this gift bag.  


I added the Black/white polka dot ribbon through the holes in the bag and secured it on the inside with Helmar Fabric Glue.  Side note:  Between the depth of the holes in the bag and the wire in the ribbon the handles stood up on there own.  I love the look and height it creates to the finished bag.  


The organdy ribbon I used to make leaves.  I brushed Helmar Stiffener & Draping Liquid to lengths of the ribbon with a foam brush.  Fully saturate the ribbon and let dry.  


After a couple of hours the glue dries and the ribbon becomes stiff and you can carefully peel away from the paper plate.  
The stiffener makes the ribbon stiff, but it also allows you to cut the ribbon and keeps it from fraying.  I used a pair of fabric scissors and cut the ribbon in to leaf shapes.  

I glued these to the bag handle.  

I then took a length of the glitter ribbon to make my flower.  I threaded it onto a piece of wire to form the base.  

I formed the wire into a circle and twisted the wire onto the base cutting off the excess.  

I took another length of the glitter ribbon and began gluing it around itself to form the center making sure to cover the wire and inside.     

My finished flower.

I glued this on top of the leaves. Once finished I decided to add some depth to my flower with a yellow marker making the insides of the flower a little darker.  


Here is a look at the finished gift bag and card I gave to the graduate.  She loved it!

Thanks for stopping by the blog today.  
Happy Crafting, Nicole

Products used in this post:

All digital svgs are from digiplayground.com


Related Posts Plugin for WordPress, Blogger...