Showing posts with label Grosgrain. Show all posts

Cute Snowman Boxes! by Melissa Craig

Friday, November 20, 2015


Hi everyone!  It's Melissa and I am sharing one of my favorite things in the whole wide world.  Snowmen!!!  I am such a sucker for a snowman, so much so that I usually dedicate an entire week on my blog to snowman projects.  I'll do that in December.

But today I'm featuring Samantha Walker's Snowman Nesting Boxes.  What a great idea!  These boxes will nest inside each other for easy storage and then stack up to the cutest display.  Tuck little treats inside each box to give to someone special.  Instead of the paper scarf that comes in the file, I used Kiwi Grosgrain ribbon.  I meant to put ribbon around the base of the hat but got too excited to put this together that I had already glued on the holly leaves and berry when I realized my little piece of ribbon was still sitting on my table.  He's still super cute!

There are some wonderful ribbons in the store that will finish off any holiday project and it's time to get those projects in the making.  Thank you for stopping by!


No Sew Easy Sachets by Melissa Craig

Friday, September 18, 2015

Hi everyone, Melissa here.  I have a fun project to share with you that I hope you like as much as I do.  I found on Pintrest awhile back so different sachets, which of course led me down the You Tube path to watch whatever videos I could find - and though fabulous ideas, I thought they were just too... too - well, not sure what the word is.  Just too much for me.  I don't have a clue how to use hem tape or whatever it's called and Aleene's fabric tape is so expensive.  I got to thinking, these items don't go in the washing machine so why not just use a really strong double sided adhesive.  Here's what I created.


I picked up some inexpensive tea towel material at JoAnn Fabrics, as well as some mesh type fabric to hold the lavender buds.  I cut the fabric about 3 inches in width and just sort fussed with the length until I had a pocket the size I wanted.  I did the same with the mesh piece, sizing it to just a bit smaller - filled it with lavender buds and then closed it off.  I then stuffed it inside the pocket and sealed it up as well.

Let's talk decoration...


This one uses French Wired ribbon - Porcelain Blue, Solid Grosgrain ribbon - Jasmine Green, and Grosgrain Dazzle ribbon - Light Pink.  To create the blue flower, I removed the wire from a length of ribbon and cut it using a die from MFT stamps.  Be sure to have a lighter on hand to heat the edges as best as possible to minimize fraying.  I free-hand cut the ribbon for the leaves.  Then I made little roses from the pink ribbon.  I hot glued all the embellishments onto the sachet.


For this one I used a left over piece of the ribbon I had layered for the wedding card and box I shared about a month ago.  I layered the Dazzle ribbon - Light Pink over a length of Double Ruffle ribbon - White.  I used these ribbons to cover the flap on the sachet and then made a rose and leaves out of felt.


Lastly, I created this embellishment using the Country Check ribbon - Light Blue.  I cut a length that is approximately 8 inches and wove a needle and thread along one edge.  I then pulled on the thread to gather the ribbon.  I hot glued it onto the sachet and added a button.  Then I made a little bow using some natural twine and glued it on.  It sort of looks like a sun-bonnet.

Thank you so much for visiting the blog today and I hope my project inspires you to create something simple and sweet - these would be perfect for little gifts!  And you don't have to use lavender buds.  You could use those dryer pellets.  Tuck these into your dresser drawers and linen closets to keep everything smelling fresh.  Personally, I'm adding some to my daughter's smelly dance bag!


Throw pillow by Nicole

Friday, July 3, 2015

Nicole here on the blog today to share a throw pillow I made accented with ribbon.  I've been meaning to make a throw pillow for my sis for awhile.  When this pink ribbon came in my box I knew it was the perfect time since pink and black were her wedding colors.  


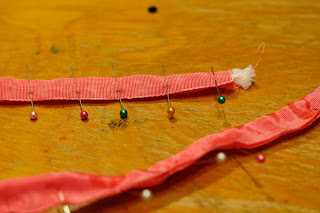
I started by making piping with cording and hot pink ribbon.  The cording I found at the craft store in the upholstery findings.  


I cut enough of the cording to go around my pillow and then made it just a tad bit longer.  Now you'll take the cording and place it in the middle of the ribbon and pin it closed.  

Once the length is pinned I did a simple straight stitch down the length of the ribbon.


Now I cut a piece of drop cloth material big enough to fit my pillow top.  The finished piping I pinned around the edges of the drop cloth being careful around the corners.    

Attach with another pass through the sewing machine.
Now to embellish that pillow top.  I used my Silhouette Cameo to cut a piece of vinyl.  Once cut I carefully laid the design on the center of my pillow top.  

The vinyl was giving me grief since I didn't get it to lay flat and it was bubbling slightly around the edges of the hearts.  To make sure the paint didn't bleed under the edges of vinyl I used a foam brush to add the black acrylic paint in an up and down motion.    
Once the paint dried I removed the vinyl and also cut three of the hearts out with a pair of fabric scissors.   

These hearts I filled with the patterned ribbon.  I took pieces of drop cloth and traced the heart shapes with a pencil.  These are going to be my base to which I attach the ribbon and and will also be placed behind the cutouts.  

Using Helmar Fabric Glue I attached all the ribbon over the top of the hearts.  
I then pinned them in place and added more glue around each of the openings on the back to secure them in place.  


Once all the glue was dry I added some sewing details with pink embroidery floss.  


I then finished off my pillow by sewing two smaller pieces of drop cloth material to form a envelope cover.  


Here is another look at the finished pillow.


Thanks so much for stopping by the blog today.

Ribbons used in this project:


All digital SVG files from digiplayground.com


Ribbon Winter Wreath by Grace

Wednesday, January 7, 2015

 Hello ribbon friends. Today I’d like to share with you a very fun way to showcase some of your favorite trims in a home décor project. Winter is just around the corner and so why not celebrate it with a winter themed wreath. The best part of this project is it doesn’t need adhesive.


Instructions:

Gather your supplies. Because this is a winter themed project, I pulled mostly blue trims with the exception of the Dazzle Ivory and the Edinburgh trim. I didn’t want it to look so monotonous so I added those two to spice it up a bit. I also used different shades of blue so my wreath wouldn’t look too predictable. 

Plan a pattern of the ribbons on your wreath and start tying them down. I used a double knot on the project to make sure that my trims won’t unravel on me. 

Repeat the process until you’ve reached your pattern. Once you’re pleased with the pattern, repeat it until you have filled up the entire wreath with ribbon. This might take a while. I did this project while watching some TV. 

Once you’ve filled up your wreath with ribbon, Cut a 12” ribbon (of your choice) wrap around the wreath and tie the ends. Add a bow on one side and this will be your piece that will allow you to hang up your wreath. 

And here are some more details of my project….


I really liked how this turned out. The cuts are all different lending to a homemade feel plus the colors will definitely bring cheer to those cold wintery days ahead of us.
If you have scraps, like I did, make sure to save them for other crafty projects such as what I did with the cards I shared earlier this month.

Thank you for stopping by.
-Grace 

Supplies Used:
Dazzle ribbon, Ivory, 7/8”, Ribbons Unlimited Inc.
Ombre wired, Sky Blue, 1 ½”, Ribbons Unlimited Inc.
Country check, Royal, 5/8”, Ribbons Unlimited Inc.
Edinburgh, Dress Stewart, 1”, Ribbons Unlimited Inc.
Grosgrain, Copen, 3/8”, Ribbons Unlimited Inc.
Foam wreath- Styrofoam
Scissors


Christmas card with ribbon scraps - Grace

Friday, December 12, 2014

Hello there friends. Today I’d like to share a super easy card design that can be mass produced for your holiday greetings. It’s also a great way to use up ribbon scraps. 

Instructions:
Gather your supplies. I will show you on a different blog post where all my ribbon scraps came from but for now, you can see all sorts of widths and lengths of ribbon in the mix. This design is also very useful to use up tools such as embossing folder, die and glitter glue. 

Create your card base from whatever cardstock you prefer. I made mine from white cardstock to measure 4 ¼ x 5 ½”. I then cut a 4 x 5 ¼” piece of white cardstock and ran them through my Cuttlebug using the Swiss dot embossing folder.

Next, I used a gold shimmer cardstock to cut my Christmas tree die from. I ran it through my die cut machine twice to make that all of the detail cuts were made. 

After that, I assembled the card. I picked out a pattern paper with red and green strips on it as a border and laid out how I want my ribbon scraps to go under the pattern paper strip. I then cut notches on each one and adhered to a ¾” strip of pattern paper. 

I first adhered my embossed background onto the card then my red strip with ribbon scraps under it; Followed by the die cut Christmas tree. To add some more texture, I filled the star top of the die with glitter glue. 

Here are some more close ups of the cards….


 I hope this inspired you to add some ribbon scraps to your next project. Thank you for stopping by.

-Grace
Supplies Used:
Dazzle ribbon, Ivory, 7/8”, Ribbons Unlimited Inc.
Country check, Royal, 5/8”, Ribbons Unlimited Inc.
Edinburgh, Dress Stewart, 1”, Ribbons Unlimited Inc.
Grosgrain, Copen, 3/8”, Ribbons Unlimited Inc.
Cardstock- (white) Walmart; (gold shimmer) Worldwin Cardstock
Pattern paper- Bazzill
Die- Die Versions

Glitter glue- Studio G, Hampton Arts


Related Posts Plugin for WordPress, Blogger...