Gift Card Holders with Pinky!

Wednesday, April 30, 2014

Hey there friends, 

Everyone has envelopes and we just toss them, so why not cover them 
up and make them pretty turning them into something useful!
I took some Metallic Envelopes and made them into 
gift card holders. Here let me share how I created them. 
Fold envelopes in half. 
 Stitch up the sides with sewing machine.
 Trim off threads. 
 Stamp front of gift card holder. 
adhere embellishments., decorate any way you like!
You could cover them with paper if they were written on- or use that 
for a vintage style background. Just spritz with some color and start creating.

I hope you enjoyed my ideas today. I had so much fun making them. 
Until next time- keep on creating!!
Envelope A7, Avocado Arts A Mother's Love Stamps, Ribbons,
vintage buttons, sewing machine. 


Forever Friends Wine Tag by Crystal

Friday, April 25, 2014

Hello Ribbons Unlimited Friends!
It's Crystal here with a cute wine tag using the Ombre 1 1/2" ribbon in Pumpkin , this ribbon is so pretty, I had to make a wine tag with it using my Prima doll stamp.
wine tag RU 4-25 008 - Copy
I first stamped a script background stamp on tan card stock  then I stamped my doll.  I am going to paper piece her dress so I stamped her dress on a small print designer paper from a 6x6 paper pad.   I colored the skin and headband and shoes and hair with colic markers.
wine tag RU 4-25 002 - Copy
I shaded the dress with copics ( doing this will really add to your paper piecing , it take it to the next level of OOOOhh ) and then shaded the outer edge of my dress , I do this so if I don't cut it out just perfect you wont be able to tell, it will blend right in with the dress!  Next, fussy cut the doll and dress and then glue the dress on our doll.
wine tag RU 4-25 003 - Copy
For my tag base I am using the Prima tags, I get it ready by stenciling with embossing paste and yellow stickle mixed and stencil on small scattered stars. I stencil with Tim Holtz blenders and Stamping Up Coastal Cabana and Calypso Coral ink  and an open circle stencil , I ink the edges with Walnut distress. I sprinkle on  shabby white embossing enamel and heat from the back side to melt then add die cut floral swirls and die cut some spiral roses from left over script tan paper and color spray then peach and sponge walnut distress on them. I add my Ribbon by threading the end thru the hole from back side so I have a loop to put over the wine bottle neck and tie in a bow and angle the tails , this ribbon as a thin wire edge so the bow will stay perky and beautiful
wine tag RU 4-25 004 - Copy
This is a close up of the Stampendous shabby embossing enamel 
( my local scrap booking store ordered this in for me )
wine tag RU 4-25 005 - Copy
I added some small glitter dots to the tag here and there too
wine tag RU 4-25 008 - Copywine tag RU 4-25 009 - Copywine tag RU 4-25 010wine tag RU 4-25 011wine tag RU 4-25 014wine tag RU 4-25 015
I really love playing with these paper dolls! This tag will make an awesome addition to a bottle of wine or 2  liter soda for a dear friend.  The Ombre Ribbon comes in many colors and can be found in the Ribbons Unlimited Store . I hope you were inspired and will come back to visit again, until then I hope you get to create something that makes you smile : )
Crystal Lopez – Design Team member for Ribbons Unlimited
crystal_lopez_bio_pic


DIY Ribbon Lei with Penga!

Wednesday, April 23, 2014

Penga is with us today to share a fabulous DIY Ribbon Lei!  These Ribbon Lei's are wonderful for many occasions, even the upcoming graduation events!  Here's Penga to tell you 

Eager to test out the ribbon-lei-making-method from Sak's mom, I added a small bead to the bottom of my really-long-thread as an anchor.  In retrospect, if one was planning on making a heavy-duty lei-to-last-a-lifetime, stronger thread (or even embroidery floss?) might work better. I have a feeling if you tugged on the lei hard enough, the thread would break and destroy all your hard work. Not that this has happened to me *yet*.

Continuing on, layer the 1/4" ribbon on top of the wider one, but keep it to one side.  Then do a simple running stitch down the length, as close to the edge as possible.

You can see that when you pull the string now, it will tighten the ribbon and create...a ruffly loop!

See where this is going? Just continue stitching up...


And scrunching down...

Until your lei is long enough!


I love this style, don't you? It's a little more sophisticated than the ribbon-loop version, however it takes much, much longer.  If you have a long running stitch setting on your sewing machine, it would be much faster than hand-sewing.

Breakdown:
~10 yards 1.5" ribbon 

~10 yards 1/4" ribbon

I plan to give this lei to my cousin since he's graduating from high school in a couple weeks. 

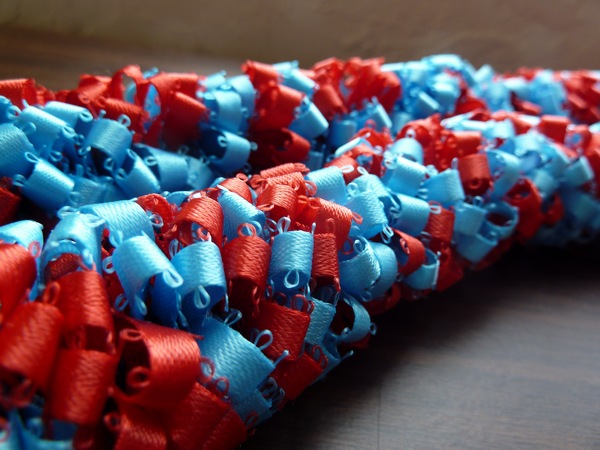
And just to show you what the first method looks like with two colors, here's another lei I made for a family friend of ours, graduating from my own high school alma mater:

I used the same method, alternating between two loops of red and two loops of blue to get the colors to bundle together.

And that's it for the graduation leis! Next year I will most likely return to this subject in overdrive, since that seems to be the big year for many of our relatives.


Card set with Animal print ribbons by Grace Tolman

Friday, April 18, 2014

Hello Ribbon’s Unlimited Inc. friends. Today I’m sharing a card set that I had created inspired by some of the fantastic animal print trims Ribbon’s Unlimited Inc. offers.
I wanted the ribbons and its design to stand out so I opted for a plain (but texturized) background and added a few stickers just to complete the sentiment.

Instructions:
1. Gather your supplies. I started with three white card base, picked some cardstock that will coordinate well with my ribbons, a sticker sheet to match the theme, buttons, twine and an embossing folder.
2. First I cut the cardstock pieces 1/8” smaller than the card base (my card base are A2 sized which is 4 ¼ x 5 ½”) I ran all of them through my Cuttlebug with a striped background embossing folder from Darice. The striped background reminded me of the lines on a cage that we normally see in a zoo.
3. Next I adhered the cardstocks on the card bases and then matched them with the ribbons that I had. 

4. I then cut a slit on the bottom fold of the card so that the ribbons can slip through it to be adhered on the inside of the card. I also tied two buttons around the trims with twine.
5. I layered some stickers, another button with twine and a sentiment on the top of the page to finish off the cards.
I kept the design of the cards pretty similar to one another which made creating this set super easy and fast.

Here’s another look at the individual cards… 


So there you have it. Who says that you can’t have fun with animal prints? With these cards, you can help but get a little ‘wild’!

Happy Creating,
Grace

Supplies Used:
Cardstock- WorldWin Papers, Bazzill
Stickers- (sentiments) SRM Stickers; (others) SEI
Buttons- Foo fala
Twine- Doodlebug Design Inc.
Embossing Folder- Darice
Scallop die- Spellbinders

Frame punch- EK Success


Related Posts Plugin for WordPress, Blogger...