Showing posts with label Ribbons. Show all posts

1 Month Baby Layout - Jamie

Sunday, November 29, 2015

Hi everyone!

Jamie here, and today I would like to share this layout of my youngest daughter Harmony.


The blue butterfly background was cut down to size and then I cut the title out with my silhouette. I placed my 2" wide Coral Nylvalour Velvet Ribbon under the title and put the background title paper on pop dots.


I cut the hearts out and added them in place as well as the little banner. I finished the layout off with a wood veneer heart next to the heart at the bottom and added my journaling in white gel pen. I hope you enjoyed looking at my layout today!


Thanks for stoppin' by and have a wonderful day!


Cute Snowman Boxes! by Melissa Craig

Friday, November 20, 2015


Hi everyone!  It's Melissa and I am sharing one of my favorite things in the whole wide world.  Snowmen!!!  I am such a sucker for a snowman, so much so that I usually dedicate an entire week on my blog to snowman projects.  I'll do that in December.

But today I'm featuring Samantha Walker's Snowman Nesting Boxes.  What a great idea!  These boxes will nest inside each other for easy storage and then stack up to the cutest display.  Tuck little treats inside each box to give to someone special.  Instead of the paper scarf that comes in the file, I used Kiwi Grosgrain ribbon.  I meant to put ribbon around the base of the hat but got too excited to put this together that I had already glued on the holly leaves and berry when I realized my little piece of ribbon was still sitting on my table.  He's still super cute!

There are some wonderful ribbons in the store that will finish off any holiday project and it's time to get those projects in the making.  Thank you for stopping by!


Decorative Fall Basket with Steph!

Friday, November 13, 2015

Good morning everyone, Steph Ackerman here today with a Fall basket that I've taken from drab to fab thanks to some pretty ribbons from Ribbons Unlimited.

I've added ribbon to the handle and edge of the basket then attached a ribbon bow.


This is the original basket - pretty but plain.


I placed fabric glue along the edge of the basket and adhered  Cream Nylvalour Ribbon.  Then, I placed it along the handle of the basket.  At 3/16" wide, it fit perfectly along the edge and the handle as a perfect accent. 


I created a bow using Soft Moss Lyon French Wired Ribbon.  This pretty ribbon appears almost two toned when turned into a bow.


And there it is a very quick and easy way to dress up a basket.

Thanks for stopping by today.

Steph


Pumpkins! by Melissa Craig

Friday, October 16, 2015


Good Morning!  Melissa here with a fun project that is cute and so easy to make!

I like Pinterest like a lot of us do.  There are some pretty great ideas on there and it can be a wonderful source of inspiration.  I was just perusing some pictures on there when I came across these pretty pumpkins someone made out of scrap pieces of wood.  You can find it here.  Well, I'm a papercrafter - not a woodcrafter, but I really wanted to make these so I set off to do my version.

Using a cut file by Lori Whitlock for the boxes and the stem from a different cut file, I created my pieces.  Inked the edges with Spiced Marmalade distress ink.  I then glued these boxes together to create my pumpkins.  I found a pretty fall foliage bunch at that Dollar Store that I cut apart to add to the top and then finished off with Double Face Satin Ribbon - Copper.


I love how these turned out and now they look fantastic on my desk at work.  My son saw them and said "those are Minecraft pumpkins!"

Thank you for stopping by and please feel free to visit me at my blog.


Sparkle Journal by Steph

Friday, October 9, 2015

Good morning everyone, Steph Ackerman here today with an altered journal.


This journal was kind of bland so I covered it with cardstock, added die cuts, a stamped phrase to the center and some rhinestones.  A bland journal turns into a pretty journal. 


Journals are a fun way to use ribbon - tie the ribbon to the rings or completely cover the rings and tie a ribbon as I've done.  And using a wired ribbon means the ribbon holds it's shape.  I've used Four Seasons Wired Sheer Ribbon in Champagne.

Thanks for stopping by today.

Steph


Back to the basics by Nicole

Saturday, October 3, 2015

Hello everyone!  Nicole here on the blog today.  Scrapbooking.  So I've been at it for over 10 years now.  I've gone through all kinds of fads and tried to keep up with the latest and greatest.  Lately though I've started trying to get back to the most important things:  the pictures and words.  As much as I like my layers and all the embellishments I also like this simple layout where a piece of ribbon and some buttons are my only embellishing.


I started this layout in Photoshop where I pulled in my photos, typed my title and journaling, and then added some "ribbon".  

Once I was happy with the placement I removed my photos and "ribbon" and printed the text onto white textured card stock.  


I used the wired satin ribbon in Sable and folded it in half to notch the end with some fabric scissors.  I used a little bit of clear glue on both ends to keep the edges from fraying and leave a clean finish.  To attach to my layout I used double sided adhesive. The small finishing touches are some buttons and a little date tag.   

Here is another look at my finished layout.  I'm really happy with the results and love that the pictures and text take center stage while the ribbon and buttons add just a small textile touch.  


The best part of putting together this layout was knowing this moment was recorded and these sweet pictures of my youngest are printed and off the computer. 

Thanks for stopping by the blog today.  Happy Crafting, Nicole

Ribbon used on this project:


Ribbon Bookmark by Jamie L.

Friday, September 25, 2015

Hey everyone, 

Jamie here, and today I'd like to share a ribbon bookmark. 


For this project all you really need is ribbon, scissors, a button, an elastic hair tie, needle & thread (or a sewing machine), and hot glue & hot glue gun (optional).

I used 5/8" red wired satin ribbon and 11/2" navy blue mini stars wired ribbon. 
This bookmark is such an easy project. If I hadn't hand stitched it probably would have only taken 15 mins. My hand stitching skills used to be decent, but I haven't hand stitched in quite awhile. My stitching was less than beautiful, so I hot glued red ribbon over it and it looks pretty good now!


Let me give you the easy steps real quick... 
1. Cut ribbon to size (size depends on book... measure around and have a gap between the ends of about 2 - 3 inches.

2. place elastic band on one edge about an inch in and fold ribbon over the elastic.
3. stitch the end of the ribbon thats folded over the elastic making a loop out of the ribbon that traps the elastic in.
4. on the other end of the ribbon sew on a button. DONE!


 (optional steps if you want to clean up the edges)

5. fold back the ribbon edge the button is on toward the inside and hot glue down.
6 wrap a different ribbon over the stitches from the elastic.


I hope you guys enjoy this project and give it a go yourself.


Thanks for stoppin' by and have a great day!


Sweet Treat Containers

Friday, September 11, 2015

There's nothing like using ribbons to finish a project.  And Ribbons Unlimited has some lovely ribbons to choose from.  Hi everyone, Steph Ackerman here today with a cute little metal caddy which I thought would be fun to turn into a sweet treat container.


I decided to  frost the glasses, so I used dip 'n etch from Etchall.  This product allows you to etch glass in just 15 minutes.  So while I waited for the glasses to etch, I decided to change the color of my caddy from white to blue to match the ribbon I wanted to use.  I simply white washed the caddy with Ann Butler Iridescents in Lagoon, letting some of the white caddy show.

Using Four Seasons Wired Ribbon in Aqua, I tied the ribbon around the necks of the bottles.  Then I tied additional ribbon about the handles of the caddy.


I think this made for a perfect candy dispenser.  It sits on my desk and when I need a sweet snack - there it is.


Thanks for stopping by today.

Steph


Initial Door 'Wreath" by Nicole

Friday, September 4, 2015

Nicole on the blog today.  I've made quite a few door wreaths over the years.  Pretty much all were for a holiday or season and I actually don't have one that is for the everyday.  That is what I'm going to show you today is how I made my new "wreath" that is hanging on my front door.  I used French Wired Ribbon in Porcelain Blue as an accent and a hanger.


I started by making a template cut from card stock and used that to trace onto three pieces of chipboard.
I cut out three since the chipboard I had on hand wasn't very thick.  I then glued these three together to make the base nice and thick.  Now I gathered a few more supplies:  a dowel, book paper, and glue.

I started rolling the book paper on the dowel and gluing the edge.
Once glue has secured the edge, slide it off the dowel.  

Once you've made a good handful start laying them down and gluing to the chipboard.  

I worked in sections gluing down quite a few and then turning the chipboard over and cutting off the overhang with scissors.  

Here is the completed letter covered in rolled dictionary paper.

Next I started with a simple ribbon. 
 To get a full bow I cut another length of ribbon and slipped the length underneath this bow.  

Tie this in another bow the opposite direction of the bottom.  Clip the extra ribbon.  
I love using this ribbon technique when you I want something a little more full than just a simple bow. 
I finished with some card stock flowers that I attached using glue and foam adhesive.  


Here is another look at my finished initial hanging on my front door. 


Thanks for stopping by the blog today, Nicole


Flower SVG cut files by Jamie Cripps from digiplayground.com


Just For You by Steph

Friday, August 14, 2015

Good morning everyone, Steph Ackerman here with a pair of cards using some really pretty Dawn Ombre Ribbon.  At 1 1/2" wide, it is just the right size to decorate cards. 


I love the ombre effect and I wanted to showcase it in the center of my card. 


I die cut the center panel from the pattern paper, then added strips of ribbon to fill in the center.


Next, I die cut 2 smaller ovals and stamped a So Suzy sentiment in the center.  This really added a different effect to my card.


For my next card, I used the oval I die cut from the first card, adding it to a card that was first wrapped with the Dawn Ombre Ribbon.  A So Suzy sentiment was repeatedly stamped in the center.

Thanks for stopping by today.

Steph


Woven Wall Decor by Nicole

Friday, August 7, 2015

Hi all!  Nicole here for another home decor idea.  I recently have been adding to my gallery wall above my craft/office alcove that is just off the living room.  It's a big traffic area of our house and I hope that people when passing through look at my wall and not the mess that may be on the desk . . . I can hope right? ;)

Today I wanted to show you how I put together this fun wall decor piece that I'm still trying to decide where I want to hang on the above wall.  

I recently picked up a set of frames at our local discount store.  It kind of reminds me of a dollar store, but better and often has some great home decor items.  The set included three white frames and two 6x6 square decorative items that were made to overlap the frames to hang in a little boys room.  At first I thought I would toss them and then the crafter in me thought otherwise.  So glad I kept them. 


I started with a piece of chipboard (cut to fit the top of the "canvas") and this gorgeous satin wired ribbon in Sable.  


I cut eight lengths of ribbon that were about 1.5 - 2 inches longer than the width of the chipboard.  


I took each ribbon and laid it onto the chipboard and bent the ends over to the back and glued them down.  


The width allowed me to lay four lengths of ribbon side by side along the chipboard piece.  Here it is with those four lengths of ribbon and the ends firmly glued to the back of the chipboard.  


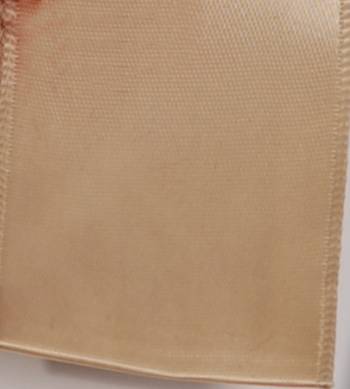
Now the other four pieces of ribbon you'll weave in and glue those ends onto the back.  Alternating each ribbon to create a checker board effect in the ribbon.  


The finished front and back.


I now glued the chipboard piece to the canvas piece with Helmar 450 Adhesive.


Press the chipboard into the glue and set aside to dry.  
As the finishing touch I cut with my silhouette word art from black glitter card stock.  

Because the woven top of the ribbon has a little dimension to it I attached the die cut words with Helmar Scrap Dots.  It raised the die cut just enough to stand out from the ribbon to make it pop.  

Here is the finished canvas.  


I love the woven background.  It adds so much interest to a little area and is so quick to put together.  This little canvas took about 30 minutes from start to finish.  What a change from that little dump truck right?!

I hope I inspired you to up cycle some of your own decor.  Thanks for stopping by the blog today.  


Ribbon used on this project:


SVG by Rivka Wilkins from digiplayground.com


Related Posts Plugin for WordPress, Blogger...