Altered Frame by Crystal

Friday, February 28, 2014

Hello Ribbons Unlimited, Inc. Friends!
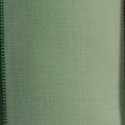
It's Crystal here and today we are going to vamp up a picture frame with ribbon from Ribbons Unlimited inc. and some handmade paper flowers. For this projects I used Ombre Wired - Grass green 1 1/2" ribbon.  This ribbon is so pretty and I love the dark to light ombre effect it has.  The ribbon adds so much interest and pop to your project!  
Let's get started ...
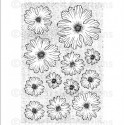
First I am making my paper flowers.  I stamp two pages of flowers , this stamp is set up as a background stamp  so this makes it easy!
(all products I used will be linked below at the bottom of this post)
Ribbons Unlimited  2-28-14 001 - Copy
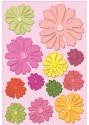
This is what it looks like stamped out.  I used pink cardstock and a rich razzleberry ink.
Ribbons Unlimited  2-28-14 002 - Copy
The die that cuts these out is set up the same as the stamp so its easy to line up and cut about a dozen different sized flowers at once! I cut two sheets worth of flowers to work with.
Ribbons Unlimited  2-28-14 003 - Copy
This is what it looks like when cut out...
Ribbons Unlimited  2-28-14 005 - Copy
Next I stack by flower size:
Ribbons Unlimited  2-28-14 006 - Copy
Then  I use a dabber and more razzelberry ink to
 ink the edges of the flowers and the centers...
Ribbons Unlimited  2-28-14 007
Next use a stylus and molding mat to shape the flowers.  Lay face down and rub every petal from the tip of petal and pull to center, this curls the petals.  Turn over face up and rub a circle in center this makes the flower take shape, then pinch each petal at the tips.
Ribbons Unlimited  2-28-14 010
Layer up the flowers!  
I make different sizes because no flowers all open the same or are the same size!
Ribbons Unlimited  2-28-14 012
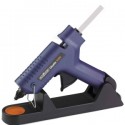
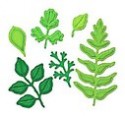
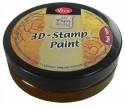
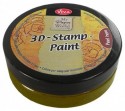
Next I use 3D paint in walnut on flowers and moss green on leaves.  I cut 8 and 7 inch strips of the ribbon and hot glue into a tailless bow shape:
Ribbons Unlimited  2-28-14 015
I then layout the flowers to see placement.   Once I determine that I have enough flowers for my 8"x10" frame, I cut a 24" piece of ribbon and start at corner and run down the bottom and up the side and twist and hot glue on the frame.  Next I angel the tails of the ribbon then hot glue on my leaves and bows and flowers.
Ribbons Unlimited  2-28-14 013
Here is the finished frame!  What do you think? 
The sweet model is my 8 yr old daughter Zoe's school picture
Ribbons Unlimited  2-28-14 016

Ribbons Unlimited  2-28-14 018

Ribbons Unlimited  2-28-14 019

Ribbons Unlimited  2-28-14 020
Look how pretty this ribbon is!  I am so going back to the Ribbons Unlimited Inc. store for more of this!  The Ombre Ribbon comes in several colors I am sure you can find just the right color for your projects.
Ribbons Unlimited  2-28-14 022
Thanks for stopping by!
 I hope this has inspired you to create something that makes you Smile : )
8upscrapin_Logocrystal_lopez_bio_pic


Shamrock Wreath by Jamie Cripps

Wednesday, February 26, 2014

Good Morning!  Jamie back with you today sharing a fun Shamrock Wreath I made using a few die cuts and some fabulous Emerald Grosgrain Swiss Dot Ribbon in 7/8" width 


Tutorial:
1.  Cut out the wreath base and the shamrocks from the Shamrock Wreath.  I cut five strips of shamrocks in the same color as my wreath base and the other three strips in a lighter shade of green.
2.  Bend each petal on the score lines provided then use glue dots to adhere the shamrocks to the wreath base.  
3.  Continue adding on the shamrocks until you get your desired look.  

4.  Cut out the two shamrock shapes from the Stitched Shamrock.  Thread your needle with twine and push it through the back of the top layer with holes near the stem.  Tape the twine in place.  Continue going in and out of the holes.
5.  You can single stitch so your shamrock looks similar to this image...
6. ...or go back through the holes that weren't stitched for a double-stitch look.
7.  When finished, tape of your twine behind the top layer.
8.  Add small foam adhesives as shown.
9.  Adhere the top layer on the larger mat piece then attach to the wreath and tie a bow using the Emerald Grosgrain Swiss Dot Ribbon in 7/8".  

Isn't it adorable!?  
to hang the wreath to my front door!

Thanks so much for stopping by today!


Scrapbook page with ribbon flair by Grace

Friday, February 21, 2014

Hello Ribbons Unlimited Inc. friends, Grace here to share with you how 
I incorporate ribbons to my scrapbook pages.

When I received these animal print ribbons, I knew exactly what page to create with it. What I found to be challenging was to find unusual ways to add the ribbons to the page. Thankfully, the variety of sizes and prints of the ribbon ignited some great ideas. Read on to see more how I created this page….


1. Create the scrapbook page foundation. Cut a white pattern paper into an 11” square and adhere to the center of the dark green paper. Add the three 4x3 photos to the center of the page.
2. Cut out the ribbons to fit the inside of the white paper and lay it horizontally on the page. Cut the widest ribbon’s edges into notches and adhere to the layout.

3. Add the same three ribbons on the top left edge of the page. Cut the edges into notches before adhering them.


4. To add some texture and layers to your page and ribbon, poke two holes on the ends of the longest ribbon. Attach brads through the holes.


5. Wrap some twine around the brads and tie the ends into a bow.


6. Cut out a handmade heart out of the wide zebra print ribbon. Add some fray check on the edge of the shape so that the ribbon threads don’t unravel. Add some pen stitching around a die cut circle, adhere to the top right edge of the page and add the heart ribbon using foam adhesive. Add the title.


7. Add a pattern paper like circle shape using ribbon. Cut out a scrap of circle from paper. Add adhesive all over the top of the paper. Add the strip of ribbon, making sure to match the pattern. Trim the excess. Add fray check to the edges of the cut so that the ribbon ends don’t fray.
8. Add some more embellishments and handwritten journaling.


I hope that my post today inspired you to pull out your favorite ribbons and add them to scrapbook pages. Find ways to incorporate them in the most unusual way. Happy creating!

Supplies Used:
Applegreen/blue chevron 7/8”, Ribbons Unlimited Inc.
LilacLeopard Grosgrain 5/8”, Ribbons Unlimited Inc.
Giraffe 7/8”, Ribbons Unlimited Inc.
Zebra festribbon 1 ½” , Ribbons Unlimited Inc.
Cardstock- WorldWin Papers
Pattern papers- (dark turquoise) BoBunny; (white) Creative Memories; (word/journaling strips) Elle’s Studio
Letter stickers- Thickers, American Crafts
Brads- My Mind’s Eye
Twine- The Twinery
Enamel dots- Doodlebug Design Inc.
Circle cutter- Creative Memories
Pen- Millennium, Zig
Others- Fray Check, Dritz

Doily- Doodlebug Design Inc. 

Ribbons Unlimited Inc. 2014 Design Team Member


Pin Cushions with Pinky!

Wednesday, February 19, 2014

Pillow Pin Cushion Tutorial by Pinky

Hey there RU friends, 
It's Pinky here today with a step by step tutorial on creating these
little Pillow Pin Cushions that are so handy to have around the house!
Even if you don't sew alot- it's nice to have safety pins or any pins handy. 
With the use of Ribbons Unlimited ribbon you can hang one anywhere!

Trim out 2 fabric pieces in 5"X5".
 Turn right sides in and stitch around edges- 
leaving a 2-3" hole to stuff on one corner.
 Flip Pillow Pin Cushion the right way.

 Stuff (I love to use old pillows for this!). 
 Place in the hole and stitch shut from the outside. 
Hand stitch bow created from
 Stitch a button in the middle to create pillow effect. 
 Now it's ready to hang or just stick your pins into!
I hope you enjoyed my mini sewing project today- 
Until next time- Keep on creating!

Products Used:
Samantha Walker Fabric, Blumenthal Lansing Button.


Related Posts Plugin for WordPress, Blogger...