Showing posts with label Organdy Delight. Show all posts

Painted Pumpkin with Crystal!

Friday, October 31, 2014

Hello Ribbons Unlimited fans !!

It's Crystal here and today I want to share a fun project using 
Ribbons Unlimited Organdy Ribbon!
I made ta cute pumpkin to put outside my front door to greet my guests .
I painted a pumpkin and added Ribbon and raffia to the top to create
a whimsical pumpkin that you could keep by the door thru Thanksgiving .

IMG_3345

IMG_3346

To make my pumpkin I used acrylic craft paint and free hand painted the face and leaves onto my pumpkin, no special prep other than wipe the surface clean , you can spray with clear spray paint when you are done but it is not needed (if you are going to paint and sell them spray a clear coat).

IMG_3333

IMG_3334

IMG_3335

IMG_3336

IMG_3337

After I have her painted up aI added my raffia bow and the made a huge 9 loop bow to the stem, I used 2 3/4" Organdy Ribbon in Blue Mist for her, it added the sparkle I wanted.

IMG_3339

IMG_3340

IMG_3341

IMG_3342

IMG_3343

IMG_3344

IMG_3345

IMG_3346

Thanks so much for stopping by , leave me some feed back if you loved this project ,
I love hearing from my scrappy computer friends who love getting crafty : )
Crystal Lopez – Design Team member for Ribbons Unlimited

crystal_lopez_bio_pic


Scrapbook Layout with Crystal

Friday, September 26, 2014

Hello Ribbons Unlimited Inc. fans !!
It's Crystal here and today I have made a scrapbook page layout and I used the oh so sheer  shimmery beautiful Organdy ribbon in Toffee 2 3/4" wide  from Ribbons Unlimited Inc. 's online store , I did something different for me today I took my layout outside in the sun to take my picture so you can really see the sheen this ribbon has , it will blow you away when you get it home and really see how beautiful it really it , pics sometimes do translate this but I tried my best for you to see it .


I started with black cardstock base and added a sheet of Heartfelt Creations  12 x 12 designer card stock and distressed the edges and tore some places and then ink the edges with Tim Holtz walnut stain ink , my picture I will add later is 4 *6 so I cut my black layer 4 1/4" * 6 1/4 " , my  purple flowers  ( two different shade of purple ) were cuts from the Silhouette store its called Silhouette Online Store 3D Chicago Peace Tea Rose  , I cut them ink the edges in a pearl and the spritz with water and mold them from the back side of the flower on a molding mat I used a 12 mm ball stylus to form them then I set aside and let them dry then after they are dry I layer them up with glue dots  ( I make my own , if you want to know how leave me a commit and I'll show on my Wed post )  , my white flowers are made with fringe scissors cut 1 " strips and fringe cut and roll up smash top down and you have a cool flower , my green leaves are a My Favorite Things die cut called large leafy flourish ,  the silver fern like leaves are from Spellbinders foliage set , I assemble all in place and then spritz with shimmer spray in a purple /blue I make myself  on the flowers and the page to add shimmer  splats. The bow is a four loop  and made with Organdy ribbon in Toffee 2 3/4" wide

ribbon layout 001 - Copy ribbon layout 002

ribbon layout 003

ribbon layout 004

ribbon layout 005
look at all the shimmer on this ribbon
ribbon layout 006
Thanks so much for stopping by , leave me some feed back if you loved this project , I love hearing from my scrappy computer friends who love getting crafty : )
Crystal Lopez – Design Team member for Ribbons Unlimited
crystal_lopez_bio_pic


Party Girl by Crystal

Wednesday, August 6, 2014

Hello Ribbons Unlimited Inc. fans!
It's Crystal here with a Birthday card I made for my granddaughter. Today I am using ribbon from Ribbons Unlimited Inc. and a Julie Nutting Prima stamp set called "Party Girl".  I totally love the big 7" doll stamps but theses smaller ones are perfect for cards.

For this card I am using  Lime Organdy 5/8" delight ribbon 

Ribbons Unlimited bday card 001
I stamped and colored a second balloon and popped it up and added glossy accents over it
Ribbons Unlimited bday card 002

Ribbons Unlimited bday card 003

Ribbons Unlimited bday card 004

Ribbons Unlimited bday card 005

Ribbons Unlimited bday card 007
inside my card I used  Lime Organdy 5/8" delight ribbon
Ribbons Unlimited bday card 006
Here is a look at my matching envelope:
Ribbons Unlimited bday card 008

I hope this project was inspiring and it  gets you to create something special with ribbon from Ribbons Unlimited Inc.
Thanks so much for stopping by! Please leave me some feed back if you loved this project, I love hearing from my scrappy computer friends who love getting crafty : )
Crystal Lopez – Design Team member for Ribbons Unlimited
crystal_lopez_bio_pic


Organdy Ribbon Roses by Crystal

Wednesday, February 5, 2014

Hello Ribbons Unlimited Friends!!
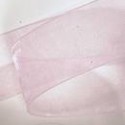
It's Crystal here with a tutorial on how to make roses out of Organdy  2 3/4" size ribbon! Ribbons Unlimited Inc. has a ton of colors so I am sure you will find the right color for your project.  If you follow my blog any at all you know I love making flowers and I will make them from anything that will hold still..lol. Today I am making these roses for hair clips, but again use your imagination as these can be added to anything to doll up your projects.
organdy roses 034
Lets get started
Take your ribbon and fold back and forth until you have 8 layers square 2-3/4 
(this doesn't have to be exact)
organdy roses 001
Your ribbon should look like this now...
organdy roses 002
Find the center and make starter hole with a piercing tool:
organdy roses 003
Then add a brad to center of the ribbons
organdy roses 004
Cut each layer apart so they are now single layers
organdy roses 005
Next make cuts from each corner to the center, do all four sides
organdy roses 008
Then twist the layers so they are all off-center and use your heat gun and carefully heat the ribbon and it will melt and curl (I use a heat gun and not lighter because the lighter will leave brown or black on light ribbon and with the heat gun you also have more control).  Do this until you have the desired look!
organdy roses 011
Your completed rose should look similar to this:
organdy roses 012
Here is the back side of the rose:
organdy roses 013
I also made a smaller one use half the width (folding it over) and only do 4 layers:
organdy roses 014
Cut in half and now you have 8 layers, add brad and make your cuts and heat
organdy roses 015
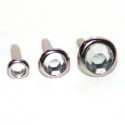
Here are my 3 flowers! 
Don't you just love how pretty these are? 
This Organdy ribbon has a beautiful shimmer to it...
organdy roses 018
To finish my flowers, I make loops for the leaves with the lime organdy delight 5/8" ribbon
organdy roses 019
organdy roses 022
Then I add felt circles to the back for a more finished look...
organdy roses 024
TIP ALERT: If you are making these for little baby's with fine hair add some of the No slip sheet  (found by the liners for the kitchen cabinets) to the inside of the clip now the flower will not slip on fine hair!
lipgloss tut 020
Now a look at my finished hair clips!
organdy roses 025

organdy roses 027

organdy roses 034
Thanks for stopping by the blog , I hope you learned something new to try with the amazing ribbon found at Ribbons Unlimited! Be sure to stop by the store and order some for those upcoming projects. 
Get scrappy and make something that makes you SMILE : )
8upscrapin_Logo


Related Posts Plugin for WordPress, Blogger...