Cheer Bow by Crystal

Wednesday, July 30, 2014

Hello Ribbons Unlimited Inc.  fans!

It's Crystal here back with a tutorial on how I solved a problem and created a Cheer Bow. 
A Cheer bow is typically 3" wide, but try to find ribbon that is 3" wide and it either cost a fortune or does not come in to many colors.  Grosgrain is the type of ribbon that is best for these bows as it has great body and holds its shape very well . So I am going to show you how to use 1-1/2" wide grosgrain ribbon to create a Cheer Bow by sewing it together!


So to start pick your colors, my daughter has a new outfit that is cameo so I am using a brown, black, and green ribbon of this bow: Ribbons Unlimited Inc has 4 pages of solid colored grosgrain ribbon in lots of colors, they also carry glittered and print grosgrain so go check it out!

Supplies used for this project are:
a small zip tie
a lighter to melt the edges
scissors
option shabby flower for center
scrap black felt
black hair pony tie

Cheer bow 005

Cut all 3 ribbons to 30" long, next set the black and brown side by side and lay the moss down the center, next we will zigzag over the top to sew the two pieces together and make a 3" wide piece with a contrast color down the center.

Cheer bow 002
Next we form the bow, find the center make the loops even...
Cheer bow 004

Grab the zip tie and wrap around center add the hair tie to back side of the bow and close the zip tie just tight enough to hold the bow in shape  but loose enough to make adjustments to the loops and tails until you get it just how you want it...
Cheer bow 006

Cheer bow 007

Cheer bow 008
With the scissors angle the bow tails and use the lighter to 
heat seal the edges this keeps the tails from fraying
Cheer bow 010

Next I try different centers, the first is a shabby center but 
then I chose to go a different route
Cheer bow 012
I took the brown and moss and tied a knot to make a center
Cheer bow 011
I chose to use the knot
Cheer bow 013
Next I glue the knot onto the bow on the back side and cover 
the glue with a felt square in black to hide the seam
Cheer bow 016
Here is my finished 3" wide Cheer bow!
Cheer bow 018
My model today is my daughter Zoe, the lighting in my scrap room was 
not the best so we went outside to take a few more pictures
Cheer bow 020
She is squinting because the sun is too bright for her lol oh the pains of being a model for your mom, but remember the bow is for her ...lol
Cheer bow 022

Cheer bow 023

Thank you Zoe for helping me today and I hope you find this tutorial helpful and you come up with your own creative Cheer Bow ideas.

I hope this project was inspiring and it  gets you to create something special with ribbon from Ribbons Unlimited Inc.  I will be back Wednesday with another great project to share with you
.
Thanks so much for stopping by, leave me some feed back if you loved this project, I love hearing from my scrappy computer friends who love getting crafty : )

Crystal Lopez – Design Team member for Ribbons Unlimited
crystal_lopez_bio_pic


Wedding Invites by Crystal

Friday, July 25, 2014

Hello Ribbons Unlimited fans!
It's Crystal here with an Elegant Wedding Invitation I recently made. I used the wired edge  1 1/2" Ombre Ribbon in Dark Plum ( **I have blocked the names to protect the people this was made for, thanks for understanding )
wedding invites 001

wedding invites 002
Here is a look at the backside of the invite:
wedding invites 005
My grey base is Bazzill in Rock Candy cut at 5" by 7" and I made the Ivory layer slightly smaller.  The invite was created on the computer by my husband ( we make a great team ) and I then took them to Staples to be printed and cut.  I used my own cardstock 110lb Ivory for the invite portion ( Staples doesn't carry this color and I wanted a very luxurious feel to this invite).  Next we took 8" silver foiled doilies and wrapped the invite and then made a belly band with the  wired edge  1 1/2" Ombre Ribbon in Dark Plum.  This ribbon is so elegant and rich, it was the perfect ribbon for this project .
wedding invites 004

wedding invites 003
We also made an RSVP insert and that envelope was in 
grey so when they stared pouring in they were easy to spot!
wedding invite dots challenge 001
I hope this project was inspiring and it  gets you to create something special with ribbon from Ribbons Unlimited Inc..  I will be back Wednesday with another great project to share with you .
Thanks so much for stopping by, leave me some feed back if you loved this project! I love hearing from my scrappy computer friends who love getting crafty : )
Crystal Lopez – Design Team member for Ribbons Unlimited
crystal_lopez_bio_pic


Woven Ribbon Tutorial by Jamie

Wednesday, July 23, 2014

Good Morning!  Jamie with you today to share a fun 
tutorial for creating a woven ribbon!  You can use the woven ribbon to create 
barrettes, headbands, bracelets or even as an embellishment for layouts or cards!

Today I am working with Ribbons Unlimited Inc.'s Double Faced Satin Ribbon in Copper in 1/4" width.  This tutorial will work with other ribbon types as well and you could even use two different colors of ribbon to change it up!

Here's the tutorial:
1.  Cut two pieces of ribbon of equal lengths.
2.  Place glue a little over an inch in on one of the ribbons.  Fold the end over to form about a 1/2" loop and adhere the end on the glue.
3.  Repeat the step for the other ribbon.  Your ribbons should look like this now.
4.  Slide one loop through the other.
5.  Next form a loop (bringing the ribbon up on itself) with the ribbon that you slid the other loop through.
6.  Push the loop through the loop that you slid through in step #4.
7.  Next form a loop with the second ribbon as you did above.
8.  Push that loop through the other loop.  Pulling the ribbons tight as you go.
 9-11. Continue forming loops and passing them through, alternating ribbons as you go.
12.  Continue until you have your desire lengths.  Trim your ribbon.
13.  Place glue under the braided ribbon end.
14.  Place glue under the second braided ribbon end. 
15.  Trim the ribbon ends.
16.  Hot glue the woven ribbon on your headband.
17.  Cut another piece of matching ribbon and tie in a bow around the headband.

Here's a look at the headband in hair!

Be sure to check out all of the ribbon selections HERE.
Thanks so much for stopping by today!


Ribbon Magnets with Grace!

Friday, July 18, 2014


Hi there ribbon friends. Grace here to share with you a very fun and easy way to use up your ribbon for home décor. Like it or not, magnets, especially those that we use on our refrigerator doors are very handy. And usually we just use the ones that we get free from our favorite auto mechanic shop or from our realtor. Well I’m here to share with you a fun and easy way to turn ribbon into magnets and make your refrigerator door’s most useful accessory stylish.

Instructions:
1.       Gather your supplies


2.       Mark a small circle from felt piece using a marker and a round shape template then cut it out.

3.       Dab some hot glue on one side of the felt circle and wrap some ribbon around it, folding it a few times to create the rosette effect. Repeat it until you’ve gone all the way around the felt piece. Trim the edge of the ribbon and tuck behind the folded ribbons for a finished look. Repeat again to create a second rosette over the first one.

4.       Attach a flair on the center of the rosette ribbon using more hot glue. Fold the ribbon, cut the ends into notches and hot glue it on the back of the ribbon.

5.       Repeat the process using the red ribbon.

6.       Hot glue a piece of magnet on the back side of the magnets.

Here’s a look at the finished project and some more details…


Thank you for joining me today and I hope I’ve inspired you to add some ribbon in your next home décor project.

Supplies Used:
Edinburgh, Dress Stewart, 1”, Ribbon’s Unlimited Inc.
Country Check, Red, 1”, Ribbon’s Unlimited Inc.
Flairs, Lawn Fawn

Others- Felt piece, Magnet strip, Hot glue gun and glue stick


Summertime Window Hanging "Surfs Up" by Pinky

Wednesday, July 16, 2014

Hey there it's Pinky today with a fun summery window hanging,
using the very cool and soft Ribbons Unlimited French Wired
Trim out patterned paper to coordinate with acrylic circle, 
Adhere to circle.

 Punch top and bottom holes. 
 Thread sun catcher using fishing line- then cover with bow using 
Ribbon in Light Yellow through top and hang. 
 The colors are perfect for summer!
Products Used:


Great Sunshine & Outdoors by Grace Tolman

Friday, July 11, 2014

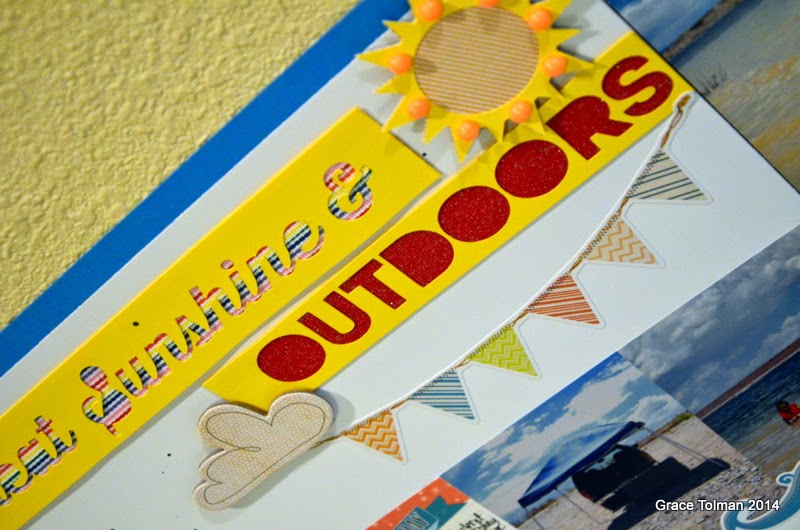
Hello ribbon friends. I love looking at trends and trying them out in my papercrafting. One of the big trends right now that I’m loving is using your diecut machine in creating one of a kind elements in your page. I’ve had a few die cut machines but my go to right now is the Cameo from Silhouette. Recently I played around with it and cut some Summer themed elements. I don’t like wastes so I kept the negative part of the cut. With the help of some ribbons from Ribbons Unlimited, I was able to make use of this negative cuts and bring an interesting texture to my title.


Instructions:
 1. Cut out two pieces of white cardstock measuring 11 x 11 ½” and adhere to the blue cardstock.

2. Cut out the negative title cuts and adhere ribbon behind the paper. I used my Xyron adhesive maker to make sure that the ribbon is well adhered on the back of the cardstock. Trim the ribbon.

3. Adhere the title block on the page. Adhere the rest of the elements. 
4. Cut out two long and two short strips from the same ribbon. Cut a notch on one side of each of them and adhere at two different places of the page. 
5. Handwrite your journaling and add the stickers and chipboard for embellishment. 

Here’s a look at the finished page and a few more detailed shots….


Thank you for joining me today and hope you’ll use your ribbons with the latest trends today.


Supplies Used:
#990 Dazzle Ribbon, Red, 7/8”, Ribbons Unlimited Inc.
Cardstock- WorldWin Papers Inc.
Journaling block- Echo Park
Stickers- Creative Memories
Chipboard shapes- Sources Unknown
Die cut- Cameo, Silhouette
Pen- (Black) Millennium, Zig
Mist- source unknown


Related Posts Plugin for WordPress, Blogger...