Embellishing Paper Clips with Ribbon

Wednesday, October 30, 2013

Good morning Ribbons Unlimited Fans - Christine joining you today!  I am always on the lookout for ways to use ribbon in new ways on my cards.  I was recently playing around with paper clips and came up with a simple and different way to incorporate ribbon!

Paperclips are trendy and easy to find...so why not find a way to incorporate them on a card!  I simply tied a knot at the top of mine and slid it over a ribbon strip on my card.  Think of the possibilities on this - you could do anything from cute to elegant depending on your ribbon choice and make use of it on layouts, tags, cards and more.  

What unique ways do you use ribbon on your cards?  We'd love to have you share some ideas with us on our facebook wall!

Ribbons Unlimited Supplies Used:


Ten Minute Headbands with Christine

Friday, October 25, 2013

Hi Ribbons Unlimited Fans!  Christine back with you today!  Do you remember that 6 year old that always loses hairbows (check out the five minute hairbow tutorial here)?  Well she loses headbands too!  Today I am going to show you a quick way to make a stylish headband!
Ten Minute Headband by Christine Meyer for Ribbons Unlimited

 All you need for supplies is ribbon and a traditional elastic rubber band!  Ribbons Unlimited has a great selection of ribbons from patterned, to glittery, to the always popular animal prints...you can definitely find what you are looking for!

Ten Minute Headband by Christine Meyer for Ribbons Unlimited

I used ribbon that was about 18 1/2 inches long....this will be dependent on the size of the head of your girl.  I then folded it over the rubber band about an inch and stitched back and forth.  I went 3 times each way to ensure it would hold well.  Do the same on the other side.  Then simply slide it on and you are done!  I made up a whole bunch of these and now she's got a bunch to match different outfits!

Ribbons Unlimited Supplies:


Hanging Frames with Jamie Cripps

Wednesday, October 23, 2013


Good morning Ribbons fans!  Jamie with you again today to share with you one of my little tricks for decorating for the Holidays.  We have several frames with photos hanging on our walls with single hooks so when it comes time to decorate for the Holidays I always try to find   framed art work that could hang in their place but the issue I find is that a lot have two hanging mechanisms on them.  Rather than placing another hole in the wall I am going to show you how to use our Satin Cord Ribbon to modify the hanging!


Our Satin Cord Ribbon is 2mm wide and it comes in 25 different colors making it easy to match to your frames and decor!  

1. Flip your frame over and measure the length between the two hanging mechanisms from their centers.  Take that measurement and add 6" then cut that length of cord.
2.  Start by placing the first end of the cord under a bracket then tie that in a double knot making sure you pull tightly.
3.  Place your second end under the remaining bracket and tie that end in a double knot as you did before.
4.  Pull the cord in the middle to secure your knots then use a matching double ruffled ribbon to tie a bow in the center then hang on your current hook!

Super easy and quick!
Thanks so much for stopping by today!


Holiday Card with Jill

Friday, October 18, 2013

Jill is joining us today with another amazing hand stamped Holiday card that she ties all together with our Black and White Polka Dot Ribbon!  Doesn't it just make the card pop!?
19

Our dotted ribbon is wired so it stays where you want it and comes in 1-1/2" width. 
 It uses our "Lyon" French Wired ribbon as a backdrop and is made in Germany.  
You can find our varieties HERE!


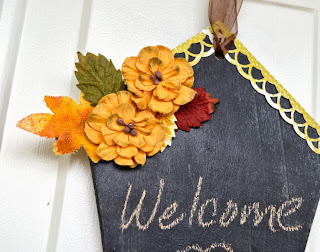
Welcome Fall Chalkboard by Pinky

Wednesday, October 16, 2013

Good morning Ribbons Unlimited friends, 

I know when you think of ribbons you probably don't jump to chalkboards!
BUT I am here to remind you that every project you create from that
scrapbook page to the seasonal home decor projects...ALL of them will rock
with some added ribbon! 

 I REALLY wanted to make a FALL home decor project
and when I saw this Ribbons Unlimited Chocolate Sheer Ribbon I knew it
would be perfect for this handmade chalboard I created. 
1. Paint wooden album page or wood plaque using Folk Art Chalkboard Paint. 
2. Create your canvas fall leaves using Smooch Spritz and ink (Stencil from Thickers). 
3. Trim paper paper to 4"X6.5". 
4. Layer patterned paper. 
5. Adhere canvas leaves.
6. Stitch through patterned paper pieces. (I just used my sewing machine)
7. Punch holes for ribbon on top of paper piece. 
8. Thread Ribbons Unlimited 7/8" Organdy Sheer Ribbon (Chocolate) through
top and sides of chalkboard piece, tie off and trim.
9. Create bow from Ribbons Unlimited 7/8" Organdy Sheer Ribbon (Chocolate).
10. Adhere to bottom of patterned paper pieces.
11. Add floral embellishments. 
That is all! Home decor perfect for any season you choose. 
Now I am off to SEW my next project! Cannot wait to share. 

Until next time- Keep on creating!!

Products Used:
Petaloo flowers, Linnie Blooms Canvas, Genuinely Jane Wood Album, Crate paper, Folk Art Chalkboard Paint


The PERFECT Halloween Accessory by Pinky

Friday, October 11, 2013

Good morning friends, 
It's just me Pinky here today with a new Halloween project and it would
not be possible without the incredible Ribbons Unlimited Ribbon!

Don't forget that Ribbon is perfect for not only your paper crafts
but jewelry, and Halloween costumes, as well as everything else.
 I used these Acrylic Bat Album pieces to create a necklace for a
Halloween costume that my friend requested. 
Her costume is not completed just yet but I wanted to share it.
 I overlapped each piece using the gorgeous 
 On the end bats I left it long to tie around the neck. Her costume
is all black and this sparkly addition will make it POP!

Even the ribbon on pearls would be simply amazing!
I hope you are inspired to create your own costumes using Ribbons Unlimited.
Until next time- keep on being creative!

Products Used:
Clear Scraps Mini Bat Album, Copper ultrafine glitter, spiderweb stamp, 


Merry and Bright with Jill Foster

Wednesday, October 9, 2013

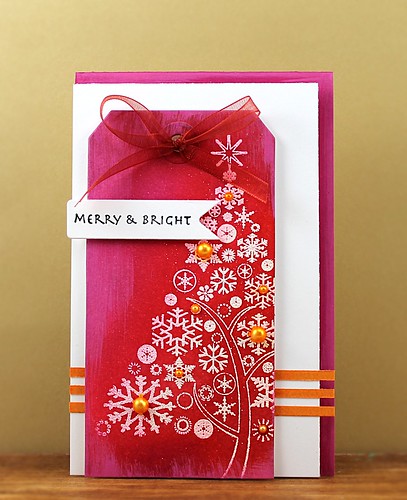
Jill is joining us today with a gorgeous Holiday card!  We love the bold and bright colors Jill selected for this card and she is using our Red Organdy Ribbon to tie it all together.   Our Organdy ribbon is an unwired sheer ribbon that has a monofilament edge sewn in to give it extra body!  The sheerness of the ribbon works perfectly with this card, allowing you to see all of the beautifully stamped and embossed tree!
11


Layering Ribbons with Jamie Cripps

Friday, October 4, 2013

 Happy Friday!  Jamie with you again today to share an easy layering tutorial that will change the look of your projects quickly!  

Let's start by showing you my before photo...


And now my after...


The ribbon adds a pop of color and really brings interest to the overall project!
The best part is that it really only took a few minutes to do!

Here is the tutorial:


1.  Cut the Four Seasons Wired Black 1-1/2" wide ribbon to your desired length then cut 5/8" wide Lime Delight Ribbon to the same length.
2.  Place a strip of adhesive tape in the center of the widest ribbon for the full length.  Remove the adhesive backing from the tape and then adhere your thinner ribbon to the center as shown.
3.  Punch a hole on each side of the tray and then push the ribbon through one end and tie a knot on the inside of the tray.  Push the ribbon through the other end to form a handle and knot in the same manner.
4.  Cut two strips of the thinner ribbon and tie around the handle on each side in a bow.

Super cute and super easy!
This layering would work for making bows of all sorts as well!

Thanks so much for stopping by today!


Weaving together a beautiful card by Christine

Wednesday, October 2, 2013

Happy October Everyone!  Christine, back with you today, sharing another weaving card!  I promised last week I would show you one that is different and I am here to do just that!

Last week I used the a wide white organdy but this week I used a Delight Satin Edge Ribbon in black that is just 5/8" wide.  It is a little more challenging to weave and keep things straight...but in the end it worked!
If you look closely you can see that I used it in my circle.  

To create this look, I traced almost a whole circle on the edge of my card and cut that out.  I weaved my ribbon onto a rectangle piece of black cardstock that would fit behind the circle.  Once done, I attached it with strong wet adhesive and set in under a book to flatten it out.

This technique is fairly new to me, especially with ribbon, but is one that I plan to use again to add texture and sophistication to my projects!  

Ribbons Unlimited Supplies Used:


Related Posts Plugin for WordPress, Blogger...