Happy Birthday Box with Jamie

Friday, August 30, 2013

Happy Friday!  Jamie back today using the beautiful 7/8" Orange-Hot Pink Chevron Ribbon with a fun gift box that comes with ribbon slots already built into the lid making this gift easy to open and close! 
Here's the tutorial:
  1.  Cut out all your pieces from your Happy Birthday Box and fold on the score lines.
  2.  Starting with the box base, add adhesive on the four tabs.
  3.  Adhere the tabs to the box sides. 
  4.  Next grab your lid and place adhesive around the lettering.
  5.  Adhere the decorative mat on the inside to give the lettering color.
  6.  Continue doing this until all the sides are covered.  You can use different colors for the decorative mats too!
  7.  Place adhesive on the four tabs as shown.
  8.  Adhere the tabs to the box sides.
  9.  Bring your 7/8" Orange-Hot Pink Chevron ribbon up through one of the long sides
10. Then back down through the opposite slit.
11. Cross the ribbon in the center of the box on the inside and then insert each end up through the side slots as shown.
12. Tie the ribbon in a bow on top of the box and then add in a twine bow.
13.  Place your goodies in the box then place the lid over the box bottom
14. Then push into place.


Hello Card and Flower Tutorial by Jamie Cripps

Wednesday, August 28, 2013

Good morning!  Can you believe we are almost at the end of August?  Crazy.  It's Jamie back with you today sharing a bright and cheerful card and a tutorial so you can recreate it too!


For this card I am using the Citron Velvet Nylvalour 7/8" and

Here is the tutorial:
1.  Cut a 6" piece of the Hot Pink Double Ruffle Ribbon
2.  Cut a 22" piece of the Citron Velvet Nylvalour 
3.  Tie a knot with the Hot Pink Double Ruffle around the Citron Velvet ribbon as shown.
4.  Trim off the ends of both ribbons so you only have the knot remaining.  This will be the center of our flower.
5.  Use a 2" Gluber (you can also use label paper or hot glue) and place the knot in the center.
6.  Begin wrapping the ribbon around itself, twisting slightly as you go but make sure you have the velvet facing up at all times.
7.  Your flower should look like this when finished.
8.  Next gather your supplies for your card.  I have two pattern papers, a card base and another 30" piece of the hot pink ribbon.
9.  Cut your main pattern paper to 4"x 5" then tie a bow around the center.
10. Next adhere your flower to the right side of the bow as shown.
11. Cut a 4" x 1-1/4" strip from your second patterned paper and punch the edge with a border punch.  Add adhesive to the top portion.
12.  Glue the piece under the bottom of the main pattern paper.
13.  Then glue the piece on to the front of the card base.
14.  Next add foam adhesive to the back of the wood veneer sentiment.
15.  Then add it to the card near the knot of the hot pink bow.
16.  Your finished card should look similar to this!


I love the texture and look of the Velvet Nylvalour for the flower!

Thanks so much for stopping by!


Ribbon Flower Sash and Flower Tutorial by Christine Meyer

Friday, August 23, 2013

Hi Ribbons Unlimited Fans, Christine with you today to share a sophisticated ribbon project!  Stephanie Smokovich, the owner of Bella Blvd, recently got married.  She shared on her blog these gorgeous sashes that she created for her bridesmaids and I was completely inspired by them!  So much so that I wanted to try my hand a creating one.  Before I go any further, let me share with you her original post, no doubt you'll be inspired too!  
I created this one with the plan to use it with either a white or black dress.  When I saw this lovely young lady at church, I knew her dress would be a perfect match (and then begged her to be my model, Thanks Jen!).  I love that it can jazz up a little black dress and make it wedding appropriate or just something a little more special.  

I went with a fairly neutral color palette but imagine the possibilities with some bright and bold colors!  You could really jazz up an outfit or add a pop of color to something plain.

For the back I just tied a simple flowing bow.  The organdy ribbon works beautifully for this!

Here's a close-up of the flowers.  They are created using organdy ribbon, a little frayed linen, and a round epiphany crafts epoxy dot (handmade to match the flowers).  Now for the nitty gritty on how I created the main part of the flower.

I cut a twelve inch piece of the ribbon and then did a simple running stitch thru the entire piece.  I used a coordinating color when doing this but to make the tutorial I used pink (so it would be easier for you to see).

I gathered it all together on my needle.

Then pull the thread all the way thru.

Once you let go it will look like one big gathered ruffle.

Tie the two ends of the thread together tightly with a double knot.

Trim your threads and then flatten out all the ruffles.  Quick, easy, and striking.  And best of all it doesn't take long at all!  I have used these flowers on headbands, hair clips, and now a sash.  All you have to do is add something to the center (rhinestones work great too) and stitch it on to the item you are creating.

We'd love to see your version if you create one!
Share it with us on the Ribbons Unlimited Facebook Wall.

Supplies Used:


Beach Photo Wall Hanging by Pinky

Wednesday, August 21, 2013

Hi there Ribbons Unlimited friends,
Pinky here today with a beautiful beach photo wall hanging
I created using a simple 3" paper mache box from Michaels


 I simply covered the box in Bo Bunny paper- then cut out a 2 1/8" hole 
into the lid so the photo would show through. 
After that I added the ribbon and punch a hole in the bottom to thread a 
suncatcher into it. Then added embellishments. 
It took a little time with the balance but after that it was good to go
and the spearmint ribbon was a beautiful accent and match for the beachy project!

I hope you were inspired to craft today.
Until next time- keep on creating!

Ribbons Unlimited products used:


Live, Love, Laugh Tag by Jill Foster

Friday, August 16, 2013

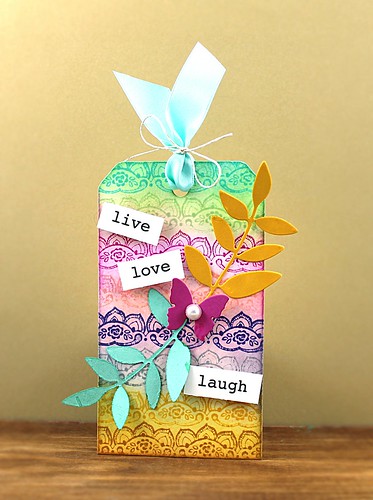
Happy Friday!  Jill is with us again this week with an inspiring tag that is sure to brighten your day!  We love Jill's color combinations and the Sea Foam Double-Face Satin Ribbon really ties everything together!

IMG_0867


We'd love to have you swing by the store to check out our entire selection of ribbons!   We offer wholesale pricing with just a $25 minimum order! Just click HERE to see more.

You can also join us on Facebook and Pinterest!


Hello Sunshine Card with Jill Foster

Wednesday, August 14, 2013


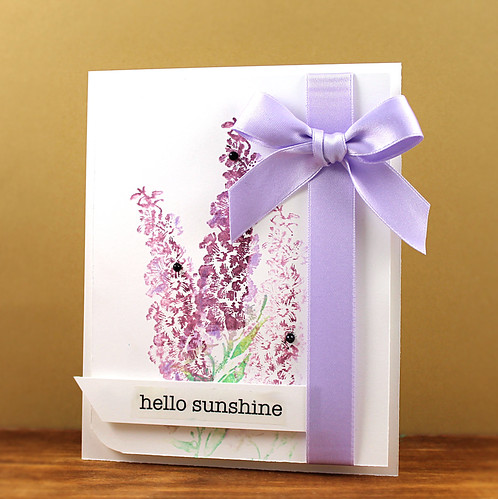
Jill is back with us today sharing a fabulous card she created.  We love the clean and simple look of her card and our Orchid Double-Face Satin Ribbon brings in so much elegance.

IMG_0866

Satin ribbon is a very popular choice for clothing, floral design, invitations, paper crafts, gift wrap, and countless other uses. Our Swiss Double Face Satin Ribbon is a favorite with bridal shops and designers. We also feature other qualities of Satin ribbon. Double face satin ribbon and single face satin ribbon are available. We also feature wired satin ribbon and unwired satin ribbon.  You can see more of our Satin Ribbon collection HERE.


What The Cluck Wobbler by Pinky Hobbs

Friday, August 9, 2013

Good morning Ribbons Unlimited friends, 
Pinky here today with a fun silly project. 

My friends and I often get a little rambunctious and silly- so when my girlfriend
was nervous about turning 30 (I am almost the big 40!) I decided to make light
of it and celebrate with her by creating this fun wobbler card. 
 BUT I really wanted it to POP and be extra special, not just from the
box- so I added the awesome Red Country Check 1" ribbon and some shiny
mirror gold cardstock. Then I just popped it all up from there!
 Really I KNEW I would find a coordinating ribbon for this  card- all I 
had to do was look through Ribbons Unlimited- they have a ribbon for everything!
 I printed out the "What the cluck" and stuck it on some gold cardstock.
There ya go- custom handmade card that made her giggle half the night!
You could even buy a card and just add a cool bow- it makes a big difference. 
So how do you use your Ribbons Unlimited ribbon?
Until next time- Keep on creating!


Supplies Used:
Kanban Wobbler Card
American Crafts Thickers
Printer
Mirror Gold Cardstock
Xyron Adhesive


Creating a Pinstripe Background with Christine

Wednesday, August 7, 2013

Christine blogging with you today!  Here's one fun technique you can give a whirl: create a background with your ribbon.  For my card today I created a background using the velvet ribbon and then added a chipboard heart cut-out above it making use of the negative space
I first ran my glue runner over the square cardstock and then started creating rows of the ribbon.  I love how it looks like pinstripes because of the pewter color!  I added the chipboard heart frame atop it and voila....a different look with lots of dimension and texture!  Have a great weekend and I hope you can find a way to play with ribbon!

Supplies Used:
Patterned Paper: Pink Paislee and American Crafts
Chipboard: Crate Paper
Sticker: SRM Stickers


Ribbon Holder Cards and Box

Friday, August 2, 2013

Hi guys!  Jamie back with you today to share a fun project to help you store your ribbons!
I created this ribbon holder box and cards using my digital die cutting machine then I simply wrapped my extra ribbons around each of the cards and placed them in the box.  Now all my ribbons are tidy and easy to access!  This is perfect for your scrap pieces or for condensing down your spools of ribbons!


Do you see all that beautiful ribbon?

How do you store your ribbon!  We'd love to see...
Link us up in the comments below!


Related Posts Plugin for WordPress, Blogger...