Two Page Scrapbook Layout by Jamie

Friday, July 31, 2015

Hey everyone,

Jamie again. Today I have a 2 page scrapbook layout to share. One of my favorite ways to use ribbon on a layout is to use it as banners. I used the Dark Mint Lyon Wired Ribbon in 1-1/2 in to make the banner on the top right of the layout. I just cut banner shapes by and out of the ribbon and adhered with ATG tape. I made sure that the tops of the banners had the wired edge to help me bend them into shape to make a curve. 


I used the 1-1/2 in Dazzle Grosgrain ribbon in Tropic Blue to line the bottom of my pictures. Let me just say how much I LOVE this ribbon! It's so pretty and it adds lots of sparkle to your projects. I also added some over a couple different photos and one of the purple paper edges as photo corners. Over the bottom part of the dazzle ribbon I added a strip of Lavender 7/8 in Double Ruffle Ribbon. For both ribbons on the bottom I cut to have a banner/pennate shape on each end. To do this and have them the exact same you take the ribbon and fold over the ends (so that with the ruffle ribbon the ruffles from top and bottom touch), and then cut at a diagonal slant going up and in toward the middle of the fold.


I cut the title out using my Silhouette Cameo and added some different color sequins that matched the rest of the page around the edges of the title (in hopes they would resemble bubbles). I hope you all enjoyed my layout.

Thanks for stoppin' by and have a great day!


Easy Wedding Gift and Card by Melissa Craig

Friday, July 24, 2015

Hello friends!  Melissa here to share a really fun and pretty project.  This is wedding themed, but really, with a tweak here and there, it really be adapted to any special occasion.  I just wanted to show you how easy and lovely it is to layer ribbons to achieve a great look.


I did have a hard time staging these elements for the perfect picture.  Working with these was like trying to get 2 toddlers to sit still and smile for the camera.    But I made this easy box from a cut file I found on the Silhouette Online store by Snapdragon Snippets.  And then using Scor-Tape, I layered the Light Pink Dazzle ribbon over the White Double  Ruffle ribbon and then used it to tie up the box.


Then I created a card to go along with it.  I got the card and the sentiment from the Silhouette Online store, too, but I don't remember who they're by.  I just decorated the card with a bit of that ribbon, too.  Easy and so pretty!


I hope my project inspires you to create something by doubling your ribbon.  Have fun!


Happy Day Card by Steph

Friday, July 17, 2015

Good morning everyone, Steph Ackerman here with a card using some really pretty Four Seasons Wired Sheer Ribbon in Aqua.   At 1 1/2" wide, it is just the right size to decorate cards. 


The Aqua ribbon coordinated perfectly with the colors in my card.  I mixed the ribbon amongst the flowers and used brads to adhere the ribbon to the card.


The flowers were stamped with ColorBox Background Basics by Ann Butler  and ColorBox Crafter's Ink in Berry.  To finish, I added Flower Soft to the flower centers and added a sentiment from So Suzy Stamps to the right corner.

Thanks for stopping by today.


Throw pillow by Nicole

Friday, July 3, 2015

Nicole here on the blog today to share a throw pillow I made accented with ribbon.  I've been meaning to make a throw pillow for my sis for awhile.  When this pink ribbon came in my box I knew it was the perfect time since pink and black were her wedding colors.  


I started by making piping with cording and hot pink ribbon.  The cording I found at the craft store in the upholstery findings.  


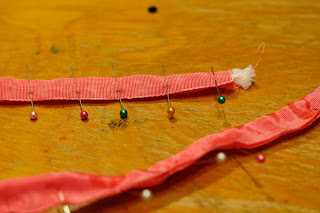
I cut enough of the cording to go around my pillow and then made it just a tad bit longer.  Now you'll take the cording and place it in the middle of the ribbon and pin it closed.  

Once the length is pinned I did a simple straight stitch down the length of the ribbon.


Now I cut a piece of drop cloth material big enough to fit my pillow top.  The finished piping I pinned around the edges of the drop cloth being careful around the corners.    

Attach with another pass through the sewing machine.
Now to embellish that pillow top.  I used my Silhouette Cameo to cut a piece of vinyl.  Once cut I carefully laid the design on the center of my pillow top.  

The vinyl was giving me grief since I didn't get it to lay flat and it was bubbling slightly around the edges of the hearts.  To make sure the paint didn't bleed under the edges of vinyl I used a foam brush to add the black acrylic paint in an up and down motion.    
Once the paint dried I removed the vinyl and also cut three of the hearts out with a pair of fabric scissors.   

These hearts I filled with the patterned ribbon.  I took pieces of drop cloth and traced the heart shapes with a pencil.  These are going to be my base to which I attach the ribbon and and will also be placed behind the cutouts.  

Using Helmar Fabric Glue I attached all the ribbon over the top of the hearts.  
I then pinned them in place and added more glue around each of the openings on the back to secure them in place.  


Once all the glue was dry I added some sewing details with pink embroidery floss.  


I then finished off my pillow by sewing two smaller pieces of drop cloth material to form a envelope cover.  


Here is another look at the finished pillow.


Thanks so much for stopping by the blog today.

Ribbons used in this project:


All digital SVG files from digiplayground.com


Related Posts Plugin for WordPress, Blogger...