Showing posts with label Double Faced Satin Ribbon. Show all posts

Cheesecloth Ghost by Jamie L.

Friday, October 23, 2015

Hey everyone,
Jamie here with a cute halloween ghost.


The ghost is pretty easy to make and super cute when done. All you need is some black felt, cheese cloth, liquid starch, scissors, hot glue, and 5/8" red wired satin ribbon. You will also need something for a form to sculpt ur ghost (i used a balloon and a vase).


You soak the cheese cloth in the liquid starch than drap it around a form or base to make the shape. Let dry over night. Remove from base/form. Cut eyes out of felt and hot glue into place. Make a bow with your ribbon and hot glue into place. All done!

Thabks for stoppin by and have a great day!


Pumpkins! by Melissa Craig

Friday, October 16, 2015


Good Morning!  Melissa here with a fun project that is cute and so easy to make!

I like Pinterest like a lot of us do.  There are some pretty great ideas on there and it can be a wonderful source of inspiration.  I was just perusing some pictures on there when I came across these pretty pumpkins someone made out of scrap pieces of wood.  You can find it here.  Well, I'm a papercrafter - not a woodcrafter, but I really wanted to make these so I set off to do my version.

Using a cut file by Lori Whitlock for the boxes and the stem from a different cut file, I created my pieces.  Inked the edges with Spiced Marmalade distress ink.  I then glued these boxes together to create my pumpkins.  I found a pretty fall foliage bunch at that Dollar Store that I cut apart to add to the top and then finished off with Double Face Satin Ribbon - Copper.


I love how these turned out and now they look fantastic on my desk at work.  My son saw them and said "those are Minecraft pumpkins!"

Thank you for stopping by and please feel free to visit me at my blog.


Ribbon Bookmark by Jamie L.

Friday, September 25, 2015

Hey everyone, 

Jamie here, and today I'd like to share a ribbon bookmark. 


For this project all you really need is ribbon, scissors, a button, an elastic hair tie, needle & thread (or a sewing machine), and hot glue & hot glue gun (optional).

I used 5/8" red wired satin ribbon and 11/2" navy blue mini stars wired ribbon. 
This bookmark is such an easy project. If I hadn't hand stitched it probably would have only taken 15 mins. My hand stitching skills used to be decent, but I haven't hand stitched in quite awhile. My stitching was less than beautiful, so I hot glued red ribbon over it and it looks pretty good now!


Let me give you the easy steps real quick... 
1. Cut ribbon to size (size depends on book... measure around and have a gap between the ends of about 2 - 3 inches.

2. place elastic band on one edge about an inch in and fold ribbon over the elastic.
3. stitch the end of the ribbon thats folded over the elastic making a loop out of the ribbon that traps the elastic in.
4. on the other end of the ribbon sew on a button. DONE!


 (optional steps if you want to clean up the edges)

5. fold back the ribbon edge the button is on toward the inside and hot glue down.
6 wrap a different ribbon over the stitches from the elastic.


I hope you guys enjoy this project and give it a go yourself.


Thanks for stoppin' by and have a great day!


Easy Ribbon Flower Center-Step card by Melissa

Tuesday, May 26, 2015

Hello,

I'm Melissa and I am thrilled to finally be able to share with you my love for ribbon.  I am thankful to be one of the newest member's of the Ribbon Unlimited design team and I look forward to the opportunity to share my craft with you.

I don't have a little girl in my life that likes hair ribbons and bows, my daughter has outgrown them so my love for ribbon is how they dress up cards and other crafty projects.


The base of the card is an svg cut file by Lori Whitlock, but the real feature is the easy ribbon flower I created using Country Check light blue (3/8") and Double Face Satin green apple ribbons.

To make the flower I cut pieces of ribbon about 2 inches, folded them over and then stitched the middle together so the point is created.  Then I strung all 5 petals and pulled tightly.  I created the center by cutting out a flower shape from white felt and layered the ribbon flower, felt flower and button and sewed it all together.  The stem and leaves are pretty self-explanatory.

I hope you enjoyed my card and again, I look forward to coming up with fun and easy ideas to share with you.


Baby headband and gifts by Crystal

Wednesday, January 14, 2015

Hello Ribbons Unlimited Inc. fans!
It's Crystal here and today I made a headband  using Double Faced Satin in Aqua 7/8"  this ribbon looks great from both sides perfect for loopy bows that show both sides , I made a bow and added it to stretch elastic , the headband has a loop so you can change out the bow , I made this for a newborn to go along with a baby bracelet and a baby onesies that I created with glitter heat transfer vinyl . This baby is getting the full hookup of BLING !!

IMG_3510

IMG_3509

IMG_3520

For this ribbon and other great ones stop by Ribbons Unlimited INC , they have a great assortment .  Thanks so much for stopping by , leave me some feed back if you loved this project, I love hearing from my scrappy computer friends who love getting crafty : )
Crystal Lopez – Design Team member for Ribbons Unlimited
crystal_lopez_bio_pic


Gift Box with Jamie

Wednesday, November 26, 2014

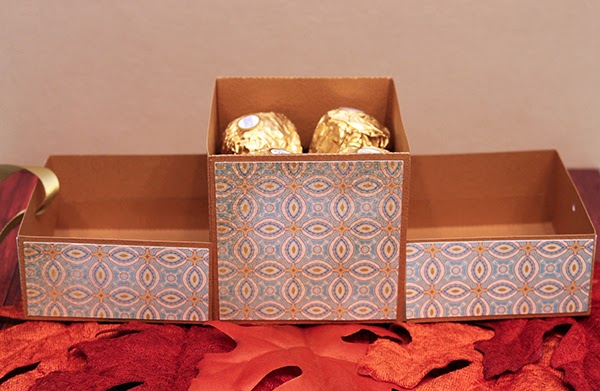
Good Morning!  Jamie back with you today sharing a fun gift box embellished with one of my favorite ribbons, the Golden Olive Double-Faced Satin Ribbon!  There are 196 colors available in widths up to 2-1/4" on the online store, and you can even special order widths up to 4"!  


This box opens up on both ends to reveal a box inside, 

which is perfect for stashing candies in!

Here is the tutorial:
1.  Cut the boxes and mats then fold the boxes on the score lines.
2.  With the smaller box, place adhesive on the four side tabs and adhere them to the box sides to form its shape.  With the large box, place adhesive on the four tabs then adhere the long sides to them as shown.
3.  Adhere the smaller box inside the center of the larger.
4.  Place adhesive on the sides and the coordinating tabs then adhere those sides to the box and fold that tab over within the smaller box.  Do this for both sides. This will hold the center box in place.
5.  Adhere the mats in place and place your goodies in the box.
6.  Once mats are in place, I punched a small hole in each side so that I could run my ribbon through.
7.  I push the ribbon up through the holes and pull the ribbon tight as I close the box.
8.  Cut out the Thank You sentiment and adhere to a tag.  Note: I cut my Thank and You apart so that I could move them to fit my tag better.  Tie a bow on the box and then tie the tag to the bow.


The ribbon really gives the box an elegance!

Thanks so much for stopping by today!
-Jamie


Holiday Gift Giving Ahead! Pinky

Wednesday, October 15, 2014

It's getting to be that time of year again- time for making those
holiday gifts and preparing for November and December. 

Why not create a beautify handmade recipe book for that loved one
who adores your cooking or wants to save their own recipes!
For this Recipe Album I used a Clear Acrylic album 
then instead of tying it together I used a giant paper clip that I attached
a beautiful silky ribbon bow from Ribbons Unlimited. 
The paper clip is perfect for adding more pages too. 
I really just wanted it to POP and it does!

Everything about this is handmade and will be treasured. 
I cannot wait to see the face of the recipient. 


Spider Bow with Jamie

Friday, October 3, 2014

 Good Morning Ribbons Unlimited, Inc. Fans!  Jamie back with you and today I am sharing a fun tutorial for creating a ribbon spider!  You can use these spiders for hair accessories, to decorate a vase, or even on gifts!  I placed my spider in the center of a bow on a hair tie so that we can use it on a vase and in our hair too!  

For my project I am using the following:

Here's the tutorial:
1.  Cut four 8" pieces and one 24" piece of the black satin ribbon.  
2.  Starting with the 24" piece, place a small piece of double-sided adhesive on one end of the ribbon.
3.  Adhere the ribbon to itself making about a 1-1/2" loop.
4.  Roll the ribbon around that loop then add another piece of double-sided adhesive to the end.
5.  Adhere the end in place.  Your loop should look similar to this now.
6.  Gather your four 8" strips together in one line.  Tie them around the loop.
7.  Pull the knot tight and pull the "legs" on each side out.
8.  Separate out the loop to form the body.
9.  Trim the "legs" at angles.  I did the front two in one direction and the back two in the other direction.
10. Next cut a 22" piece of the Princess Glitter Ribbon.  Get your hair tie and a zip tie for your bow if you are using it.
11.  Flip your bow over and place the hair tie on the back.  Feed the zip tie around and include the hair tie in and latch it together.  Fluff out your bow to have equal loops then pull the zip tie tight.
12.  Trim off the back of the zip tie.
13.  Flip your bow back over - it should look similar to this.  Fluff the bow as needed.
14.  Hot glue your spider in place in the center!


Thanks so much for stopping by today


Pop-Up Card with Jamie

Wednesday, September 24, 2014

Good Morning Ribbons Unlimited, Inc. Fans!  Jamie back with you and today I am sharing a pop-up card made elegant with Buttermilk Double-Faced Satin Ribbon!  This ribbon is so gorgeous and feels just as amazing as it looks!  

Here's the tutorial:

1.  Cut out all your pieces.  Bend the leaf pieces up from the mat as shown.
2.  Curl your flower petals with a skewer/pencil then layer the two flower pieces together staggering the petals and adhere the center to the flower, pulling the points up as shown.  
3.  Adhere the flowers to the mat with foam adhesive and tie a ribbon to embellish.
4.  Adhere the mat to the card base using foam adhesive, centering.

Thanks so much for stopping by today!
-Jamie


Homemade Cheer Bows!

Wednesday, August 27, 2014

 Good Morning Ribbons Fans!  Jamie with you today to 
share a Cheer Bow that I made for my daughter's team!  


For this bow, I used the 2-1/4" Width Navy Blue Satin Ribbon and a cut 24" length piece.  I folded the bow to make the shape and used a zip tie to hold the bow in the middle (you can see a tutorial HERE).  Once I had the bow shaped, I cut strips of the Dazzle ribbon and hot glued them on the angles and around the middle.  I finished the bow by cutting out our team logo with heat transfer vinyl in two colors and ironing it on the satin bow (carefully!)!


We love how they turned out and they are so much 
cheaper than ordering team bows!

I hope you will give them a try!


Ribbon Charm Bracelet by Grace

Friday, August 22, 2014

Ribbon jewelry has been a rage right now. Just check out Pinterest and you will find an enormous array of accessories that combine satin ribbon with some fun pearls, beads and accents. This trend inspired me to create my own charm bracelet. Read on to see how I created my bracelet that my sweet daughter is proudly modeling for me.

Instructions:
 1. Gather your supplies.

 2. Pick pattern papers that have small accents that would be good to highlight as part of your charm. I chose a paper pack that had a fall/autumn theme so I can wear my bracelet in the upcoming season. I also chose to use a 6x6 paper pack since I know the designs would be smaller in scale, which would be perfect for the size of my bubble circle stickers.
I just adhered the plain bubble sticker over the design that I wanted to use and then use my scissors to cut it out. 
 3. Then you add your bubble sticker onto a charm foundation. After looking at my design, I decided to add another charm making it 6 metal charms in all.

4. Next you thread the charms through the satin ribbon. I used my mat (with the grids) to space out my charms evenly. Because the hole of the charm fit nicely with the size of the ribbon, I didn’t need to tie my ribbon in between the charms. These accents didn’t move through my ribbon. I trimmed the ends leaving about 6” on each ends for tying. I added some fray check on the ends so that my ribbon ends don’t fray.

This process can be used for necklaces as well.

Here’s a couple of close up images of my bracelet…. 


Thank you for joining me today and happy creating.
-Grace

Supplies Used:
Satin, Pastel green, 5/8”, Ribbons Unlimited Inc.
Pattern papers- Into the Woods, Lawn Fawn
Epoxy stickers and charm metal- Epiphany Crafts
Fray check- Dritz


Woven Ribbon Tutorial by Jamie

Wednesday, July 23, 2014

Good Morning!  Jamie with you today to share a fun 
tutorial for creating a woven ribbon!  You can use the woven ribbon to create 
barrettes, headbands, bracelets or even as an embellishment for layouts or cards!

Today I am working with Ribbons Unlimited Inc.'s Double Faced Satin Ribbon in Copper in 1/4" width.  This tutorial will work with other ribbon types as well and you could even use two different colors of ribbon to change it up!

Here's the tutorial:
1.  Cut two pieces of ribbon of equal lengths.
2.  Place glue a little over an inch in on one of the ribbons.  Fold the end over to form about a 1/2" loop and adhere the end on the glue.
3.  Repeat the step for the other ribbon.  Your ribbons should look like this now.
4.  Slide one loop through the other.
5.  Next form a loop (bringing the ribbon up on itself) with the ribbon that you slid the other loop through.
6.  Push the loop through the loop that you slid through in step #4.
7.  Next form a loop with the second ribbon as you did above.
8.  Push that loop through the other loop.  Pulling the ribbons tight as you go.
 9-11. Continue forming loops and passing them through, alternating ribbons as you go.
12.  Continue until you have your desire lengths.  Trim your ribbon.
13.  Place glue under the braided ribbon end.
14.  Place glue under the second braided ribbon end. 
15.  Trim the ribbon ends.
16.  Hot glue the woven ribbon on your headband.
17.  Cut another piece of matching ribbon and tie in a bow around the headband.

Here's a look at the headband in hair!

Be sure to check out all of the ribbon selections HERE.
Thanks so much for stopping by today!


Mini Keychain Album with Pinky

Wednesday, June 18, 2014

Hey there friends, it's Pinky again. 
I always say that it's the small touches that make a project special
and I can't imagine the next two projects being nearly as cool
without the ribbon, it really just makes it!
 This is a mini keychain album I used 
Ribbons Unlimited Sheer Organdy Ribbon in Silver to really highlight the album. 
 The album is filed with inspirational quotes for encouragement. 
The silver ribbon made it perfect. 
And on this adorable beach card I took 
I created a ruffle with my sewing machine, trimmed to card face
down and adhere it inside. 
Doesn't it make it POP?! It looks like a little gift bag. 
This little touches show that you took the time to really make it special. 
I hope you grab some ribbon and get to work!
Until next time- keep on creating.

Ribbons used in these projects:


Related Posts Plugin for WordPress, Blogger...
‚