Showing posts with label Ribbon. Show all posts

Baby Scrapbook Layout by Jamie L.

Friday, May 29, 2015

Hey everyone,

Jamie here! Today I have a scrapbook layout to share with you all. These are some pics of my youngest at the hospital being held by her Uncle Aaron (my husbands brother). For my layout I used a lot of scrap papers, my silhouette cameo to make the title, but most importantly some fantastic Nylvalour Velvet Ribbon in coral (2" wide) from Ribbons Unlimited Inc.


I'd like to show you all how I used the ribbon on this layout, I tried to go outside the box a little. I have a quick picture tutorial. I hope you enjoy it.

I cut a portion of ribbon about 3-4inches long. I then flipped the ribbon over and free handed a shape on the back in white gel pen (in this case an arrow).


I then cut the arrow out with scissors.

After the arrow was cut I used the scraps to make little banners and another arrow.

Simple but super cute and it gives the page some texture and softness. I really like it and I hope you do too!

Thanks for stoppin' by and have a great day!


Candy Wand by Crystal

Sunday, November 30, 2014

Hello Ribbons Unlimited Inc. fans !!
It's Crystal here and today I have a fun project I made for my daughter , she love to dress up and run around the house like a princess , so today I made her a candy wand , play now treat later . For this project I'm using the 7/8" Aqua DF Satin ribbon from the Ribbons Unlimited Inc. online store , lets get busy and I'll show you how I made this ..

Supply list :
6" wide sparkle tulle
7/8" Aqua DF Satin ribbon
Giant Pixie Stix
Tim Holtz mini snowflake rosette die
cardstock
scoretape
shatter proof plastic snowflake
a bottle cap with an image ( I just punched out a princess from the packaging off a toy my daughter received ) (#trash to treasure )
felt circle
sharp scissors

wand
put score tape on end of rosette die cut
wand 2wand 3I added glue dot to hold rosette in shape so I could hot glue the felt circle in place
wand 4wand 5
punch the image from toy packaging and make the bottle cap
wand 6
next tie a bow with tulle
wand 7
the layer should be tulle bow then glue pixie stick to tulle bow , next glue the plastic snowflake
wand 8
glue the rosette with bottle cap and add my Aqua satin bow
wand 9

close up to my finished candy wand
I am sure my daughter will love this and I hope it has inspired you to create something fun
for your little one and look at that toy packaging a new way lol..

wand 10

Thanks so much for stopping by , leave me some feed back if you loved this project ,
I love hearing from my scrappy computer friends who love getting crafty : )
Crystal Lopez – Design Team member for Ribbons Unlimited


crystal_lopez_bio_pic


Altered Jewelry Organizer by Grace

Friday, September 19, 2014

Hello ribbon friends. One of the things on my “to make” list is a jewelry organizer. I’ve seen various kinds in Pinterest and decided to go with a frame one.  I found a frame that had a nice edge/frame to it at the thrift store and knew that it would be a perfect base for my project. With the help of some grosgrain ribbon fromRibbon’s Unlimited Inc., my project came together in a snap and with lots of personality. Read on to see how I created my frame.

Instructions:
1. First step was to paint the frame. At first I decided to hand paint it with a brush and acrylic paint. But because my frame has many intricate parts, it was hard to give it a good overall coverage. So I bought a small can of spray paint and then painted it brown instead of my original idea of apple green. 

 2. While the paint is drying, I worked on the center of the frame. I measured the inside part of the frame and cut a piece of cardboard to fit.

3. Then I found this chicken wire paper from my stash and adhered it to my cardboard backing. I trimmed off the excess using a craft knife.

 4. Then I laid my ribbon diagonally onto my board and started cutting them at an angle.

5. I repeated the same process with the ribbons going on the opposite direction and cut the trims to my desired length.  

6. Next I laid the ribbons, weaving them through each other to create the cross pattern and then hot glued the ends to the back of the cardboard. 

7. I then adhered the cardboard to the existing frame backing with some more hot glue and it was ready to be used. 

 Here’s some more close up of the project….


Thank you for joining me today and happy creating.
-Grace

Supplies Used:
#995Grosgrain stripes, Yellow, 3/8”, Ribbons Unlimited Inc.
Frame- Thrift store
Pattern paper- Hambly Screen Prints
Spray paint- Krylon
Others- Cardboard, Hot glue gun


Homemade Cheer Bows!

Wednesday, August 27, 2014

 Good Morning Ribbons Fans!  Jamie with you today to 
share a Cheer Bow that I made for my daughter's team!  


For this bow, I used the 2-1/4" Width Navy Blue Satin Ribbon and a cut 24" length piece.  I folded the bow to make the shape and used a zip tie to hold the bow in the middle (you can see a tutorial HERE).  Once I had the bow shaped, I cut strips of the Dazzle ribbon and hot glued them on the angles and around the middle.  I finished the bow by cutting out our team logo with heat transfer vinyl in two colors and ironing it on the satin bow (carefully!)!


We love how they turned out and they are so much 
cheaper than ordering team bows!

I hope you will give them a try!


Ribbon Valentine’s Day Cards by Grace

Wednesday, February 12, 2014


Hi there friends. Since Valentine’s day is just around the corner, I decided to share with you two cards featuring some beautiful Ribbon’sUnlimited Inc. trims.


Love you card
Size: 4 ¼ x 5 ½”

1. Create the card base with white cardstock.
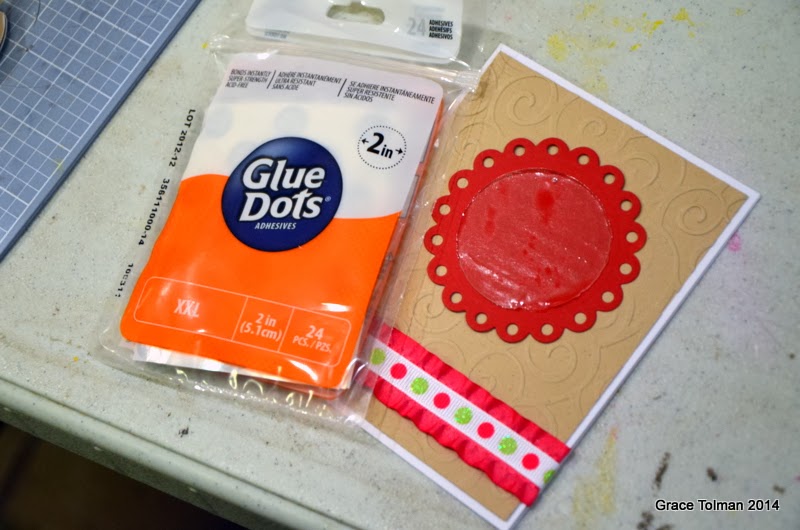
2. Cut out a kraft cardstock measuring 4 x 5 ¼” and run it through the die cut machine using a swirl embossing folder. Adhere to the center of the card.

3. Cut a slit on the cut of the card and slip the ruffle ribbon through it. Adhere the trim on the bottom portion of the card and secure the ends on the inside of the card.

4. Repeat step #3 for the smaller dot ribbon, layering it over the ruffle ribbon.

5. Cut out a scallop circle from red cardstock using die cut machine. Adhere on the center of the card. Add a XXL size glue dot in the center. Using the pink ruffle ribbon, create a ruffled flower over the adhesive.

6. Finish off the flower with a button threaded with twine.
7. Stick a couple of heart pins to the top left side of the flower.
8. Add a sentiment block between the flower and ruffle ribbon border, adhere with foam adhesive.


I love us card
Size: 5 ½ x 4 1/4

1. Create the card base with white cardstock.

2. Cut out a kraft cardstock measuring 4 x 5 ¼”. Add some ruffled red ribbon, weaving them over each other and securing the ends on the back of the cardstock. Adhere to the center of the card base.
3. Repeat the steps to create the ruffled ribbon accent from the previous card using a scallop light green cardstock.
4. Adhere to the card using foam adhesive.
5. Add the sentiment and some epoxy dots.

Thank you for taking the time to visit the blog today and I hope my projects inspired you today. Happy Creating!

Supplies Used:
Dazzle Dot ribbon 3/8”, Ribbons Unlimited Inc.
Double Ruffled Hot Pink 7/8”, Ribbons Unlimited Inc.
Double Ruffled Red 3/8”, Ribbons Unlimited Inc.
Cardstock- (white) Walmart; (kraft) Bazzill; (others) WorldWin Papers
Sentiment strips- Elle’s Studio
Pins- Maya Road
Buttons- October Afternoon
Twine- The Twinery
Embossing folder- Cuttlebug, Provo Craft
Scallops die cuts- Spellbinders
Enamel dots- Doodlebug Design Inc.

Ribbons Unlimited Inc. 2014 Design team member


Announcing the 2014 Ribbons Unlimited Design Team...

Friday, January 10, 2014


Before we get to our announcement, we wanted to take a few moments to give a special "Thank You" to everyone that applied!  The applications were all so fabulous and we appreciate each and every one of you for taking the time to submit to the call!  We hope you continue to share your ribbon work on our Facebook page and try for the team again next year!

We are very excited about our new team and can't wait to share all their fabulous projects with you!  Please help us welcome our 2014 Ribbons Unlimited Design Team!


Pinky (Cristal) Hobbs - Returning Member
Jamie Cripps - Team Lead|Social Media

Be sure to click on the team names to visit their blogs!
We will begin sharing their work with you soon so be sure to check back often!


Framed Holiday Decor with Christine

Wednesday, December 4, 2013

Hi Ribbons Unlimited Fans!  Christine joining you again today! I'm so excited that it is the Christmas Season and today I have simple way to add some holiday decor to your home.

 One thing I like to do is switch out some of the pictures in my picture frames for a Christmas look.  I go very simple!  All you need is a vibrant piece of Christmas patterned paper.  This one comes from Doodlebug Design.  Then if you add ribbon you can make it look like the top of a present.

I added a real simple bow (that doesn't look simple.)  First of all the key to making this bow easy and with lots of dimension is to use wired ribbon (for this one I used the Luxor Wired Metallic Ribbon in red).  To make it simply cut 7 strips of equal sized ribbon.  Fold them in half and staple the ends together.   Then lay 6 out to look like the base of the bow.  Cover up the mess center with one more in the middle (use some good fabric glue and it sticks in nice and easy).  Then use your fingers to puff them up and make them pretty!  I also left the glass off the frame, so that my bow wouldn't get smashed back down!

Hope your holiday season has started off wonderfully!


Be sure to enter to win!
Simply click the photo and fill out the Rafflecopter 
to get your chance at $1,100 CASH!


Counting Down to Christmas...with Jamie

Friday, November 1, 2013

Welcome to November!  Before you know it Christmas will be here...which is why I started this next project!  It's Jamie with you today sharing a fun count down to Christmas!


Supplies used:


I know it is hard to see the project in the full photo...I just couldn't figure out how to photograph it :)  Here are some close ups...

 
Each loop is about 2" x 2-1/4" when finished which means you could place little treats in each one or you could use it like a traditional count down and just remove the loops as you go until you are down to Christmas day!
This project is a lot of fun to put together and easy enough to get the kids to help with!  It would also be a fun gift to get the Holiday season started and begin building the excitement!

Here is the tutorial:

1.  Cut out the pieces in your desired papers.
2.  Bring the tab end around and tuck it into the slot end to form a loop.
3.  Next cut a 20" piece of ribbon and pull one end through the loop as shown.
4.  Place the ends of your ribbon through a second loop, crossing the ribbon.
5.  Bring the ribbon up on top of the second loop and tie.
6.  Complete a bow and trim the ends of the ribbon.
7.  Continue with steps #3-6 until all 25 loops are in place.
8.  Adhere the numbers on the the larger circles and then adhere one number on each loop using a foam adhesive.


Thanks so much for stopping by!


Related Posts Plugin for WordPress, Blogger...
‚