Showing posts with label Dazzle ribbon. Show all posts

No Sew Easy Sachets by Melissa Craig

Friday, September 18, 2015

Hi everyone, Melissa here.  I have a fun project to share with you that I hope you like as much as I do.  I found on Pintrest awhile back so different sachets, which of course led me down the You Tube path to watch whatever videos I could find - and though fabulous ideas, I thought they were just too... too - well, not sure what the word is.  Just too much for me.  I don't have a clue how to use hem tape or whatever it's called and Aleene's fabric tape is so expensive.  I got to thinking, these items don't go in the washing machine so why not just use a really strong double sided adhesive.  Here's what I created.


I picked up some inexpensive tea towel material at JoAnn Fabrics, as well as some mesh type fabric to hold the lavender buds.  I cut the fabric about 3 inches in width and just sort fussed with the length until I had a pocket the size I wanted.  I did the same with the mesh piece, sizing it to just a bit smaller - filled it with lavender buds and then closed it off.  I then stuffed it inside the pocket and sealed it up as well.

Let's talk decoration...


This one uses French Wired ribbon - Porcelain Blue, Solid Grosgrain ribbon - Jasmine Green, and Grosgrain Dazzle ribbon - Light Pink.  To create the blue flower, I removed the wire from a length of ribbon and cut it using a die from MFT stamps.  Be sure to have a lighter on hand to heat the edges as best as possible to minimize fraying.  I free-hand cut the ribbon for the leaves.  Then I made little roses from the pink ribbon.  I hot glued all the embellishments onto the sachet.


For this one I used a left over piece of the ribbon I had layered for the wedding card and box I shared about a month ago.  I layered the Dazzle ribbon - Light Pink over a length of Double Ruffle ribbon - White.  I used these ribbons to cover the flap on the sachet and then made a rose and leaves out of felt.


Lastly, I created this embellishment using the Country Check ribbon - Light Blue.  I cut a length that is approximately 8 inches and wove a needle and thread along one edge.  I then pulled on the thread to gather the ribbon.  I hot glued it onto the sachet and added a button.  Then I made a little bow using some natural twine and glued it on.  It sort of looks like a sun-bonnet.

Thank you so much for visiting the blog today and I hope my project inspires you to create something simple and sweet - these would be perfect for little gifts!  And you don't have to use lavender buds.  You could use those dryer pellets.  Tuck these into your dresser drawers and linen closets to keep everything smelling fresh.  Personally, I'm adding some to my daughter's smelly dance bag!


Just a little bit can make a big impact - by Melissa Craig

Friday, June 19, 2015

Good Morning!  I cannot tell you how excited I am about today's card.  I've been dreaming this one up since I received the Country Check - Light Blue ribbon.  It's just a little bit of ribbon, but who wouldn't identify this combo right off the bat?


Although I used red glitter paper, Dazzle (Glittered Grosgrain) Red would work equally as well!

I created the card by first typing out a sentiment in a word program and printing it on white card stock.  Then I embossed some clouds using an embossing folder by Darice.  I adhered the ribbon and the glittered card stock below the sentiment.  I then cut out 5 doggie shapes, stacked them to give my embellishment some dimension and that was it!  Clean... simple... a great encouragement card.

I do hope you like my card and thank you for letting me share with you today.


Ribbon Winter Wreath by Grace

Wednesday, January 7, 2015

 Hello ribbon friends. Today I’d like to share with you a very fun way to showcase some of your favorite trims in a home décor project. Winter is just around the corner and so why not celebrate it with a winter themed wreath. The best part of this project is it doesn’t need adhesive.


Instructions:

Gather your supplies. Because this is a winter themed project, I pulled mostly blue trims with the exception of the Dazzle Ivory and the Edinburgh trim. I didn’t want it to look so monotonous so I added those two to spice it up a bit. I also used different shades of blue so my wreath wouldn’t look too predictable. 

Plan a pattern of the ribbons on your wreath and start tying them down. I used a double knot on the project to make sure that my trims won’t unravel on me. 

Repeat the process until you’ve reached your pattern. Once you’re pleased with the pattern, repeat it until you have filled up the entire wreath with ribbon. This might take a while. I did this project while watching some TV. 

Once you’ve filled up your wreath with ribbon, Cut a 12” ribbon (of your choice) wrap around the wreath and tie the ends. Add a bow on one side and this will be your piece that will allow you to hang up your wreath. 

And here are some more details of my project….


I really liked how this turned out. The cuts are all different lending to a homemade feel plus the colors will definitely bring cheer to those cold wintery days ahead of us.
If you have scraps, like I did, make sure to save them for other crafty projects such as what I did with the cards I shared earlier this month.

Thank you for stopping by.
-Grace 

Supplies Used:
Dazzle ribbon, Ivory, 7/8”, Ribbons Unlimited Inc.
Ombre wired, Sky Blue, 1 ½”, Ribbons Unlimited Inc.
Country check, Royal, 5/8”, Ribbons Unlimited Inc.
Edinburgh, Dress Stewart, 1”, Ribbons Unlimited Inc.
Grosgrain, Copen, 3/8”, Ribbons Unlimited Inc.
Foam wreath- Styrofoam
Scissors


Be Merry Dazzling Cards by Pinky

Friday, January 2, 2015

Hey again, Happy Holidays from Pinky!

It's that time of year, the time to create cards and use that glitter.
Perfect for cards and so much more. 
 For this card I used a card stock base at 3.5X6, then added an acrylic front. 
In order to add the acrylic front I needed to use a stripe of glue,
the Ribbons Unlimited Dazzle Ribbon is perfect for covering that stripe
of glue. Adding the bow above the sentiment image was just for fun!
This ribbon is strong, and works well on any project from cards 
to hair bows, sewing and more. 
The glittered side is beautiful and adds holiday fun. 


Christmas card with ribbon scraps - Grace

Friday, December 12, 2014

Hello there friends. Today I’d like to share a super easy card design that can be mass produced for your holiday greetings. It’s also a great way to use up ribbon scraps. 

Instructions:
Gather your supplies. I will show you on a different blog post where all my ribbon scraps came from but for now, you can see all sorts of widths and lengths of ribbon in the mix. This design is also very useful to use up tools such as embossing folder, die and glitter glue. 

Create your card base from whatever cardstock you prefer. I made mine from white cardstock to measure 4 ¼ x 5 ½”. I then cut a 4 x 5 ¼” piece of white cardstock and ran them through my Cuttlebug using the Swiss dot embossing folder.

Next, I used a gold shimmer cardstock to cut my Christmas tree die from. I ran it through my die cut machine twice to make that all of the detail cuts were made. 

After that, I assembled the card. I picked out a pattern paper with red and green strips on it as a border and laid out how I want my ribbon scraps to go under the pattern paper strip. I then cut notches on each one and adhered to a ¾” strip of pattern paper. 

I first adhered my embossed background onto the card then my red strip with ribbon scraps under it; Followed by the die cut Christmas tree. To add some more texture, I filled the star top of the die with glitter glue. 

Here are some more close ups of the cards….


 I hope this inspired you to add some ribbon scraps to your next project. Thank you for stopping by.

-Grace
Supplies Used:
Dazzle ribbon, Ivory, 7/8”, Ribbons Unlimited Inc.
Country check, Royal, 5/8”, Ribbons Unlimited Inc.
Edinburgh, Dress Stewart, 1”, Ribbons Unlimited Inc.
Grosgrain, Copen, 3/8”, Ribbons Unlimited Inc.
Cardstock- (white) Walmart; (gold shimmer) Worldwin Cardstock
Pattern paper- Bazzill
Die- Die Versions

Glitter glue- Studio G, Hampton Arts


Magazine Inspired Card by Grace

Friday, October 10, 2014


Hi there ribbon friends. I am a big magazine reader. I love grabbing information, recipes, ideas and of course inspiration from the pages of lifestyle magazines. While browsing through an issue of HGTV magazine, I was stopped in my tracks with the photo of a cool door. As I studied the door, I noticed that the diamond design can easily be replicated with ribbons. Read on to see how I incorporated the design onto a thank you card.


Instructions:

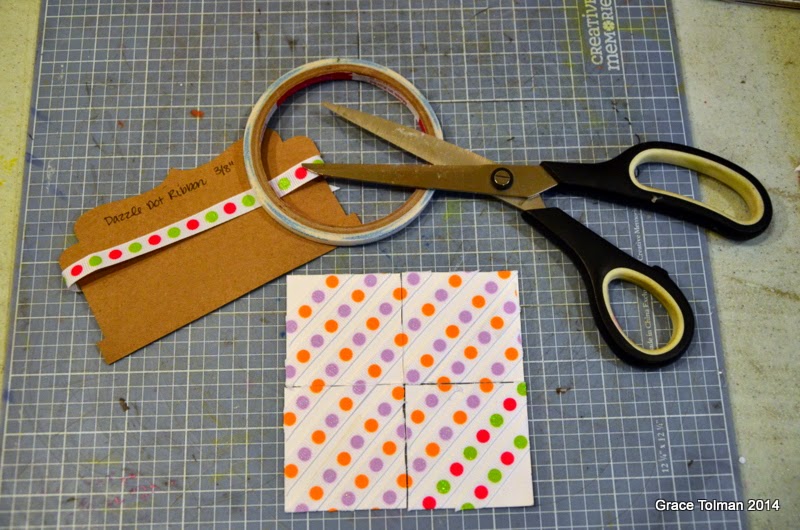
1. For my square card, I cut out a 4 ½” square piece of white paper. I added some dazzle ribbon strips diagonally onto the paper. 

2. Next, I cut the square into four smaller pieces. 

3. Then I turned each square till I got a design that I was happy with. 

4. Then I adhered the blocks onto the center of a 5” square card. I then added a tiny strip of dark purple cardstock, a tied ribbon from more dazzle ribbon and two die cut tabs where I handwrote my sentiment. 

Here’s the finished card…

I used very minimal decoration on this card so that the eye can focus on the cool design created by the ribbon. 
I hope this inspires you to use some ribbon to create some cool geometric shapes for your next paper crafting project.

Happy Creating,
Grace
Supplies Used:
Dazzle Dotribbon 3/8”, Ribbons Unlimited Inc.
Cardstock-Bazzill
Pen- Millennium, Zig
Die cut tabs- SEI
Enamel dot- Homemade


Birthday Apron by Crystal

Friday, August 29, 2014

Hello Ribbons Unlimited Inc. Fans!
It's Crystal here and today I am making a Birthday Apron with ribbon from Ribbons Unlimited Inc.. The ribbon I am using today is Dazzle Ribbon and it is so full of sparkle you will go into sensory over load from it!  This is a good thing if you love all that sparkles! Grab you cup of coffee and let me walk you thru how I made this cute little apron
my little model is Zoe.
Birthday apron 019
I found this muslin type apron at JoAnns for about $4.50 , I thought it would make a great base for this ribbon project and we are going to jazz it up !!!!
Birthday apron 001
next I take the 7/8" Lime /Hot Pink Sugar Dot ribbon and make small pleats and sew down the center of the ribbon to adhere to the neck strap
Birthday apron 002

Birthday apron 003
I was pretty tickled how cute this came out! This was all done with out pinning ahead of time. Make a pleat, sew, and repeat until complete!
Birthday apron 005
next I cut my lettering ( Birthday Girl ) from contact paper in my silhouette and and stick them to my apron frontBirthday apron 001 - Copy
next we are going to add ink splatters by stamping and spraying ink , I sponged all-purpose ink on my stamp and stamped some splats , use any brand of ink sprays most are permanent on fabricBirthday apron 002
after I was done with that I took off my letter to see what I had , my letters were not standing out as much as I would have liked so I went around the letter with an Ultra Fine Sharpie         TIP :there are never mistakes when crafting just opportunities to embellish
Birthday apron 003
next I am making pin wheel bows to pin at the top of each side , I made these into pins so you can take them off and use in a jacket or headband ect. , we can get more use out of our creation if we make them detachable
with 5/8'  Turquoise Dazzle Ribbon I cut I cut 4 3" strips and forked the ends and heat sealed them , create a cross over pattern as below and hand tack them in place with needle and thread
Birthday apron 006
cut 4   5/8" hot pink dazzle and fork ends ,heat seal and tack with needle and thread
Birthday apron 007
I made a loop flower with 3/8" orchid dazzle ribbon and tack with needle and thread this flowers ends up being 2 1/2 wide when done
Birthday apron 009
I also made a white 5/8" dazzle straight line bow tied with  3/8 orchid dazzle ribbon , after you get two sets cut it time to assemble with the hot glue gun , I put a white felt circle on the back to finish the under side , add the bar pin and the cut a 3/4 in long piece of White Dazzle to cover bar pin
Birthday apron 008
a look from the back and the finished bow pin
Birthday apron 009
next I made a cupcake out of my  7/8" Lime /Hot Pink Sugar Dot ribbon for the base and 5/8" hot pink I ruffled for the top and sewed it onto the apron , I chose to sew all my embellishments because I want it to be machine washable
my finished apron
Birthday apron 010

Birthday apron 012

Birthday apron 019

Birthday apron 020
Ribbon Supplies :

Thanks so much for stopping by, leave me some feed back if you loved this project, I love hearing from my scrappy computer friends who love getting crafty : )
Crystal Lopez – Design Team member for Ribbons Unlimited
crystal_lopez_bio_pic


Related Posts Plugin for WordPress, Blogger...