Showing posts with label Grace Tolman. Show all posts

Ribbon Winter Wreath by Grace

Wednesday, January 7, 2015

 Hello ribbon friends. Today I’d like to share with you a very fun way to showcase some of your favorite trims in a home décor project. Winter is just around the corner and so why not celebrate it with a winter themed wreath. The best part of this project is it doesn’t need adhesive.


Instructions:

Gather your supplies. Because this is a winter themed project, I pulled mostly blue trims with the exception of the Dazzle Ivory and the Edinburgh trim. I didn’t want it to look so monotonous so I added those two to spice it up a bit. I also used different shades of blue so my wreath wouldn’t look too predictable. 

Plan a pattern of the ribbons on your wreath and start tying them down. I used a double knot on the project to make sure that my trims won’t unravel on me. 

Repeat the process until you’ve reached your pattern. Once you’re pleased with the pattern, repeat it until you have filled up the entire wreath with ribbon. This might take a while. I did this project while watching some TV. 

Once you’ve filled up your wreath with ribbon, Cut a 12” ribbon (of your choice) wrap around the wreath and tie the ends. Add a bow on one side and this will be your piece that will allow you to hang up your wreath. 

And here are some more details of my project….


I really liked how this turned out. The cuts are all different lending to a homemade feel plus the colors will definitely bring cheer to those cold wintery days ahead of us.
If you have scraps, like I did, make sure to save them for other crafty projects such as what I did with the cards I shared earlier this month.

Thank you for stopping by.
-Grace 

Supplies Used:
Dazzle ribbon, Ivory, 7/8”, Ribbons Unlimited Inc.
Ombre wired, Sky Blue, 1 ½”, Ribbons Unlimited Inc.
Country check, Royal, 5/8”, Ribbons Unlimited Inc.
Edinburgh, Dress Stewart, 1”, Ribbons Unlimited Inc.
Grosgrain, Copen, 3/8”, Ribbons Unlimited Inc.
Foam wreath- Styrofoam
Scissors


Christmas card with ribbon scraps - Grace

Friday, December 12, 2014

Hello there friends. Today I’d like to share a super easy card design that can be mass produced for your holiday greetings. It’s also a great way to use up ribbon scraps. 

Instructions:
Gather your supplies. I will show you on a different blog post where all my ribbon scraps came from but for now, you can see all sorts of widths and lengths of ribbon in the mix. This design is also very useful to use up tools such as embossing folder, die and glitter glue. 

Create your card base from whatever cardstock you prefer. I made mine from white cardstock to measure 4 ¼ x 5 ½”. I then cut a 4 x 5 ¼” piece of white cardstock and ran them through my Cuttlebug using the Swiss dot embossing folder.

Next, I used a gold shimmer cardstock to cut my Christmas tree die from. I ran it through my die cut machine twice to make that all of the detail cuts were made. 

After that, I assembled the card. I picked out a pattern paper with red and green strips on it as a border and laid out how I want my ribbon scraps to go under the pattern paper strip. I then cut notches on each one and adhered to a ¾” strip of pattern paper. 

I first adhered my embossed background onto the card then my red strip with ribbon scraps under it; Followed by the die cut Christmas tree. To add some more texture, I filled the star top of the die with glitter glue. 

Here are some more close ups of the cards….


 I hope this inspired you to add some ribbon scraps to your next project. Thank you for stopping by.

-Grace
Supplies Used:
Dazzle ribbon, Ivory, 7/8”, Ribbons Unlimited Inc.
Country check, Royal, 5/8”, Ribbons Unlimited Inc.
Edinburgh, Dress Stewart, 1”, Ribbons Unlimited Inc.
Grosgrain, Copen, 3/8”, Ribbons Unlimited Inc.
Cardstock- (white) Walmart; (gold shimmer) Worldwin Cardstock
Pattern paper- Bazzill
Die- Die Versions

Glitter glue- Studio G, Hampton Arts


Christmas Paper Treat Box by Grace

Friday, November 21, 2014

Hi there Ribbons Unlimited friends. Today I’d like to share a project that can easily be mass produced and could hold your favorite Holiday handmade gift or like me, just fill it up with candy and you are good to go.


Instructions:
1. Using a full 12x12 sheet of paper, Score at 1”, 4”, 8” and 11”. Turn the paper 90 degrees and repeat the scoring process. Fold on the scored marks. 

2. Cut at the 4” and 8” marks leaving a 4” square box in the center. If you desire, you can cut away 2x4” on each corner of the template. I did this for the first one to trim down the excess paper and the layers of paper won’t be too bulky but I found that it lost some important structure so I opted not to trim the corners on the second box.
Punch out a border on each edge of the box. Grabbing the two 2x4” pieces towards the center, adhere them together and then adhere one side of the box over them. Fold the edge over the front. 

3. To reinforce the structure of the first box, I adhered a strip of the red checkered ribbon around the box. 

4. Adhere the ends over each other using some glue dots. 

5. Punch out a hole on two adjacent sides of the box. Adhere the checkered ribbon over the gold trim. 

6. Thread both ribbons through your holes, and adhere the ends inside the box using some tape. 

7. Create two bows from the gold ribbon and adhere on the sides of the box, covering the holes you’ve created for the handle. 

 8. Add a sentiment block using paper and stickers. Repeat the process for how many boxes you need to make.

Here’s some more close ups…

Thank you for joining me today and I hope this helped you find ways to incorporate your ribbons and papercrafting supplies in your gift giving this season.

Happy Creating,
Grace

Supplies Used:
Country check, Red, 1”, Ribbons Unlimited Inc.
#274 Luxor(Wired) Gold, 1 ½”,Ribbons Unlimited Inc.
Paper and stickers- Noel, SEI
Border punch- Recollections

Others- Adhesive strip, foam adhesive


Christmas Glittered Cards with Grace

Friday, November 14, 2014


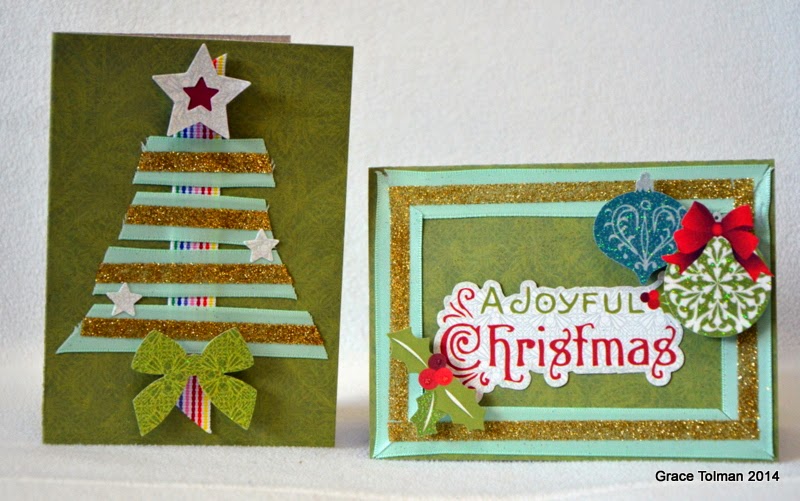
Hello there ribbon friends.  It’s that time of the year again. I’m talking about tackling those holiday projects. Today I’d like to share a couple of cards where I used some ribbon and glitter to add some “shine” to these Holiday greetings.

 Instructions:
1. Create your card base. Mine measured to 4 ¼ x 5 ½”

2. Cut a strip of the candy stripe ribbon and adhere it on the center of the card front horizontally. Cut staggered length of the pastel green satin ribbon to create the Christmas tree, don’t adhere yet.

3. Adhere a strip of adhesive on the center of the ribbon strips, pour glitter over it, press to adhere the glitter and dump the rest back into the container or on a scrap of paper. Use a paint brush to clean off the rest of the glitter on the ribbon. Decorate the tree with die cut and stickers.

4. For the frame card-  Adhere some of the pastel green trim around the card front using strips of adhesive.

5 Adhere another layer of adhesive over the center of the ribbon frame and add glitter, brushing off the excess. Decorate with stickers and die cuts.

Here are some pictures of the final product….


Thank you for joining me today and I hope this inspired you to add glitter to your favorite trims to make your next crafting project “sparkle “ even more.

Happy Creating,
Grace


Supplies Used:
Satin,Pastel green, 5/8”, Ribbons Unlimited Inc.
Grosgrain,Stripes, 5/8”, Ribbons Unlimited Inc.
Paper and stickers- Noel, SEI
Glitter- American Crafts

Others- Adhesive strip, foam adhesive


Today Minibook by Grace

Friday, October 17, 2014


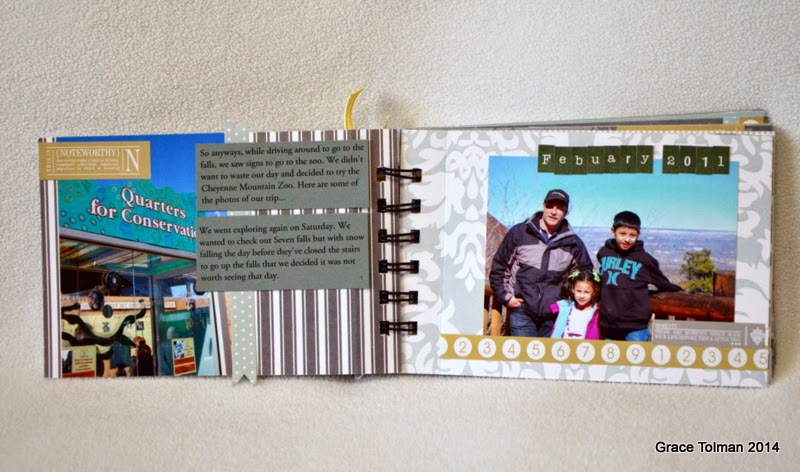
Hello there friends. Today I’m sharing a mini book project that I created using some 4x6 pocket scrapbook papers. Pocket pages and scrapbook supplies are a rage right now. While I don’t do project life, I still like to get the products cause they’re so cool. Recently, I got a pack of 4x6 papers designed for pocket scrapbooking. I used it as a base for my mini album. I then put it all together with a coil binding.  Because the papers were already cut into one size, I was able to put this book together in record time.


To spruce up the front of the book, I tied some colorful ribbons from Ribbons Unlimited Inc.


Here are a few pictures of the inside pages of the book…


I hope this inspired you to use those pocket scrapbooking products in your next mini album project.

Happy Creating,
Grace
Supplies Used:
#995 Grosgrain stripes, Yellow, 3/8”, Ribbons Unlimited Inc.
Grosgrain, Stripes, 5/8”, Ribbons Unlimited Inc.
Country check, Red, 1”, Ribbons Unlimited Inc.
Lilac Leopard Grosgrain 5/8”, Ribbons Unlimited Inc.
Giraffe 7/8”, Ribbons Unlimited Inc.
Edinburgh, Dress Stewart, 1”, Ribbon’s Unlimited Inc.
Papers and border stickers- Ruby Rock It
Letter stickers- My Little Shoebox
Cardstock- WorldWin Cardstock
Bind it tool- Bind it all, Zutter
Pen- Millennium, Zig

Enamel dots- homemade


Related Posts Plugin for WordPress, Blogger...