Gift Wrap - From Drab to Fab!

Tuesday, February 12, 2013

Jamie Cripps loves to wrap gifts in scrapbooking paper. It's colorful, sturdy, and fun to decorate. Jamie takes a plainly wrapped gift and spices it up with extra ribbon! She used Green Lyon French Wired Ribbon 1" for her base wrap then Tornado Blue Double Faced Satin 1/4" Ribbon. She layered the ribbons and bows for a dimensional feel and added color and interest;


To finish off her package, Jamie added a stamped tag and circles of patterned papers!


How beautiful... Thank you, Jamie.  Join us tomorrow for a ribbon bracelet tutorial that you'll be inspired to make right away!


St. Patrick's Day Tag and Free Digi Cut File

Monday, February 11, 2013

Jamie Cripps is back with another free digital cut file. (See last Monday's post as well!)  This time she created a St. Patrick's Day tag. You can download the cut file HERE. It contains a .svg and .studio file. Enjoy! Be sure to scroll down to view Jamie's tutorial on assembling your tag...


SUPPLIES:

Cardstock: White 
Twine: Peapod (The Twinery) 
Stickers: Lucky Clover (SRM Stickers
Marker: Pine Needles Distress Marker by Tim Holtz (Ranger) 
Die Cut: Clover Tag (Jamie Lane Designs)


INSTRUCTIONS:

1. Cut the Clover Tag in the cardstock color you desire. 
2. Place adhesive on the solid tag, this will be the back of the tag. 
3. Cut a piece of the 1-1/2" width ribbon at 2". 
4. Adhere the ribbon to the solid tag cut. 
5. Place the Clover cut tag over the top of the solid tag and adhere. 
6. Add ribbon and twine to the top of the tag and embellish as desired! 

We have more tutorials to share this week, don't go far!


More Hair Bows!

Friday, February 8, 2013

My second grader asked me to make hair bows as a Valentine goody for each girl in her class. I took on the challenge with the help of Rae Barthel's Hair Bow Tutorial. I made only one small adjustment... Since the bows were going to be handled by little fingers, I wanted to make sure they were very secure. I placed a small stitch with each step. I then used hot-glue to place the centerpieces (epoxy stickers) and barrettes.


I was able to make 12 hair bows from 8 yards of our 1 1/2" red grosgrain ribbon. Our grosgrain ribbon comes in 196 colors! It's color-safe, washable, and available in widths up to 2 1/4". Widths up to 4" are available via special order.

Have a great weekend!  Stay tuned for our first reader challenge next week.  We want to see what YOU can do with ribbon!


Valentine Treat Box by Jamie

Thursday, February 7, 2013

Looking to dress up a treat box? Ribbon always does the trick! Jamie Cripps added a fluffy dotted bow to the twine-wrapped handle of her treat box (decorated with SRM Stickers), and wrapped the bow with a bit more pink twine;


Jamie used wired Baby Pink Dotted Ribbon, 1 1/2" wide.  Check out our huge selection of dotted ribbon!


Anniversary Card by Rae

Wednesday, February 6, 2013

A shimmery background, fancy sentiment on vellum, and beautiful bow is all this Anniversary card by Rae Barthel needed to make it shine. Rae used our sheer delight satin-edged ribbon in gold;


Our Sheer Delight ribbon is a satin-edged sheer ribbon. It is not wired and comes in widths from 3/8" to 1 1/2". It is very economical and great for packaging, gift wrap, invitations, floral design, and more! Click HERE to view our huge selection of color choices in our online store.

We have another pretty Valentine project by Jamie for you tomorrow, see you then!


Valentine Bag by Jamie

Tuesday, February 5, 2013

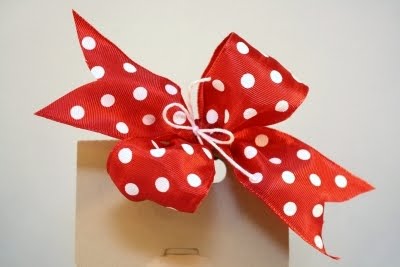
Jamie Cripps is back with another quick and easy tutorial on creating the perfect bow. Jamie used her bow to dress up a Valentine treat bag that's sure to please;


Jamie used our dotted red/white ribbon, which is edged with fine wire for easy manipulating. Jamie says, "Working with a wired ribbon is perfect for quick gift wrapping as the bow will remain in the shape you want it!


TUTORIAL:

1. Cut the Red|White Polka Dot Wired Ribbon to 22". 
2. Tie the ribbon around the handle of the bag so that you have equal parts of the ribbon on both sides of the middle knot. 
3. Tie a bow as you normally would then play with the loops to "fluff" them. 
4. Fold the ribbon ends in half then trim at an angle as shown. 
5. Even out the ends of the box so they lay nicely.
You can add twine or decorative cord (available in 25 colors!) to the center of your bow to add more color and interest.


Our dotted wired ribbon is high quality ribbon made in Germany. It is available in a 1 1/2" width. Click HERE to see all of the fantastic color combinations!


Happy Graduation Tutorial/Digi Cut by Jamie

Monday, February 4, 2013

Ribbons Unlimited, Inc. Designer, Jamie Cripps is back with a fun freebie -- a digital cut file that you can download for FREE! Jamie also includes instructions to create the banner in her 'Happy Graduation' card. Jamie used patterned paper, a custom die cut, SRM graduation stickers, and black grosgrain ribbon;


The FREE digital cut download (which contains both a .svg and .studio file) to create the ribbon loop tag used on Jamie's card can be downloaded by clicking HERE! The die cut should be used with 1/4" ribbon.


TUTORIAL


 1. Cut a black grosgrain ribbon to 8-1/2" 
 2. Cut the Ribbon Loop Tag digital cut file onto cardstock 
 3. Place foam adhesive on the back of the circle and both of the stars 
 4. Place the large star in the center of the circle 
 5. Adhere the smaller star in the center of the larger star 
 6. Cut your black grosgrain ribbon in half and grab the tag die cut. 
 7. Using the first slot on the right side of the tag, insert ribbon as shown 
 8. Create a loop on the back side of the tag and push the loop up through the second slot 
 9. Repeat step #7 on the left side 
10. Repeat step #8 to create the loop 
11. Adhere the ends with adhesive 
12. Adhere the assembled circle in the center of the tag to finish 

Thank you, Jamie! We'll have another FREE digital cut file for you next Monday. In the meantime, we're loading up the blog this week with projects galore, be sure stop in and see us!


Attention Hair Accessory Designers!

Friday, February 1, 2013

We are on the hunt for a superstar hair accessory designer to put in the spotlight. If you're interested in Guest Designing for Ribbons Unlimited, Inc., or know someone who might be, email me at jenyfurpohl@gmail.com. We'd love to see what YOU can do with hair bows!


My little girls wear hair accessories every single day. My 10 year old, Aubrey, especially likes colorful hair pieces, and the crazier the color combo, the better! I made this big, bold hair bow for her - she loves it. It was surprisingly simple to create.

I used 3/8" grosgrain ribbon in Tornado Blue, Light Orchid, and Baby Maize. The bottom row of loops was done with six 10" pieces. The orchid layer was done with five 9" pieces. The maize layer was done with four 8" pieces, and finally, the topper was done with three 4 1/4" pieces. I sewed each layer individually then nested them together with a glue gun. I added an orchid button for a center, and adhered the bow onto a hair clip.


Have a wonderful weekend. If you create a bow based on this one, email me so I can feature it on our Facebook Page or at Twitter! We're back all next week with much more. Until then, happy crafting!


Just a note...

Thursday, January 31, 2013

Our Designer Jamie Cripps is a card making queen! Jamie assembled this sweet "just a note" card using ribbon to spice it up. Jamie says, "I used my Silhouette for the card pieces then added gray wired ribbon for dimension and interest! I love how easy the Lyon French Wired ribbon is to work with, and how it stays wherever you place it!"


Our French Wired ribbon is a dream to work with and one of our best sellers! Although it is named after Lyon, one of France's well known textile centers, it is actually made in Germany. Most of the colors have two shades of thread sewn together to give the ribbon an iridescent quality. It is bio-degradable (except for the wire) and comes in over 100 colors with available widths up to 2 3/8". Click HERE to see it all and shop!


Altered Canvas by Jill

Wednesday, January 30, 2013

Jill Foster's mixed media art is breathtaking! Jill created this lovely canvas and used velvet ribbon as a finishing touch.  Be sure to click on the photographs to view the details in a larger size;


Jill used Gelatos, gesso, acrylic paint, patterned paper, Glimmer Mist, stickers and rubber stamps to create the background, flowers, and vase. Modeling paste was used to add texture. Jill even altered the velvet bow with a bit of paint. Our velvet ribbon is Swiss made with a luxurious feel, in a variety of vibrant colors.  You'll find width options from 3/16 to 2".


We're here every weekday with fresh new projects from our amazing Design Team. Be sure to add us to your blog feeder or join as a follower!


Related Posts Plugin for WordPress, Blogger...