Christmas Glittered Cards with Grace

Friday, November 14, 2014


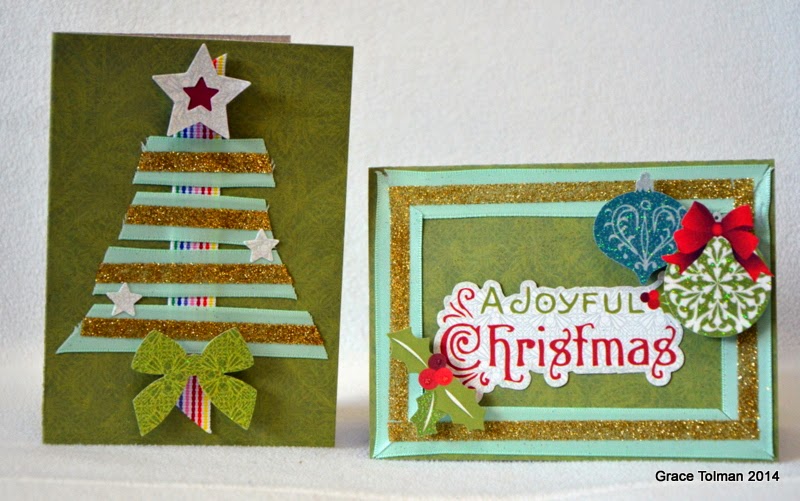
Hello there ribbon friends.  It’s that time of the year again. I’m talking about tackling those holiday projects. Today I’d like to share a couple of cards where I used some ribbon and glitter to add some “shine” to these Holiday greetings.

 Instructions:
1. Create your card base. Mine measured to 4 ¼ x 5 ½”

2. Cut a strip of the candy stripe ribbon and adhere it on the center of the card front horizontally. Cut staggered length of the pastel green satin ribbon to create the Christmas tree, don’t adhere yet.

3. Adhere a strip of adhesive on the center of the ribbon strips, pour glitter over it, press to adhere the glitter and dump the rest back into the container or on a scrap of paper. Use a paint brush to clean off the rest of the glitter on the ribbon. Decorate the tree with die cut and stickers.

4. For the frame card-  Adhere some of the pastel green trim around the card front using strips of adhesive.

5 Adhere another layer of adhesive over the center of the ribbon frame and add glitter, brushing off the excess. Decorate with stickers and die cuts.

Here are some pictures of the final product….


Thank you for joining me today and I hope this inspired you to add glitter to your favorite trims to make your next crafting project “sparkle “ even more.

Happy Creating,
Grace


Supplies Used:
Satin,Pastel green, 5/8”, Ribbons Unlimited Inc.
Grosgrain,Stripes, 5/8”, Ribbons Unlimited Inc.
Paper and stickers- Noel, SEI
Glitter- American Crafts

Others- Adhesive strip, foam adhesive


Holiday Frame Gift Project By Pinky

Wednesday, November 12, 2014

Have you checked out the selection of ribbons from RU lately?
Hi there, it's Pinky today with this holiday frame project.
Actually this is my favorite time of year to craft because I love the holiday
glitter and shine that happens!
For this project I used Gold Krylon paint, along with Clear Scraps Mascils, 
Tri-Fold Frame, and Flower Mixers. 
And some beautiful ribbon from Ribbons Unlimited along with some 
crystals, and card stock. 


I am happy with how it turned out and it's so much richer with Ribbons Unlimited ribbon. 
What gifts are you making this year??


Cheerleading Centerpiece with Jamie

Friday, November 7, 2014

Good morning!  Jamie back with you today!  We are gearing up for competitive cheer season and today I am sharing my new 3D Paper Megaphone!  This project is great for individual cheerleaders or to use as a table centerpiece!  

I am using the Silver Luxor Ribbon for both of these projects.  This ribbon has a delicious shimmer to it so it draws in a lot of attention AND it is wired so the bow really holds its shape well!  You can find more colors of the Luxor Ribbons here!


This file is really easy to assemble, you simply place adhesive on the tabs and wrap the paper around and adhere the tabs to the paper to form the cone shape.  Layer the banner and adhere with a foam square to the megaphone then adhere the cheer sentiments in place and adhere with foam to the banner.  Tie the Silver Luxor Ribbon around the handle in a bow then tie twine around the bow center.


Thanks so much for stopping by today!


Boutique Style Hair Bow with Crystal

Wednesday, November 5, 2014

Hello Ribbons Unlimited Inc. Fans!!!
It's Crystal here with a fun bow made with grosgrain ribbon from the Ribbons Unlimited Inc.
Today I will be using the Zebra and the Black 1 1\2" grosgrain ribbon to create my boutique style bow with feathers.  I start with a 30" strip of  black and Zebra grosgrain form a figure eight and clamp to hold together.

IMG_3347
next bring each side to the middle and clamp
IMG_3348
next I crease the center to form valleys and hills and the wrap it with a very thin wire
IMG_3349
it should look like this , make both the zebra and black layer like this
IMG_3350
next  cut 8" strips that I fork tailed the ends and heat sealed them , layer up and crease the center and wrap with wire
IMG_3351
next I knot  the center of a 4" strip
IMG_3352
this is the finished layers
IMG_3353
start with the pin wheel layer and then I layered on some feathers from my stash
IMG_3354
layer on the zebra bow , I hot glue each layer then add the black and wrap the zebra knot and
finish the  off the bow by glueing a clip of your choice to the bow

IMG_3355
a look at the clip I glued on the back
IMG_3356
my finished bow
IMG_3360
IMG_3361


Thanks so much for stopping by , leave me some feed back if you loved this project ,
I love hearing from my scrappy computer friends who love getting crafty : )
Crystal Lopez – Design Team member for Ribbons Unlimited
crystal_lopez_bio_pic


Painted Pumpkin with Crystal!

Friday, October 31, 2014

Hello Ribbons Unlimited fans !!

It's Crystal here and today I want to share a fun project using 
Ribbons Unlimited Organdy Ribbon!
I made ta cute pumpkin to put outside my front door to greet my guests .
I painted a pumpkin and added Ribbon and raffia to the top to create
a whimsical pumpkin that you could keep by the door thru Thanksgiving .

IMG_3345

IMG_3346

To make my pumpkin I used acrylic craft paint and free hand painted the face and leaves onto my pumpkin, no special prep other than wipe the surface clean , you can spray with clear spray paint when you are done but it is not needed (if you are going to paint and sell them spray a clear coat).

IMG_3333

IMG_3334

IMG_3335

IMG_3336

IMG_3337

After I have her painted up aI added my raffia bow and the made a huge 9 loop bow to the stem, I used 2 3/4" Organdy Ribbon in Blue Mist for her, it added the sparkle I wanted.

IMG_3339

IMG_3340

IMG_3341

IMG_3342

IMG_3343

IMG_3344

IMG_3345

IMG_3346

Thanks so much for stopping by , leave me some feed back if you loved this project ,
I love hearing from my scrappy computer friends who love getting crafty : )
Crystal Lopez – Design Team member for Ribbons Unlimited

crystal_lopez_bio_pic


Finger Treat Boxes with Jamie!

Friday, October 24, 2014

Good Morning!  Jamie with you and today I am sharing Halloween Finger Boxes!  I am absolutely in love with these.  You can put all sorts of goodies in these boxes; handmade munchies, school supplies, crayons, or party treats!  

I am using the Emerald Grosgrain Swiss Dot Ribbon in 7/8" to embellish my boxes with! 


You can find the box tutorial HERE
Here is a quick tutorial for assembling the box details:
1.  Cut out the box and finger pieces.  Fold the box on the score lines and then place adhesive on the side tab and the bottom flap.  Adhere the box sides together and then adhere the bottom flap to the box side.
2.  Adhere the finger details on the finger mat piece as shown.   Place a strip of adhesive on one side of the box.
3.  Adhere the finger on the box, lining up the bottom and centering.
4.  Ink around the edges with a coordinating ink color.
5.  Slightly bend the finger nails.  Continue the steps for the other four boxes.


I love the pop of color the Emerald Grosgrain Swiss Dot Ribbon in 7/8" 
adds to the Skeleton Fingers!


You can find the boxes here:


Related Posts Plugin for WordPress, Blogger...