DIY Ribbon Lei with Penga!

Wednesday, April 23, 2014

Penga is with us today to share a fabulous DIY Ribbon Lei!  These Ribbon Lei's are wonderful for many occasions, even the upcoming graduation events!  Here's Penga to tell you 

Eager to test out the ribbon-lei-making-method from Sak's mom, I added a small bead to the bottom of my really-long-thread as an anchor.  In retrospect, if one was planning on making a heavy-duty lei-to-last-a-lifetime, stronger thread (or even embroidery floss?) might work better. I have a feeling if you tugged on the lei hard enough, the thread would break and destroy all your hard work. Not that this has happened to me *yet*.

Continuing on, layer the 1/4" ribbon on top of the wider one, but keep it to one side.  Then do a simple running stitch down the length, as close to the edge as possible.

You can see that when you pull the string now, it will tighten the ribbon and create...a ruffly loop!

See where this is going? Just continue stitching up...


And scrunching down...

Until your lei is long enough!


I love this style, don't you? It's a little more sophisticated than the ribbon-loop version, however it takes much, much longer.  If you have a long running stitch setting on your sewing machine, it would be much faster than hand-sewing.

Breakdown:
~10 yards 1.5" ribbon 

~10 yards 1/4" ribbon

I plan to give this lei to my cousin since he's graduating from high school in a couple weeks. 

And just to show you what the first method looks like with two colors, here's another lei I made for a family friend of ours, graduating from my own high school alma mater:

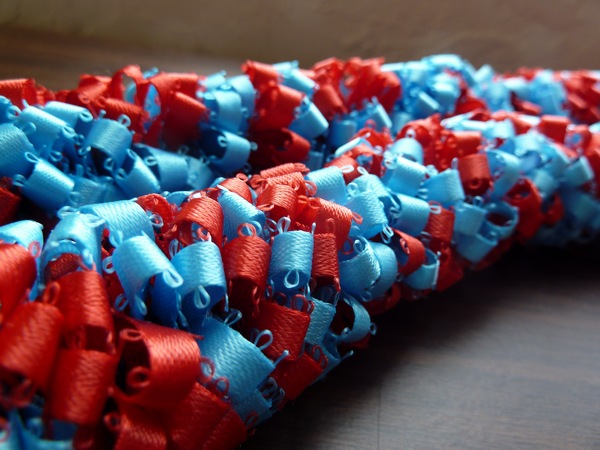
I used the same method, alternating between two loops of red and two loops of blue to get the colors to bundle together.

And that's it for the graduation leis! Next year I will most likely return to this subject in overdrive, since that seems to be the big year for many of our relatives.


Card set with Animal print ribbons by Grace Tolman

Friday, April 18, 2014

Hello Ribbon’s Unlimited Inc. friends. Today I’m sharing a card set that I had created inspired by some of the fantastic animal print trims Ribbon’s Unlimited Inc. offers.
I wanted the ribbons and its design to stand out so I opted for a plain (but texturized) background and added a few stickers just to complete the sentiment.

Instructions:
1. Gather your supplies. I started with three white card base, picked some cardstock that will coordinate well with my ribbons, a sticker sheet to match the theme, buttons, twine and an embossing folder.
2. First I cut the cardstock pieces 1/8” smaller than the card base (my card base are A2 sized which is 4 ¼ x 5 ½”) I ran all of them through my Cuttlebug with a striped background embossing folder from Darice. The striped background reminded me of the lines on a cage that we normally see in a zoo.
3. Next I adhered the cardstocks on the card bases and then matched them with the ribbons that I had. 

4. I then cut a slit on the bottom fold of the card so that the ribbons can slip through it to be adhered on the inside of the card. I also tied two buttons around the trims with twine.
5. I layered some stickers, another button with twine and a sentiment on the top of the page to finish off the cards.
I kept the design of the cards pretty similar to one another which made creating this set super easy and fast.

Here’s another look at the individual cards… 


So there you have it. Who says that you can’t have fun with animal prints? With these cards, you can help but get a little ‘wild’!

Happy Creating,
Grace

Supplies Used:
Cardstock- WorldWin Papers, Bazzill
Stickers- (sentiments) SRM Stickers; (others) SEI
Buttons- Foo fala
Twine- Doodlebug Design Inc.
Embossing Folder- Darice
Scallop die- Spellbinders

Frame punch- EK Success


Easter Gift Treat Jars with Pinky!

Wednesday, April 16, 2014

It's that time of year you know, time to make amazing sweet gifts for
friends and family and why not use Easter as an excuse to 
make treat jars?!
Take crystals and thread them into bracelets using elastic thread. 
jar and tack with Xyron Adhesive.
 Tack bracelet into place. Fill jar with candy and they get a treat jar and 
a sweet handmade bracelet too. 
I hope you make your own treat jars this week!
Products Used:
Connie Crystal crystals, jar, candy, stretch elastic


All Dolled up Layout by Grace Tolman

Wednesday, April 9, 2014

Hello ribbon friends. Today I’d like to share with you a scrapbook page featuring a fun masking technique made with the wide sheer ribbon.

I love the trend of stencils. It’s so fun and an easy way to add great designs to any page. I decided that the wide sheer ribbon would be a great piece to try this technique on.

Instructions:
1. First I covered my work surface with scrap paper. I laid my ribbon over it and taped the ends with a bit of washi tape so that it doesn’t move during my inking.
2. I then picked the stencil that I wanted to use. I have a 12x12 stencil from Heidi Swapp and I thought that the length was perfect for a scrapbook page. I sprayed my ribbon (with stencil over it) with Bronze mist and set it aside to dry.
3. After it had dried, I then added the ribbon piece on my layout.  I layered some more papers and embellishments to complete my page.

Here’s another look at the finished project:


Thank you for stopping by and I hope you try the stencil technique for your next ribbon project.

Happy Creating,
Grace


Supplies Used:
Cardstock- The Paper Company
Pattern papers- (Background) Yes Please, American Crafts; (others) Party day, Crate Paper
Chipboard stickers- Soleil, Basic Grey
Doilies- Doodlebug Design Inc.
Hand and bee stickers- SRM Stickers
Letter stickers- (white) Basic Grey; (turquoise) Webster’s Pages
Circle cutter- Creative Memories
Mist and Stencil- Heidi Swapp
Pen- Millenium, Zig
Journaling font- Century Gothic, MS Word
Button- Foofala
Twine and Tag- Source Unknown


Loopy Ribbon Bow with Jamie

Friday, April 4, 2014

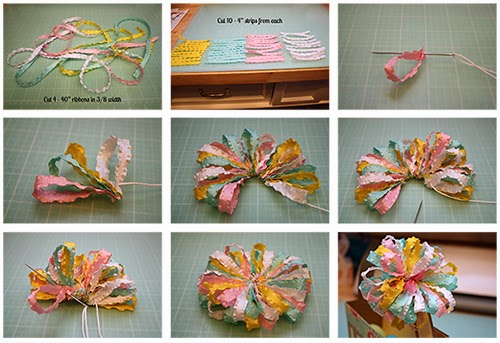
 Good Morning!  Jamie back with you today to share a fun loopy ribbon bow tutorial using the Ribbons Unlimited Double Ruffled Ribbon in 3/8".  These bows are perfect for cards, layouts, altered projects, sewing projects, and would even be darling for hair bows!

Here's what you will need:
40" of 3/8" Double Ruffle in each of the following colors:
 Scissors
Needle & Thread

Here is the tutorial: 
1.  Cut four strings of 40" ribbon.
2.  Cut each of the 40" strips into 4" cuts, making 10 in each color.
3.  Bend one of the ribbon pieces in half to form a loop and then push your needle/thread up through the center of the ends as shown.
4.  Determine your pattern and string your ribbons pushing them down to your end knot.
5.  Continue adding your ribbons in your pattern.  I used pink, aqua, dandelion, white.
6.  Once you have finished, pull your string tightly to bunch up the ribbons.
7.  Pull your thread back through your first loop and double knot it.
8.  Your finished bow will look similar to this.
9.  Tie your bow on to your project.  I am using a 3/8" Organdy ribbon tied in a bow.


Here is a look at my finished project:

You can find the digital cutting basket file here: 3D Tall Easter Basket

Thanks so much for stopping by today!


Ribbon Roses Trellis Card by Crystal

Wednesday, April 2, 2014

Hello Ribbons Unlimited friends !!
It's Crystal here with more hand-made flowers from the high quality ribbon from Ribbons Unlimited Inc. Today I am going to share with you how I made my trellis card with these roses, super easy once you know the tricks! The ribbon I am using today is Ombre wired pumpkin color 1/1/2".
To make this card you need only one sheet of 8 1/2" by 11" card stock then cut 4 1/4" by 1" score at 51/2", cut a piece at 4 1/8 by 5 3/8" and then with the last piece cut 1/4' strips with your cutter.  
These will be the pieces we will weave.
week 4-1-2014 002 - Copy
Pick a frame die of your choice circles and ovals work too just use what you have , open card base and add the extra sheet we cut at 4 1/4" by 5 3/8" add a bit if tape runner to center and sandwich pcs together so when you die cut they will match up perfectly , I add a dot to inside layer so I know how to match up , center your die on the front and cut thru both pieces at once  set pc aside and add tape runner around inside of frame inside your card  , I lay my strips all going same way and then go back and weave the other direction , I always start in the center with my first strip on first direction
week 4-1-2014 003 - Copy
once you have to all weaved trim off over hand
week 4-1-2014 004 - Copy
next add double stick tape around the frame and adhere your cover piece
week 4-1-2014 005 - Copy
cover should look like this covering all the ends of strips
week 4-1-2014 007 - Copy
to make my flowers I pulled the wire  on one side of the Ombre pumpkin ribbon and then coil it to make buds and a full rose i use glossy accents to glue it secured and to add to front once I get my layout figured out , the wire in the ribbon is light weight and perfect for forming the rose edge to give a real look
week 4-1-2014 008 - Copy
my finished card I added some die cut leaves and some tulle to add to it and some adhesive glitter stickers , when you die cut your frame from the front it leaves that indent which just adds to this cool card
week 4-1-2014 009

week 4-1-2014 010

week 4-1-2014 011

week 4-1-2014 012

week 4-1-2014 013
inside see how making the extra panel hides your messy ends on the weaving
week 4-1-2014 014
I hope you will give this a try with the Ombre ribbon it comes in several color combos and it has a beautiful shimmer to the ribbon that adds to the richness of your projects .
Crystal Lopez - Design Team member for Ribbons Unlimited
crystal_lopez_bio_pic


Related Posts Plugin for WordPress, Blogger...